RSS

I currently live in Charlotte, NC and after spending 7 years as a personal chef and caterer, I am now happy to share my love of cooking with friends and family. My heart is in the kitchen, but my soul is in the stars!

Passage of Time

This time of year not only marks the much anticipated end of the sultry dog days of summer but also the change of seasons for appetites. Menus will soon consist of the warmth of comfort foods and hearty soups and stews. Road-side produce stands and farmers markets will fold up their tents and the bounty of summer will be replaced by root vegetables and produce trucked in from far away warmer climates.

My taste buds mourn the passage of this time, wanting instead to rewind to the time when South Carolina peaches were just gorgeous blooms on a tree. Wanting to relive the eager anticipation of the juicy, sweet fruit. Never wanting summer to end.

It has become a summer ritual to stop for peaches at McLeod Farms in South Carolina on the way home from the beach and last year, I used the peaches to honor my friend. This year, I couldn't decide which direction I wanted to go and luckily I brought home enough peaches for three kitchen projects!
One of my favorite but hardly-ever-used kitchen appliances came out of hiding for the first project ~ peach ice cream. Rich, cool and creamy, it is the perfect way to say goodbye to the few remaining hot and humid summer days. As with most homemade ice creams, it is best served while still in the soft-serve stage but if you need to freeze and serve later, just let it sit out for a bit to soften up. I'm already having luscious visions of using brandied peaches next year for an over-the-top ice cream treat.

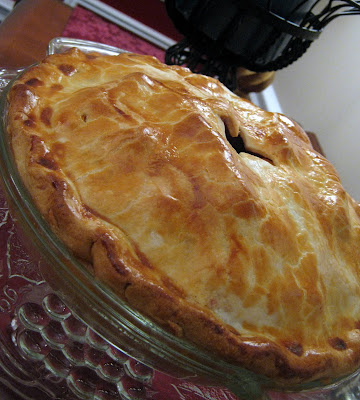
It would be a crime to let peach season pass without an old-fashioned peach pie. And let's just get one thing out of the way....I used a pre-fab pie crust because while I may be good at alot of things, making pie crusts is not one of them. I am not ashamed. I am ashamed, however, at how many pieces of this pie I ate. I had aspirations of baking a peach, cranberry, apple pie but that will have to wait until next year.

The third project was a combination peach-strawberry quick bread that was reduced to mere crumbs by my coworkers before I could even entertain taking a picture.

Unfortunately, I can't stop the passage of time or the change of seasons, but I can continue to dream up fabulous creations for next year's peach projects. I hope you'll enjoy the last official week of summer with one of these peachy delights!


Carolina Peach Ice Cream

2 1/2 pounds fresh peaches - peeled, pitted and chopped
1/2 cup granulated sugar
1 pint half-and-half cream
1 (14 ounce) can sweetened condensed milk
1 (12 fluid ounce) can evaporated milk
1 teaspoon vanilla extract
2 cups whole milk, or as needed

Puree peaches with the sugar and half-and-half in batches in a blender or food processor.

In a gallon ice cream freezer container, mix together the peach mixture, sweetened condensed milk, evaporated milk, and vanilla. Pour in enough whole milk to fill the container to the fill line, about 2 cups.

Follow the manufacturer's instructions to freeze the ice cream.

_____________________________________________________________________________________

Old-fashioned Peach Pie

1 (15 ounce) package pastry for a 9 inch double crust pie
1 egg, beaten
5 cups sliced peeled peaches
2 tablespoons lemon juice
1/2 cup all-purpose flour
1 cup white sugar
1/2 teaspoon ground cinnamon
1/4 teaspoon ground nutmeg
1/4 teaspoon salt
2 tablespoons butter

Preheat the oven to 450 degrees.

Line the bottom and sides of a 9 inch pie plate with one of the pie crusts. Brush with some of the beaten egg to keep the dough from becoming soggy later.

Place the sliced peaches in a large bowl, and sprinkle with lemon juice. Mix gently. In a separate bowl, mix together the flour, sugar, cinnamon, nutmeg and salt. Pour over the peaches, and mix gently. Pour into the pie crust, and dot with butter. Cover with the other pie crust, and fold the edges under. Flute the edges to seal or press the edges with the tines of a fork dipped in egg. Brush the remaining egg over the top crust. Cut several slits in the top crust to vent steam.

Bake for 10 minutes in the preheated oven, then reduce the heat to 350 degrees and bake for an additional 30 to 35 minutes, until the crust is brown and the juice begins to bubble through the vents. If the edges brown to fast, cover them with strips of aluminum foil about halfway through baking. Serve warm.

Pin It
  • Digg
  • Del.icio.us
  • StumbleUpon
  • Reddit
  • RSS

Just Stuff It!

We've all had one of those Steven Slater kind of days.

The kids are cranky and the spouse is on your last nerve. Traffic is a bitch and making you later than normal. The boss is yelling and the next thing you know you've been hit in the head with a suitcase.

It's enough to make anyone grab a few beers and scoot down the emergency ramp, all the while telling everyone within earshot to go screw themselves. But we really shouldn't say things like "Screw you!" on this blog, now should we? (That's really just a question interjected to show my mother that I try to keep it clean. Hi Mom!)

Who can blame Steven, anyway? Alot of us wish we could quit our jobs in a blaze of glory and develop a huge fan base in support of our defiance. But unfortunately, for most of us it's out of the question to do such a bold thing.

I dedicate today's post to Steven because as I stood looking at a pint of fresh strawberries, I was perplexed as to what to do with them. Bake them into bread? Whirl them into a smoothie? Use them for salad or ice cream makings? I was just too overwhelmed to make a decision and finally I just said to myself, "Oh, screw it...just stuff 'em!"

There's no real recipe here folks ~ I just pulled the emergency chute and hoped I'd land on my feet when I whipped up a block of softened cream cheese with about a 1/2 cup of confectioner's sugar (more or less to get the consistency to squeeze through a decorator tube and have it hold it's shape) and about 2 tablespoons of orange liqueur. Cut the stem from the top of the berries so they sit flat and with a small pairing knife, cut an "X" in the bottom of the berry, taking care not to cut all the way through. Gently open the berry and pipe the cream cheese mixture inside. You may like to garnish with some finely shaved chocolate, whereas I did not because these were going to be out in the heat for a bit and I didn't want them to have a total meltdown as opposed to the "small meltdown" that Slater's mother described. The next time someone asks me for an idea of what to do with fresh strawberries, I'm going to tell them to fix 'em Slater style!

If you really want to crack up, check out this reenactment of Slater's ordeal from the Chinese viewpoint.

Pin It
  • Digg
  • Del.icio.us
  • StumbleUpon
  • Reddit
  • RSS

WOW Factor

In the catering world, the art of selling food is all about keeping things fresh and exciting and once you've elicited the word "WOW!" from clients and guests, you know you've hit the jackpot.

I'm no longer in the business of selling food, but that doesn't mean I'm not still constantly trying to WOW my friends and family with food creations. It never ceases to amaze me what does or does not impress them. I can spend many laborious hours sweating over a hot stove and pull together a meal fit for a king and while they are appreciative, the level of enthusiasm just doesn't seem to meet my expectations. But just watch the eager stampede of approving noshers sing my praises shortly after I've presented something made by simply cleaning out the refrigerator and throwing it all together just to see what I could come up with.

It seems to be the simplest of things that get the WOW factor. For instance, some friends and I hosted a cocktail party not long ago and I had some leftover fruit from the sangria that I wound up plopping into the water and tea pitchers on the drink table. The guests weren't sure if the pitchers were for actual drinking or only for decoration and continuously expressed delight over the simple act of adding fruit.

Another thing that seems to trip the trigger of party guests is these muffuletta skewers. I ran across the original idea in a Southern Living magazine but have never followed the recipe verbatim, instead just winging it by using up bits and pieces of items that I have in the fridge at any given time. This particular time I managed to fish out some artichoke hearts, cocktail onions, olives, deli ham, pepperoni, and cherry tomatoes from my mother's garden. I combined them on a platter with Pioneer Woman's stuffed jalapenos and spent the rest of the evening basking in the glory of admiration from my friends.


The presentation is unbeatable no matter what you end up making them with and seriously, it took me like 15 minutes to pull these skewers together and cost nearly nothing. I can't help but think of this classic commercial every time I make them!


* Exported from MasterCook *

Muffuletta Skewers

Serving Size : 24
Categories : Appetizers

Amount Measure Ingredient -- Preparation Method
-------- ------------ --------------------------------
5 slices deli style ham
5 slices provolone cheese
5 slices Genoa salami
24 pepperoncini pepper
48 slices roasted red peppers -- thinly sliced
24 green olives
24 kalamata olive -- pitted
24 wooden skewer
1 bottle oil and vinegar salad dressing
1/2 teaspoon Italian seasoning

Layer 1 slice of ham, provolone cheese, and Genoa salami; tightly roll up, and slice into 4 equal pieces. Repeat procedure 5 times.

Thread 24 (4") wooden skewers with 1 of each: pepperoncini pepper, red bell pepper strip, meat and cheese roll, large pitted green olive, another red bell pepper strip, and kalamata olive.

Place in a 9x13 baking dish. Whisk together 8 oz. bottle of olive oil and vinegar dressing and 1/2 teaspoon Italian seasoning; pour over skewers, and chill 30 mins.

Source:
"Southern Living"

Pin It
  • Digg
  • Del.icio.us
  • StumbleUpon
  • Reddit
  • RSS

Life of a Pioneer

It seems like only yesterday I thought about what I'd say if I were giving a commencement speech to the class of 2010 and here it's already time for the Class of 2011 to sharpen their pencils and break out their new Blue Horse notebook. The TV is full of back-to-school shopping ads which cause my nights, even twenty years later, to be filled with the typical first-day-of-school anxiety dreams.

Since I've already advised last year's graduating class, allow me to start this school year off by spewing words of advice for teachers, especially history teachers. When I was a kid, we'd open our American History books to Page 1 and begin. Every. Single. Year.

Thanks to that, I can kick some serious booty in Trivial Pursuit when it comes to questions about Christopher Columbus, Pilgrims, and pioneers. Just as we'd get to the good stuff, it was time to close the books for summer, and you guessed it....Page 1 was always waiting for us the next school year, just like we'd never seen it before in our lives. When you get past the 4th or 5th grade, there's really no need to remind us that Columbus sailed the ocean blue in 1492 and the pioneers lived in log cabins and fought Indians. Is it so wrong to skip a few chapters and learn about more recent stuff like the JKF administration, World Wars, and communist China? Evidently.

The only pioneer I care to know anything about these days is Ree Drummond aka Pioneer Woman. You can read about PW's story, Black Heels to Tractor Wheels, as she tells it far better than I ever could, but her main claim to fame is that she was a bonafide city girl who fell in love with and married an Oklahoma rancher known as Marlboro Man and became an "accidental country girl." She, like so many of us bloggers, started documenting her thoughts and ramblings and before long she had millions (literally) of followers, a cookbook, book tour and an upcoming movie about her life (unlike so many of us bloggers). Just like the pioneers in my history book, she lives in a farmhouse (albeit a VERY NICE farmhouse) and her family works the land and farms cattle and horses.

There are lovers and haters of Pioneer Woman and I'll admit that I don't follow her on a regular basis anymore simply because I have a short-lived attention span but you can read and decide for yourself if you think she's really "keeping it real." I fall into the category of thinking that Ree started her story as a real thing but soon realized that she had a knack for story-telling and capturing an audience and used it much to her benefit. Personally, I'm inspired by her progress and find motivation in her ability to build an empire based on herself. What she's accomplished is really no different than the likes of Martha Stewart or any other self-made female. And like all females who pioneer the frontier of breaking the glass ceiling and carving a name for themselves, she must also fight the Indians of ridicule.

I did not feel motivated, however, to stand in line for hours and hours on end to get my copy of her cookbook signed when she recently visited the Queen City on her book tour. I left my copy at the desk for Ree to sign and picked it up a few days later. The book is beautifully illustrated and while it doesn't contain any new, earth-shattering recipes, it does bring back to mind some long forgotten favorites that have been tucked away in my recipe box for eons. Again, I bought the book simply for inspirational value and it will soon claim it's rightful place on my over-burdened cookbook shelf.

Before I close the book on this piece of blog history, I'll leave you with Pioneer Woman's recipe for jalapeno poppers, which I made for a cookout last weekend. In an effort to "keep it real," my next post will detail how these things caused myself and all other party guests to nearly die alone on the prairie with a severe case of heartburn. Zantac anyone?

Pioneer Woman's BBQ Jalapeno Poppers

18 fresh jalapeños
One 8-ounce package cream cheese
½ cup grated cheddar cheese
1 green onion, sliced
18 slices thin bacon, cut into halves
Bottled barbecue sauce
Toothpicks
Rubber gloves (or plastic bags) for working with jalapeños

Preheat the oven to 275ºF.

Begin by cutting jalapeños in half lengthwise. Try to keep the stems intact. They look prettier that way.(Important: Wear gloves when working with fresh jalapeños or you'll curse the ground on which I walk because you'll wake up in the middle of the night with throbbing fingertips. And that's nothing compared to what happens if you accidentally scratch your eye—or worse, something else.)

With a spoon, scrape out the seeds and light-colored membranes. Remember: The heat comes from the seeds and membranes, so if you can handle the sizzle, leave some of them intact.

Now, in a bowl, combine the cream cheese, cheddar cheese, and chopped green onion. Mix the ingredients together gently. And don't feel you have to use an electric mixer. I do because I'm lazy and don't like to exert myself. Ever. (Too much scrubbing clothes on the washboard, I suppose.)

Next, stuff each hollowed jalapeño half with the cheese mixture.

Wrap bacon slices around each half, covering as much of the surface as you can. Be careful not to stretch the bacon too tightly around the jalapeño, as the bacon will contract as it cooks.

Brush the surface of the bacon with your favorite barbecue sauce. Chutney or apricot jelly works well, too!

Secure the jalapeños with toothpicks and pop them in the oven for 1 hour, or until the bacon is sizzling.

Serve hot or at room temperature, and watch them disappear within seconds. I've seriously caught guests stuffing these into their purses. Sometimes I have to call law enforcement.

Variations:

For a simpler version, omit the cheddar and green onion from the cream cheese.

Cut sliced peaches or pineapple into small bits and press them into the cream cheese before wrapping the jalapeños in bacon.

Use Pepper Jack cheese in place of the cheddar cheese.

Pin It
  • Digg
  • Del.icio.us
  • StumbleUpon
  • Reddit
  • RSS

Taste the Caribbean

If I could spend my days frolicking with the Boy Toy in the Caribbean sand, I would.

But since I have bills to pay and the sand chafes me, I'll settle for being reminded of the Caribbean with these yummy fresh fruit and chicken kabobs.

Quick and easy to make, these kabobs are perfect for the grill and keeping you out of the kitchen during this blazing hot summer.

If you don't have the time to marinate, just baste them with the glaze while grilling but I do recommend marinating if you have the time ~ since the marinade ingredients are so light, it adds a little more depth to the flavor. I like to serve these with a simple side dish like rice or a green vegetable and a light salad.

Simplicity. Deliciousness. The next best thing to building sand castles in the Caribbean with the Boy Toy. Almost.


Caribbean Chicken Kabobs

Serves 6

1-3/4 cups honey
3/4 cup fresh lemon juice
1/3 cup fresh ginger
1/2 cup Dijon mustard
4 pounds boned and skinned chicken breast, cut into 1" cubes
6 each plums -- pitted & quartered
4 cups fresh pineapple -- cubed
2 cups coconut, toasted

Combine first four ingredients. Skewer chicken and fruit then use half of the marinade to marinate chicken for several hours or overnight. Grill, turning and brushing frequently with remaining marinade. When chicken is done, roll in toasted coconut.

Pin It
  • Digg
  • Del.icio.us
  • StumbleUpon
  • Reddit
  • RSS

Copy Cat


Imitation is the sincerest form of flattery.

Growing up, my BFF was a couple of years older than me and those extra years guaranteed that she was the first to advance to more grown-up things. When she showed up astride a shiny red 10-speed and out rode me and my little blue bicycle, I was envious. I wanted one of my own and a few weeks later when I peddled up on my bright yellow Schwinn, she called me a copycat and was less than flattered. I was hurt ~ couldn't she see that I wanted to be just like her? Of course, I was as equally unimpressed a few years later when I caught her kissing my date at a party.

In the world of recipes, alot of time, energy and websites have been dedicated to copying and recreating food enjoyed from favorites restaurants. If you have a hankering for bread sticks from the Olive Garden or Bonefish Grill's Bang Bang Shrimp, check out this copycat recipe source.

But if you're like me and crave the Lobster Martini from Mickey and Mooch and the Gambas al Ajillo (shrimp sauteed in garlic and olive oil) from Miro Spanish Grille then look no further than right here, my friends! These aren't exact replicas (dare I say they may even be better than the real thing?), but they're close enough that I think both restaurants would be flattered to know that I'm reminded of good times long ago spent noshing there with someone special.

Call me a copy cat if you wish ~ I've been called much worse!


Seafood Martini
Serves 4
inspired by Bon Appetit, August 2007

Gazpacho Sauce
8 ounce bottle clam juice
1 cup chopped fresh cilantro
3/4 cup can crushed tomatoes with added puree
1/4 cup unseasoned rice vinegar
2 tablespoons fresh lime juice
2 tablespoons prepared horseradish
hot sauce, to taste
1 garlic clove, pressed

Seafood
1 cup 1/4" cubes seeded plum tomatoes (about 3 large)
1 cup 1/3" cubes peeled pitted avocado
1 cup 1/4" diced seeded cucumber
1-1/2 cups cooked lump crabmeat (5 to 6 oz), cut into 1/2" cubes
16 cooked peeled deveined medium shrimp
1-1/2 cups shelled cooked lobster meat (5 to 6 oz), cut into 1/2" cubes
Lime wedges
Fresh cilantro sprigs

For gazpacho sauce: Combine all ingredients and season with salt and pepper. Cover and refrigerate until cold, about 4 hours or overnight.

For seafood: Divide tomatoes, avocado, and cucumber among 4 large martini glasses or deep goblets. Top with crab, dividing equally. Top with about 1/4 cup gazpacho sauce. Divide shrimp, then lobster among glasses. Divide remaining sauce over top. Garnish with lime wedges and cilantro sprigs.
_____________________________________________________________________________________

Gambas al Ajillo (Shrimp in Garlic)

1 lb. shrimp, 25 count per lb. or larger, if you wish
4 large cloves garlic, pressed
1 teaspoon paprika
1 teaspoon red pepper flakes
2 ounces Cognac or dry sherry
1/4 cup olive oil
3 teaspoons chopped fresh parsley
1 lemon for juice
French bread baguette

Peel shrimp. Heat oil over medium heat. Add garlic and red pepper flakes and saute for about a minute or two or until they begin to brown. Do NOT burn the garlic or you'll have to start over!

Raise heat to high and add shrimp, lemon juice, sherry (or Cognac) and paprika. Stir briskly about 3 minutes or until the shrimp turn pink and curl.

Remove from heat and transfer to a warm platter and season with salt and pepper. Sprinkle with fresh parsley.

Serve with French baguette that has been warmed to sop up the garlic oil.

Pin It
  • Digg
  • Del.icio.us
  • StumbleUpon
  • Reddit
  • RSS