RSS

I currently live in Charlotte, NC and after spending 7 years as a personal chef and caterer, I am now happy to share my love of cooking with friends and family. My heart is in the kitchen, but my soul is in the stars!

Showing posts with label appetizers. Show all posts

My Little Candied Kumquat


My weekly produce deliveries from Backyard Produce have allowed me to be a bit more daring than I normally would be on my regular visits.  I'm usually on a mission when I shop - to get in and get out quickly.  I have my list and try not to deviate (too much) from said list. 

A few weeks ago, I made the daring decision to include kumquats in my delivery from Backyard Produce - something I've always been curious about but have never purchased (and most likely wouldn't ever have.)  Kumquats resemble an orange in color and have a similar thick peel but are only about the size of the end of your thumb.  They are native to south Asia and the Asia-Pacific region but have been cultivated in North America for nearly 150 years now (and I'm just now brave enough to try them?!?)  The growing season ranges from January through June for those grown in California and November through mid-March for fruits harvested in Florida. 

I wasn't sure what to expect or do with the kumquats.  Do I peel them?  Are they sweet?  How exactly should I use them?  The answers to the first two questions are no and HECK NO! The skins aren't quite as thick as an orange peel and provide the only bit of sweetness amongst an otherwise extremely tart fruit.  For such a tiny thing, it packs a punch of zing - it took me a few minutes to come back to my senses after popping one into my mouth for taste-testing. 

Preliminary recipe research showed that most people enjoy them sliced and raw on a salad but they were a bit too sour for me to enjoy that way.  Others baked with them but quite frankly, I was too lazy to deseed them, so I opted to turn them into candied kumquats to enjoy spooned over the Hillsborough Farm goat cheese (also from Backyard Produce) and crackers.  I think it would make a fantastic topping for vanilla ice cream as well. 

Dare yourself to try something new by picking up a container of these little jewels on your next shopping trip and if you're interested in receiving fresh organic and natural produce delivered right to your door, check out Backyard Produce's website for how you can get started. 


Candied Kumquats

Printable Recipe

4 cups roughly chopped kumquats (about 1-1-1/2 lbs)
1 cup water
2 cups sugar

With a pairing knife, roughly chop the kumquats.  Discard any seeds that are easy to get too, but they're edible so don't worry if you don't get them all. 

Heat the water and sugar over high heat until boiling.  Reduce heat and simmer for 4 minutes.  Add the kumquats and simmer for 10 minutes.

Drain the kumquats through a sieve over a bowl.  Return the syrup to the pan and simmer for 5 minutes to reduce the syrup.  Combine the kumquats and 1/4 cup syrup together.

Serve or jar and refrigerate for up to 2 weeks. 

Pin It
  • Digg
  • Del.icio.us
  • StumbleUpon
  • Reddit
  • RSS

Polly Wants A Cracker


When I first made the decision to cut out processed foods and move toward real food, I was worried about what I would eat for snacks as the items that I once considered pantry staples/snacks started disappearing from my shelves.  I'm not a huge snacker but my weakest moments happen when I just get home from work and start preparing dinner.  

I'm slowly working my way through some real food snack recipes that I've found online to find ones that I like and I've purchased a few items like Larabars, Triscuits and roasted almonds for quick "grab a handful and go" snacks.  Of course, fresh fruits and veggies make excellent snack choices as well. 

I ran across this recipe from 100 Days of Real Food for Easy Cheesy Crackers with only three ingredients.  They're super easy to mix up, bake and have on hand for snack attacks.  They freeze well (either as an unbaked log or go ahead and slice, bake and freeze) so you can have them on hand any time you like.  They taste just like Cheez-Its or maybe like the goldfish crackers, although I haven't had one of those in eons to remember exactly what it tastes like. 

When I make these, I like to add some fresh herbs to the dough - whatever is growing plentiful in my garden at the time - and cut them really thin.  Serve on a platter with your favorite cheeses and/or fruits or just eat them for a snack all by themselves. 

Make sure you visit Lisa Leake's page 100 Days of Real Food for more great tips on how to gradually change your diet and menus to include more real food. 

Cheesy Herb Crackers
Makes about 2 dozen, depending on thickness

Inspired by Lisa Leake's Easy Cheesy Crackers

Printable Recipe

1 cup whole-wheat flour
5 tablespoons cold butter, cut into tablespoon size chunks
1 ½ cups (about 4 oz.) grated cheddar cheese
2 tablespoons fresh herbs of choice, chopped (chives or dill makes an excellent choice)
Preheat oven to 350 degrees F.
 
Combine first three ingredients in a food processor and blend until it forms a dough ball (it may take a few minutes).
 
Roll the ball into a log about 1 ½” in diameter.  Roll dough in your choice of chopped herbs, coating the outside of the whole log.  (If you'd like your herbs to be mixed into your crackers, just knead them into the dough ball as you are shaping it into the log)  You can refrigerate or freeze at this point if you'd like to wait until later to prepare.
 
Slice into ¼” thick rounds and place on an ungreased baking sheet.
 
Bake for 8 - 14 minutes or until golden brown.
 

Pin It
  • Digg
  • Del.icio.us
  • StumbleUpon
  • Reddit
  • RSS

The Way To A Man's Heart


I've always heard that the way to a man's heart is through his stomach and Lord knows I travel that route as often as I can for the Boy Toy despite his insinuations that all my cooking is making his "road" more "curvy." My mailbox overflows each month with subscriptions to various cooking magazines to ensure the road to Boy Toy's heart is traveled often, but as a woman I know the stomach isn't the only avenue to a man's heart.

A few months ago I purchased a Groupon that would grant me a year's subscription to Cosmopolitan magazine for a mere $5.  I wanted to make sure I wasn't missing out on any new tricks of the trade for wooing a man by a means other than with my cooking.  The first few editions came and I scanned through pages and pages of information and instruction hoping to find something useful.  I honestly feared most of the tricks Cosmo was touting to woo a man would land me square in the hospital with a dislocated something or other that my insurance copay would not cover.  I felt the folks at Cosmo were more concerned with how to stop a man's heart than how to find your way to it, so I was ready to toss the useless magazines into the recycle bin when I noticed - far back on those last few pages typically reserved for advertisements about psychics and online dating services - a recipe.  I ripped it from the the magazine and realized I should forget about all those other tricks and tips because surely food WAS the way to a man's heart afterall!

A quick online search of the recipe "Crispy Chicken with Rosemary Lemon Salt" shows that Giada De Laurentiis also takes credit for the published recipe in her cookbook "Weeknights with Giada" which probably proves my theory that Cosmopolitan can't come up with any original ideas on their own to win to a man's heart without making you perform like a circus pony or very minorly tweaking someone else's idea - like suggesting the chicken be served with marinara sauce and calling it their own.  I replaced the cornmeal with whole wheat bread crumbs and also had plenty of herbed salt left over so I've been using it for salads and such.  If you are focusing on "real food" for your meals, use a suitable oil such as coconut oil for frying and use organic, free-range chicken. 

In addition to serving these as an entree, these would make a great party appetizer.

Crispy Chicken with Rosemary Lemon Salt
inspired by Giada De Laurentiis/Cosmopolitan July 2012

Printable Recipe

Suitable oil, for frying
1 (6-inch) sprig fresh rosemary
1/4 cup kosher salt plus 3/4 teaspoon
Zest of 1 large lemon, divided
1 pound chicken tenders
2 cloves garlic, minced
1-1/2 tablespoons chopped fresh rosemary
1/4 teaspoon freshly ground black pepper
1/2 cup breadcrumbs (I whole wheat crumbs from my homemade bread leftovers)

For the salt: Heat 1/4-inch oil in a large, high-sided skillet over medium-high heat (the oil is hot enough when a pinch of breadcrumbs sizzles when added to the pan). Add the rosemary sprig and fry for 30 seconds until crisp. Using tongs, remove the rosemary sprig and drain on paper towels. Remove the leaves and finely chop to yield 1 tablespoon. Place the rosemary, 1/4 cup salt, and half the lemon zest in a small bowl. Mix with a fork until combined. Set aside.

For the chicken: In a medium bowl, mix together the chicken, garlic, rosemary, 3/4 teaspoon salt, other half of the lemon zest, and pepper. Add the breadcrumbs and toss until the chicken is coated. Add 1/2 the chicken to the same skillet used to cook the rosemary and fry until golden and crispy, 2 to 3 minutes on each side. Drain on paper towels. Repeat with the remaining chicken. Sprinkle with the rosemary-lemon salt and serve (with marinara, if you'd like).

Pin It
  • Digg
  • Del.icio.us
  • StumbleUpon
  • Reddit
  • RSS

Zo's Pork Heaven

This was taken 5 minutes into the party.  A quick photo snapped with my phone before these became nothing but a figment of everyone's imagination.   

A few months ago Boy Toy and I invited some friends over to watch a football game.  We had the standard party fare - his awesome chicken wings, shrimp, cheese and crackers, chips and dip, and one of my favorite party foods, mini ham and cheese rolls.  Half-time hadn't even rolled around when I realized that both pans of rolls were completely gone. There was nothing but a few crumbs left to verify their existence.

I later found out that Boy Toy's best friend Zo was the culprit for hogging all the ham rolls.  I met said friend during the summer and was really excited to do so because I knew he was Boy Toy's BFF but much to my dismay, our first few meetings were less than cordial.  The friend totally ignored me and barely said three words to me all day.   I mentioned it to Boy Toy but was reassured it was nothing to worry about. It happened the next time we saw each other and yet again a third time and so on.  I took it very personally because I wanted nothing more than to be a nice happy group of friends.  I later came to realize that Zo is just....well, he's just an odd person to say it politely, and it's not just me that he totally ignores.

So fast-forward to this party where he scarfed down 48 of my ham rolls before half-time.  It seems that I hit a soft spot within Zo with these rolls. Information was leaked to me by a reliable source that he declared these rolls "pork heaven" and I haven't been able to attend a gathering since that also included him that I wasn't requested to bring these.

So even though Zo still can't bring himself to do more than grunt a greeting to me and it's still not clear what he thinks of me as a person, it's pretty clear that he likes my cooking. Maybe it is true that the way to a man's heart is through is stomach, but it's not his heart that I'm after. A simple "hello" would totally suffice. I do still take it very personally that he is not at least friendly to me, but every time I make these rolls for him I think maybe this will be the time that he breaks down and slips me a smile or something.  I'm beginning to wonder if there are enough dinner rolls in town to make that happen. 

In addition to great party food, these rolls also work well for breakfast or brunch. I usually prepare them the night before and pour the butter mixture over them just before baking. Sometimes the right kind of dinner rolls can be hard to find - I'm only able to find them at Walmart in my neck of the woods.  The recipe as written is enough for 2 packages of rolls but you can easily cut the recipe in half.  They are good and they will go fast!  If you want to be all fancy pants, I suppose you could take these out of the foil pans and bake them in a baking dish and then serve them on a nice platter but I like the fact that they have their own built-in baking/serving dish and you don't have to worry about accidently leaving your nice stuff at the party (guilty as charged!)

These are my favorite kind of dinner rolls to use.


Mini Ham and Cheese Rolls

2 pkg (24 count) white dinner rolls
20 slices honey ham
20 slices cheese (Swiss, mozzarella or provolone)
Dijon Mustard, to taste
2 Tablespoons poppyseeds
1 stick butter, melted
2 Tablespoons dried minced onion
1 teaspoon Worcestershire sauce

Remove dinner rolls from foil package.  With a serrated knife, slice rolls in half lengthwise.  Spread Dijon mustard on both sides of rolls.  Place bottom half of rolls back into pan. 

Layer ham and cheese on bottom half of rolls and replace top half.  Using the serrated knife, cut each roll into individual sections, taking care not to cut through the foil pan.

In a small bowl, whisk together the poppy seeds and next 3 ingredients. Pour evenly over all of the sandwiches.  Bake at 350 degrees for 12-15 minutes or until cheese is melted and tops are golden brown.

Pin It
  • Digg
  • Del.icio.us
  • StumbleUpon
  • Reddit
  • RSS

A Little Help From My Friend


I was probably about 8 or 9 years old when I started showing an interest in cooking, thanks in part to the 4-H Club in my elementary school and to my mom for letting me help when she was in the kitchen.  I started out making simple things like cookies, biscuits, and corn muffins and I was also responsible for tearing up the cheese slices for my mom's homemade mac & cheese, which was a very important task because that was some seriously good stuff! 

I'm always delighted when Boy Toy's 10-year-old daughter wants to help me in the kitchen.  She already has some really good slicing, chopping and stirring skills and so far her attention span is long enough to pretty much see a project through until the end (minus the cleaning up part, of course).  She doesn't know it yet, but she's getting her own apron for her birthday in March.  Shhhh! 

When working with kids in the kitchen, you have to keep in mind that they are probably going to make a mess and it may not turn out quite the way you planned, but that's okay because the whole point is to get them involved and keep it at their level.  Show them, teach them and fine tune their skills and know that you are teaching them a life skill that will benefit them many times over. 

I had to whip up a quick appetizer for a New Year's Eve party (quick because I had totally forgotten that I was supposed to take something), and I chose these Spicy Sausage and Cheese Tarts that I found on Pinterest from Plain Chicken.  I like Plain Chicken's blog because she has alot of "Football Friday" recipes that are perfect for entertaining or watching sports and I've bookmarked alot of her stuff because Boy Toy occasionally has friends over during football and baseball season and I'm always looking for quick and easy "dude food."

My sous chef pretty much completed this task all by herself - she chopped the pepper, browned the sausage and then mixed all the ingredients together.  She did a bang up job of filling the phyllo cups and even decorated the tray and plated them.  She claimed the whole time that she didn't like sausage and even when she tried one after they were baked she said she didn't like it, but I'd almost swear I saw her sneak one later in the evening when she thought no one was looking. 

Could you say "No" to this tray of treats? I thought not. 


Spicy Sausage and Cheese Tarts
inspired by www.plainchicken.com

1 lb pork sausage
1/2 cup red bell pepper, diced small
2 cups shredded cheddar cheese
8 oz Spicy Hidden Valley Ranch dressing
5 (2.1 ounce) packages frozen mini phyllo shells

Preheat oven to 350 degrees.

Cook sausage in a large skillet, stirring until it crumbles and is no longer pink.   About halfway through cooking the sausage, add bell pepper.  Drain.

Combine the sausage, cheese and Spicy Ranch dressing in a large bowl.

Fill each phyllo shell with a heaping teaspoon of the sausage mixture. (Freeze at this point, if desired.)

Bake for 8-10 minutes, until cheese melts. (Add 2-3 minutes to baking time if baking frozen tarts.)

Makes approximately 75 tarts.

Pin It
  • Digg
  • Del.icio.us
  • StumbleUpon
  • Reddit
  • RSS

It's Party Time!


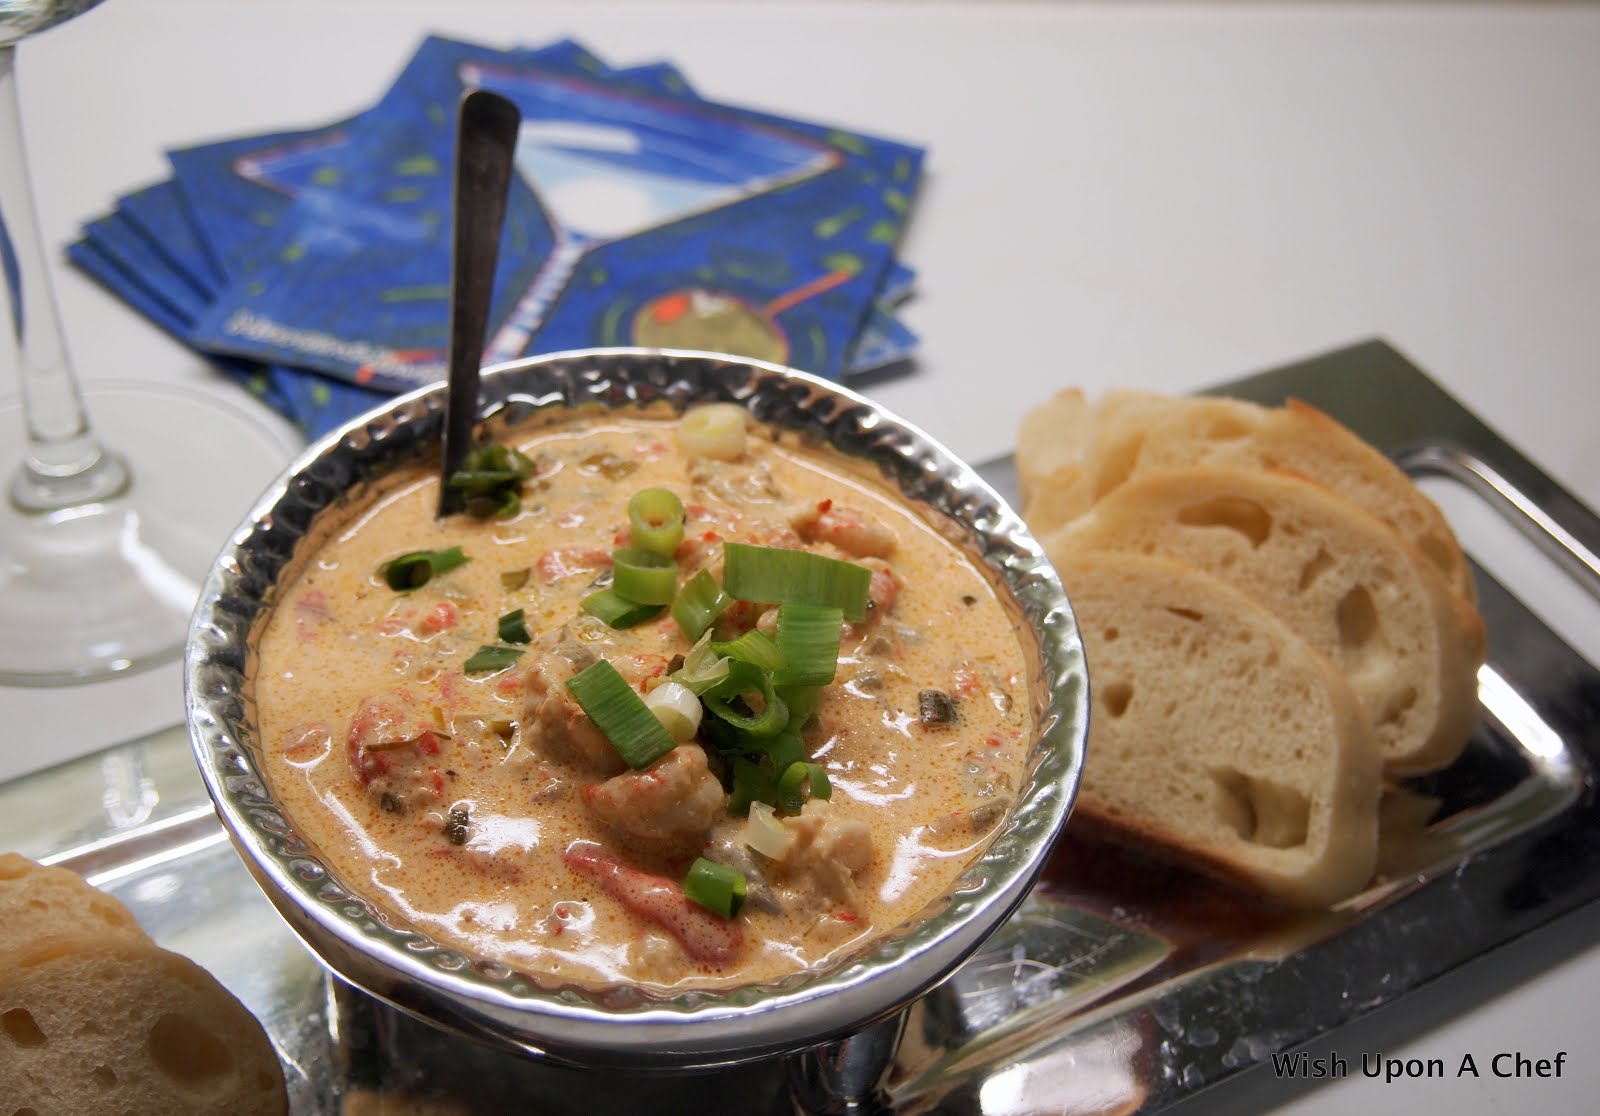
If you're looking for something a little different but still yet quick and easy to prepare as an appetizer during this holiday season, try this crawfish dip from the February 2012 edition of Southern Living.

I prepared this for Boy Toy's Halloween party but feared that it wouldn't go over very well if people had never eaten crawfish.  You just never know what people are afraid of when it comes to food.   I advertised it as "seafood dip" and all those who tasted and enjoyed probed further for what was in it so I gave up my secret ingredient.   Hopefully I've spread the love and joy about the deliciousness of crawfish - it really can be likened to lobster meat, in my opinion, because it's equally as buttery and rich tasting. 

I made this on the stove and then held it in a small crockpot during the party. It worked out well for an hour or so but if you leave the crockpot turned on too long, it will eventually get too hot and become a bit too liquidy which makes for a messy dip (but as a side note, it makes for a tasty and quick dinner when tossed with pasta!)  

Hot Crawfish Dip
from Southern Living, February 2012

1/2 cup butter
1 bunch green onions, sliced (about 1 cup)
1 small green bell pepper, diced
1 (1-lb.) package frozen cooked, peeled crawfish tails, thawed and undrained
2 garlic cloves, minced
1 (4-oz.) jar diced pimiento, drained
2 teaspoons Creole seasoning (add more to taste)
1 (8-oz.) package cream cheese, softened
French bread baguette slices
Garnishes: sliced green onion, chopped flat-leaf parsley

Melt butter in a Dutch oven over medium heat; add green onions and bell pepper. Cook, stirring occasionally, 8 minutes or until bell pepper is tender. Stir in crawfish and next 3 ingredients; cook, stirring occasionally, 10 minutes. Reduce heat to low. Stir in cream cheese until mixture is smooth and bubbly. Serve with toasted French bread slices.
 

Pin It
  • Digg
  • Del.icio.us
  • StumbleUpon
  • Reddit
  • RSS

Summertime Nosh


With the temperatures in the Queen City reaching all-time record highs of 100+ degrees these past couple of weeks, my summertime meals have become more of a nosh than an actual meal.  The heat just seems to completely zap my appetite and who wants to heat up an already blazing hot kitchen with an oven and long cooking times?

This quick and easy recipe from Southern Living featuring two of my favorite things: cherries and bleu cheese certainly fits the bill for something light yet satisfying on a hot summer day.  The combination of the sweet cherries and honey, the salty bleu cheese and the savory rosemary and arugula sends the taste buds into deliciousness overload. 

This is meant to be an appetizer and the kind where you can set out all the individual components and allow your guests to assemble their own crostini or you can assemble and plate in advance.  The cherry compote also keeps for at least a week in the refrigerator.  The only change that I would make from the original recipe next time is to coarsely chop the cherries and possibly even the arugula as leaving them whole made for a pretty hefty crostini and it was awkward to bite into and maintain a lady-like appearance. 

Stay cool but don't stay out of the kitchen!

Honey-Rosemary Cherries & Bleu Cheese Crostini
Southern Living, December 2011

printable recipe

1 shallot, thinly sliced
2 teaspoons olive oil
1 (12-oz.) package frozen dark, sweet pitted cherries, thawed
2 tablespoons balsamic vinegar
2 tablespoons honey
1/4 teaspoon chopped fresh rosemary
1/8 teaspoon salt
1/8 teaspoon pepper
2 cups loosely packed arugula
16 (1/4-inch-thick) ciabatta bread slices, toasted
1 (8-oz.) wedge bleu cheese, thinly sliced*


1. Drain cherries and coarsely chop, reserving the juice.  Sauté shallot in hot oil in a medium skillet over medium-high heat 2 to 3 minutes or until tender. Add cherries (and reserved liquid) and next 5 ingredients. Cook, stirring occasionally, 8 to 10 minutes or until thickened. Let stand 10 minutes.

2. Divide arugula among toasted bread slices (you may want to coarsely chop this as well if your leaves are large). Top each with cherry mixture and 1 bleu cheese slice.

*Manchego or goat cheese may be substituted.

Pin It
  • Digg
  • Del.icio.us
  • StumbleUpon
  • Reddit
  • RSS

I'm such a slacker

I fell off the blogging wagon last week and I'm sorry that I let you down, my faithful reader(s).  I should be tarred and feathered and sent to my room with no dinner.  Or maybe just tarred and feathered because I've got some really good stuff cooking on the stove today. 

I made a resolution at the beginning of this year that I would publish a blog post here at Wish Upon A Chef every week of the year.  It was my attempt to be more attentive to my blog and to get back into the kitchen to do the things that I love.  I even have this little Post-It Note list in my desk drawer that I derive great pleasure from when checking off each week after I publish.  Sort of like the chart of chores that you do for your kids and award a gold star for each chore accomplished.  I kept my resolutions for 19 weeks before I failed. 


As week 20 rolled around, my house became chaotic while I had some painting done and on top of that, I was all excited about packing for my weekend beach trip. The week came and went and it dawned on me while en route to the beach and the TomTom was taking me off-course through corn fields and desolate towns that I totally forgot to publish.  No gold star for me. 

But perhaps you'll forgive me if I share my recipe for these tasty Teriyaki Tailgate Tenders.  The Boy Toy and I tailgated at the Charlotte Knights baseball game with some friends and I brought these along so I wouldn't have to suffer the digestive indignity of eating a hot dog.  I noticed that even the kids were gobbling them up.  You can certainly use the marinade for chicken breast halves if you're just hanging around the house using the grill - you'll just need to grill them a bit longer.  These would also work great as an appetizer served with maybe a sweet and sour sauce or hoisin sauce for dipping.  I took along a simple pasta salad and made some happy and full tailgaters. 


Teriyaki Tailgate Tenders

1/2 cup soy sauce
4 tablespoons honey
2 tablespoons vegetable oil
Juice of 2 limes
2 teaspoons minced garlic
2 teaspoons chopped fresh cilantro
Chicken tenders (I made about 20 skewers)
Wooden skewers

In a small bowl combine soy sauce, honey, vegetable oil, lime juice, cilantro and garlic. Thread tenders onto wooden skewers and marinate for at least 30 minutes or overnight.  Cover them while they are marinating.  After I threaded the tenders onto the skewers, I placed them in a 9x13 baking dish with the ends of the skewers resting on the sides of the baking dish. This prevented the whole skewer from being submerged in the marinade and getting all messy. I marinated overnight and turned the skewers occasionally to make sure the chicken was coated.  To make them easier to transport, I removed the skewers from the marinade and transferred them to a large disposable plastic container. 

Grill over medium high heat for 6 to 8 minutes on each side or until juices run clear.

Pin It
  • Digg
  • Del.icio.us
  • StumbleUpon
  • Reddit
  • RSS

Who's The Cheesiest?


Just in time to try and capture the Super Bowl crowd, Domino's Pizza is advertising their Stuffed Cheesy Bread and how great it is. Their claim is that they sampled cheese bread from all the other competing pizza joints and then made theirs even cheesier.

I've got news for you Domino's....my bread is even more cheesier than the cheesiest bread you could ever dream of creating! With a whopping 1/2 pound of melted mozzarella and Havarti oozing out of this, who could argue??

This recipe hails from a 2008 issue of Gourmet magazine and claims to be a close replica of a traditional bread from the Republic of Georgia (the country, not the state) called khachapuri. The combination of Havarti and mozzarella is similar to the salted cow's milk cheese called sulguni used in the Georgian version of the bread. Of course we Americans are notorious for putting our own "traditional" spin on things and serving this warm, cheesy goodness with marinara sauce or a garlicky butter sauce would no doubt make this an over-the-top Super Bowl game snack.

This bread is best right out of the oven but the dough can be made the day before and left to rise slowly in the refrigerator, so you can have a batch of this ready to bake just before kick off or during half-time if you want to avoid another display of total narcissism.


Georgian Cheese Bread
Serves 8

2 1/4 teaspoons active dry yeast (a 1/4-ounce package)
7 tablespoons warm water (105-115°F)
1 2/3 cups unbleached all-purpose flour, divided
3/4 teaspoon salt
1 large egg, lightly beaten
1/4 pound Havarti cheese, coarsely grated
1/4 pound salted mozzarella, coarsely grated
1 teaspoon unsalted butter, melted

Sprinkle yeast over warm water and stir in 1 tablespoon flour. Let stand until creamy, about 5 minutes. (If yeast does not activate, start over with new yeast.)

Stir together salt and remaining flour in a large bowl, then stir in egg and yeast mixture to form a dough.

Turn out dough onto a well-floured surface and turn to coat with flour, then knead until smooth and elastic, about 5 minutes. Form into a ball and dust with flour. Let dough rest in a bowl, covered with plastic wrap, punching down with a wet fist every hour, at least 2 hours and up to 3.

Preheat oven to 500°F with rack in middle.

Turn out dough onto floured pizza pan, turning to coat, then flatten with your fingers into a 7-inch disk.

Toss together cheeses and press into a compact 3-inch ball with your hands. Place ball in middle of dough, then gather dough up around ball of cheese, squeezing excess dough into a topknot. Press down on topknot with a damp fist to press cheese out from center. Continue to flatten dough and distribute cheese evenly, pressing outward from center, until dough is an 11-inch disk.

Cut a 6-inch X through top of dough to expose cheese. Bake until pale golden, 10 to 12 minutes. Brush surface of dough with butter and bake until golden and cooked through, 3 to 5 minutes more.

Cooks' note: • Dough can be made 1 day ahead and chilled in bowl (for a slow rise), covered with plastic wrap. Punch down and bring to room temperature before proceeding with recipe.

Pin It
  • Digg
  • Del.icio.us
  • StumbleUpon
  • Reddit
  • RSS

The Cracker Crack Pipe


Nothing good ever comes of an addiction. Cigarettes make you cough up a lung. Alcohol rots your liver. Porn scorches your eyes. And snacks...well, snacks make your jeans shrink up real tight. They make the scale tip way too far in the wrong direction. Extra pounds appear seemingly overnight. Yet despite the horrible side effects, we think nothing of bending our elbow toward our mouth for another hit from the snack crack pipe.

My latest snack addiction is these Sensible Portions Pita Bites. You'd think they'd be all good-for-you healthy and stuff and they probably are, but the words sensible and portions should be a clue that CONTROL is key to proper addiction management. When my beloved Harris Teeter advertises these little bites of cracker meth for BOGO, you can bet my pantry is stocked for just those occasions when I'm in desperate need of a hit.

So what do you think happened the one night that I rounded the kitchen corner, peered into the pantry and suddenly realized I was facing an empty shelf? I got an adrenaline rush, my heart raced, my blood pressure sky-rocketed, I shook like a leaf, my pupils dilated as large as saucers, my hairs stood on end, and I broke into a cold sweat. Classic symptoms of the DTs.

Thank heavens for Smitten Kitchen's rendition of Gourmet magazine's Crisp Rosemary Flatbreads. Now I can feed the addiction any time I damn well please. If you're a straight shooter like me, you'll enjoy these on their own but they're also perfect with cheeses and any dip or spread that you can conjure up.

Pass the pipe over this way, would ya? And get me some bigger jeans while you're at it.


Crisp Rosemary Flatbread
Adapted from Gourmet, July 2008
Stolen shamelessly from Smitten Kitchen. (All notes are those of SK's)

Nothing could be easier than making this cracker, but that doesn’t mean you shouldn’t tell people you slaved all day over it because they’re going to be impressed, really impressed, and I see no reason not to milk it.

I think you could easily swap the rosemary for other herbs, such as thyme or tarragon, or punch it up with black pepper or other spices, but personally, I like it just the way it is here.

1 3/4 cups unbleached all-purpose flour
1 tablespoon chopped rosemary plus 2 (6-inch) sprigs
1 teaspoon baking powder
3/4 teaspoon salt
1/2 cup water
1/3 cup olive oil plus more for brushing
Flaky sea salt such as Maldon

Preheat oven to 450°F with a heavy baking sheet on rack in middle.

Stir together flour, chopped rosemary, baking powder, and salt in a medium bowl. Make a well in center, then add water and oil and gradually stir into flour with a wooden spoon until a dough forms. Knead dough gently on a work surface 4 or 5 times.

Divide dough into 3 pieces and roll out 1 piece (keep remaining pieces covered with plastic wrap) on a sheet of parchment paper into a 10-inch round (shape can be rustic; dough should be thin).

Lightly brush top with additional oil and scatter small clusters of rosemary leaves on top, pressing in slightly. Sprinkle with sea salt. Slide round (still on parchment) onto preheated baking sheet and bake until pale golden and browned in spots, 8 to 10 minutes. Transfer flatbread (discard parchment) to a rack to cool, then make 2 more rounds (1 at a time) on fresh parchment (do not oil or salt until just before baking). Break into pieces.

Flatbread can be made 2 days ahead and cooled completely, then kept in an airtight container at room temperature.

Pin It
  • Digg
  • Del.icio.us
  • StumbleUpon
  • Reddit
  • RSS

WOW Factor

In the catering world, the art of selling food is all about keeping things fresh and exciting and once you've elicited the word "WOW!" from clients and guests, you know you've hit the jackpot.

I'm no longer in the business of selling food, but that doesn't mean I'm not still constantly trying to WOW my friends and family with food creations. It never ceases to amaze me what does or does not impress them. I can spend many laborious hours sweating over a hot stove and pull together a meal fit for a king and while they are appreciative, the level of enthusiasm just doesn't seem to meet my expectations. But just watch the eager stampede of approving noshers sing my praises shortly after I've presented something made by simply cleaning out the refrigerator and throwing it all together just to see what I could come up with.

It seems to be the simplest of things that get the WOW factor. For instance, some friends and I hosted a cocktail party not long ago and I had some leftover fruit from the sangria that I wound up plopping into the water and tea pitchers on the drink table. The guests weren't sure if the pitchers were for actual drinking or only for decoration and continuously expressed delight over the simple act of adding fruit.

Another thing that seems to trip the trigger of party guests is these muffuletta skewers. I ran across the original idea in a Southern Living magazine but have never followed the recipe verbatim, instead just winging it by using up bits and pieces of items that I have in the fridge at any given time. This particular time I managed to fish out some artichoke hearts, cocktail onions, olives, deli ham, pepperoni, and cherry tomatoes from my mother's garden. I combined them on a platter with Pioneer Woman's stuffed jalapenos and spent the rest of the evening basking in the glory of admiration from my friends.


The presentation is unbeatable no matter what you end up making them with and seriously, it took me like 15 minutes to pull these skewers together and cost nearly nothing. I can't help but think of this classic commercial every time I make them!


* Exported from MasterCook *

Muffuletta Skewers

Serving Size : 24
Categories : Appetizers

Amount Measure Ingredient -- Preparation Method
-------- ------------ --------------------------------
5 slices deli style ham
5 slices provolone cheese
5 slices Genoa salami
24 pepperoncini pepper
48 slices roasted red peppers -- thinly sliced
24 green olives
24 kalamata olive -- pitted
24 wooden skewer
1 bottle oil and vinegar salad dressing
1/2 teaspoon Italian seasoning

Layer 1 slice of ham, provolone cheese, and Genoa salami; tightly roll up, and slice into 4 equal pieces. Repeat procedure 5 times.

Thread 24 (4") wooden skewers with 1 of each: pepperoncini pepper, red bell pepper strip, meat and cheese roll, large pitted green olive, another red bell pepper strip, and kalamata olive.

Place in a 9x13 baking dish. Whisk together 8 oz. bottle of olive oil and vinegar dressing and 1/2 teaspoon Italian seasoning; pour over skewers, and chill 30 mins.

Source:
"Southern Living"

Pin It
  • Digg
  • Del.icio.us
  • StumbleUpon
  • Reddit
  • RSS

Life of a Pioneer

It seems like only yesterday I thought about what I'd say if I were giving a commencement speech to the class of 2010 and here it's already time for the Class of 2011 to sharpen their pencils and break out their new Blue Horse notebook. The TV is full of back-to-school shopping ads which cause my nights, even twenty years later, to be filled with the typical first-day-of-school anxiety dreams.

Since I've already advised last year's graduating class, allow me to start this school year off by spewing words of advice for teachers, especially history teachers. When I was a kid, we'd open our American History books to Page 1 and begin. Every. Single. Year.

Thanks to that, I can kick some serious booty in Trivial Pursuit when it comes to questions about Christopher Columbus, Pilgrims, and pioneers. Just as we'd get to the good stuff, it was time to close the books for summer, and you guessed it....Page 1 was always waiting for us the next school year, just like we'd never seen it before in our lives. When you get past the 4th or 5th grade, there's really no need to remind us that Columbus sailed the ocean blue in 1492 and the pioneers lived in log cabins and fought Indians. Is it so wrong to skip a few chapters and learn about more recent stuff like the JKF administration, World Wars, and communist China? Evidently.

The only pioneer I care to know anything about these days is Ree Drummond aka Pioneer Woman. You can read about PW's story, Black Heels to Tractor Wheels, as she tells it far better than I ever could, but her main claim to fame is that she was a bonafide city girl who fell in love with and married an Oklahoma rancher known as Marlboro Man and became an "accidental country girl." She, like so many of us bloggers, started documenting her thoughts and ramblings and before long she had millions (literally) of followers, a cookbook, book tour and an upcoming movie about her life (unlike so many of us bloggers). Just like the pioneers in my history book, she lives in a farmhouse (albeit a VERY NICE farmhouse) and her family works the land and farms cattle and horses.

There are lovers and haters of Pioneer Woman and I'll admit that I don't follow her on a regular basis anymore simply because I have a short-lived attention span but you can read and decide for yourself if you think she's really "keeping it real." I fall into the category of thinking that Ree started her story as a real thing but soon realized that she had a knack for story-telling and capturing an audience and used it much to her benefit. Personally, I'm inspired by her progress and find motivation in her ability to build an empire based on herself. What she's accomplished is really no different than the likes of Martha Stewart or any other self-made female. And like all females who pioneer the frontier of breaking the glass ceiling and carving a name for themselves, she must also fight the Indians of ridicule.

I did not feel motivated, however, to stand in line for hours and hours on end to get my copy of her cookbook signed when she recently visited the Queen City on her book tour. I left my copy at the desk for Ree to sign and picked it up a few days later. The book is beautifully illustrated and while it doesn't contain any new, earth-shattering recipes, it does bring back to mind some long forgotten favorites that have been tucked away in my recipe box for eons. Again, I bought the book simply for inspirational value and it will soon claim it's rightful place on my over-burdened cookbook shelf.

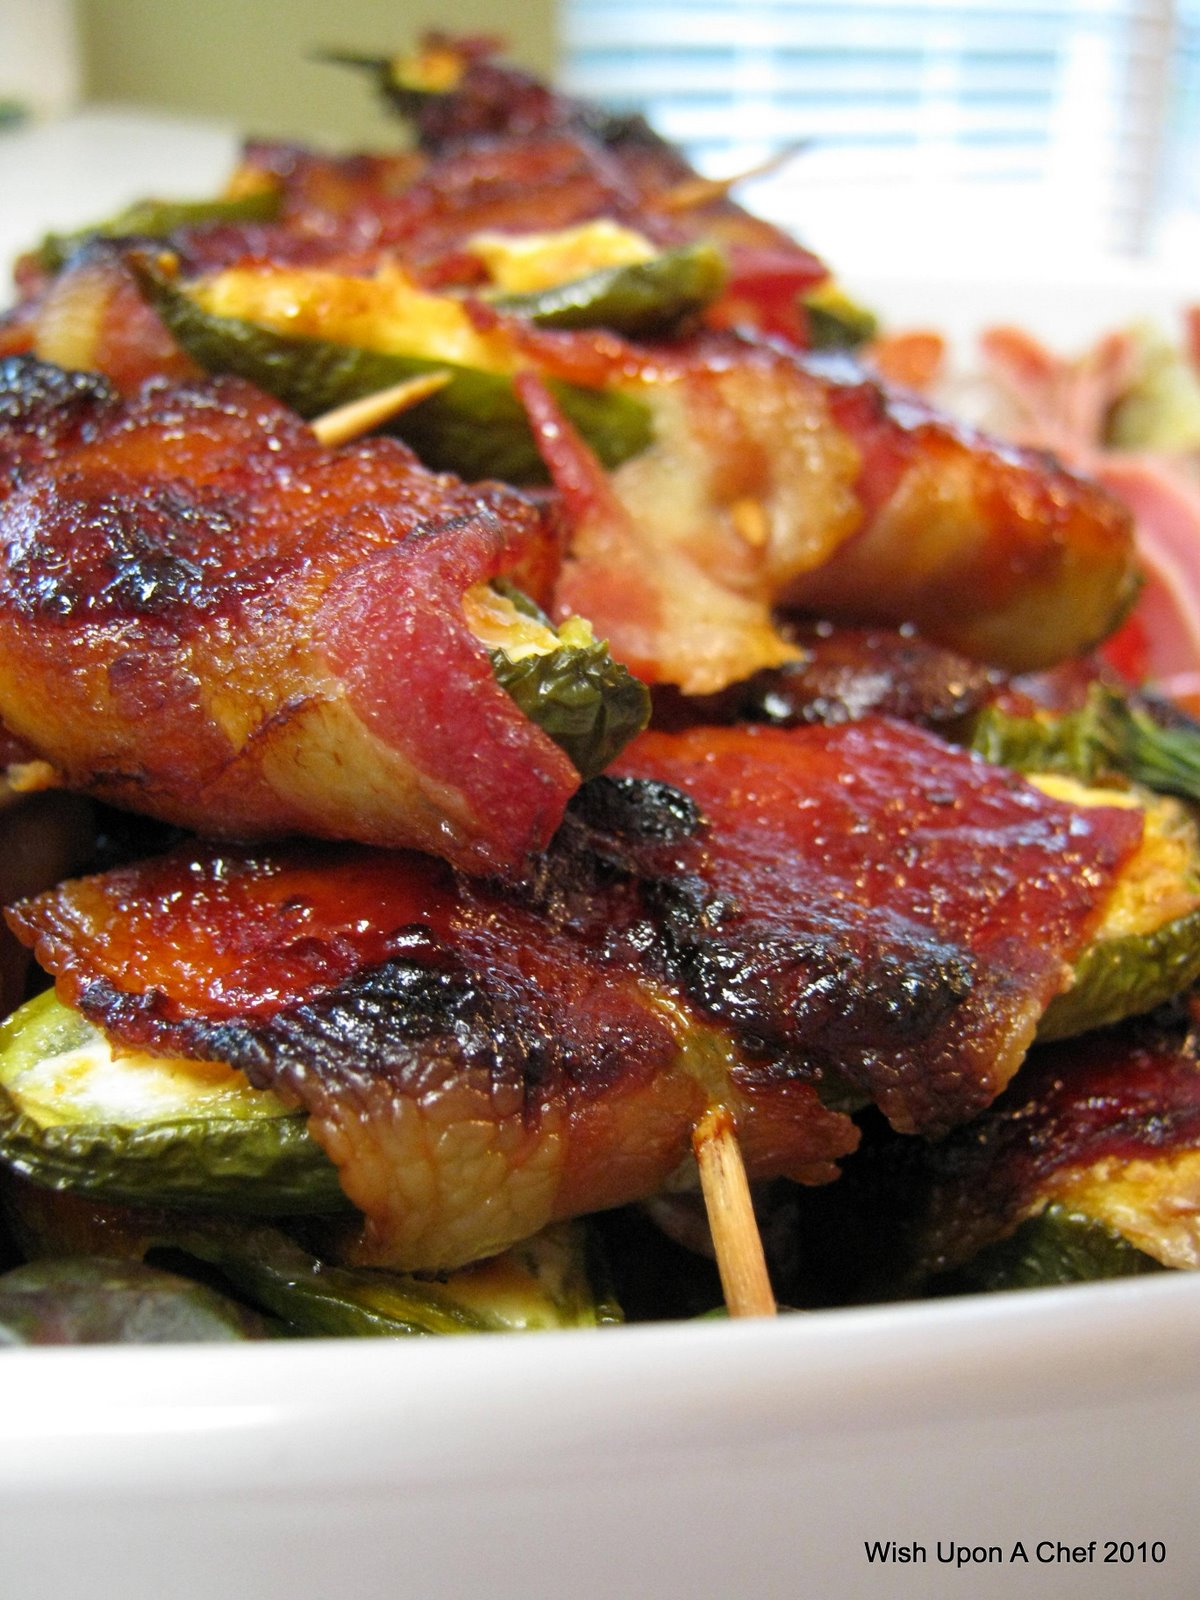
Before I close the book on this piece of blog history, I'll leave you with Pioneer Woman's recipe for jalapeno poppers, which I made for a cookout last weekend. In an effort to "keep it real," my next post will detail how these things caused myself and all other party guests to nearly die alone on the prairie with a severe case of heartburn. Zantac anyone?

Pioneer Woman's BBQ Jalapeno Poppers

18 fresh jalapeños
One 8-ounce package cream cheese
½ cup grated cheddar cheese
1 green onion, sliced
18 slices thin bacon, cut into halves
Bottled barbecue sauce
Toothpicks
Rubber gloves (or plastic bags) for working with jalapeños

Preheat the oven to 275ºF.

Begin by cutting jalapeños in half lengthwise. Try to keep the stems intact. They look prettier that way.(Important: Wear gloves when working with fresh jalapeños or you'll curse the ground on which I walk because you'll wake up in the middle of the night with throbbing fingertips. And that's nothing compared to what happens if you accidentally scratch your eye—or worse, something else.)

With a spoon, scrape out the seeds and light-colored membranes. Remember: The heat comes from the seeds and membranes, so if you can handle the sizzle, leave some of them intact.

Now, in a bowl, combine the cream cheese, cheddar cheese, and chopped green onion. Mix the ingredients together gently. And don't feel you have to use an electric mixer. I do because I'm lazy and don't like to exert myself. Ever. (Too much scrubbing clothes on the washboard, I suppose.)

Next, stuff each hollowed jalapeño half with the cheese mixture.

Wrap bacon slices around each half, covering as much of the surface as you can. Be careful not to stretch the bacon too tightly around the jalapeño, as the bacon will contract as it cooks.

Brush the surface of the bacon with your favorite barbecue sauce. Chutney or apricot jelly works well, too!

Secure the jalapeños with toothpicks and pop them in the oven for 1 hour, or until the bacon is sizzling.

Serve hot or at room temperature, and watch them disappear within seconds. I've seriously caught guests stuffing these into their purses. Sometimes I have to call law enforcement.

Variations:

For a simpler version, omit the cheddar and green onion from the cream cheese.

Cut sliced peaches or pineapple into small bits and press them into the cream cheese before wrapping the jalapeños in bacon.

Use Pepper Jack cheese in place of the cheddar cheese.

Pin It
  • Digg
  • Del.icio.us
  • StumbleUpon
  • Reddit
  • RSS

Picnic At The Pops

The Charlotte Symphony Pops In The Park series concluded July 3 after a resounding success both in performance and fund raising. The financially strapped orchestra raised nearly $150,000 this season from patrons eager to pay the small suggested donation. In addition to doing my part monetarily, I also contributed to my favorite summertime activity by introducing "newbies" to four of the symphony concerts. I hope they, in turn, will continue to populate the lawn each summer with friends and more friends.

Not only did I show up with new people in tow, each week also brought new and exciting picnic fare. Simplicity was the key for each of the concerts so that I could enjoy the day doing other things and not be stuck in the kitchen prepping and cleaning. Rosemary Flatbread with Bleu Cheese, Grapes and Honey from Food and Wine magazine was a delicious combination of sweet and savory and considering that I'm not a huge fan of bleu cheese, that's a pretty bold statement. I'm fully aware that all of these components compliment each other but it would never have occured to me to combine them in this manner. While this was quick and easy to put together, it does require a bit of planning in order to make the dough and let it rise.

If you're in the mood for something a little more substantial, then no doubt this overstuffed
muffuletta sandwich will fill the void. Another simple and delicious snack to pull together but again, forethought is required. The olive tapenade needs to be made at least a day in advance so the flavors can meld and the longer the assembled sandwich sits, the better it tastes ~ perfect for a picnic because it won't get soggy. Tangy and spicy, this hearty sandwich is not for the faint of heart!

Insalata Caprese is probably one of the most elegant things you can prepare for a picnic. Thick sliced heirloom tomatoes layered with fresh mozzarella, and fresh basil all drizzled with first cold pressed extra virgin olive oil. Amore mio! Of course, I do have to admit that I don't keep the dish true to its Neapolitan roots because I also add a dash of balsamic vinegar and some coarsely ground sea salt. It is imperative to use the best of fresh, home grown tomatoes and basil ~ do not refrigerate either of them prior to making the salad or even after assembly or else the flavors will diminish ~ and make sure you choose a very good fresh mozzarella and not the rubbery stuff that is so common in the grocery stores. Mozzarella di Bufala is ideal but sometimes hard to find so a good fresh cow's milk cheese will work just as well. Each and every item in this salad is showcased so it is important to use quality, fresh, and expensive.

My coveted picnic backpack is neatly store away until next summer but in the meantime, I hope you enoy these recipes and enjoy the summer!

Muffuletta Sandwiches

1 cup pimento-stuffed green olives, crushed
1/2 cup drained kalamata olives, crushed
2 cloves garlic, minced
2 tablespoons drained capers
1 tablespoon chopped celery
1 tablespoon chopped carrot
1/2 cup pepperoncini, drained
1/4 cup marinated cocktail onions
1/2 teaspoon celery seed
1 teaspoon dried oregano
1 teaspoon dried basil
3/4 teaspoon ground black pepper
1/4 cup red wine vinegar
1/2 cup olive oil
1/4 cup canola oil
2 (1 pound) loaves Italian bread
8 ounces thinly sliced Genoa salami
8 ounces thinly sliced cooked ham
8 ounces sliced mozzarella cheese
8 ounces sliced Provolone cheese

To Make Olive Salad: In a medium bowl, combine the green olives, kalamata olives, garlic, capers, celery, carrot, pepperoncini, cocktail onions, celery seed, oregano, basil, black pepper, vinegar, olive oil and canola oil. Mix together and transfer mixture into a glass jar (or other nonreactive container). If needed, pour in more oil to cover. Cover jar or container and refrigerate at least overnight.

To Make Sandwiches: Cut loaves of bread in half horizontally; hollow out some of the excess bread to make room for filling. Spread each piece of bread with equal amounts olive salad, including oil. Layer bottom of each loaf with 1/2 of the salami, ham, mozzarella and Provolone. Replace top on each loaf and cut sandwich into quarters.

Serve immediately, or wrap tightly and refrigerate for a few hours; this will allow for the flavors to mingle and the olive salad to soak into the bread.

Source:
Adapted from allrecipes.com

NOTES : Marinates overnight.

~~~~~~~~~~~~~~~~~~~~~~~~~~~~~~~~~~~~~~~~~~~~~~~~~~~~~~~~~

Rosemary Flatbread with Bleu Cheese, Grapes, and Honey

Ingredients
1 envelope active dry yeast
2 tablespoons sugar
2 cups bread flour, plus more for rolling
3/4 cup warm water
2 teaspoons chopped rosemary
1/2 teaspoon fine salt
1/4 teaspoon freshly ground pepper
1/2 pound red grapes (1 1/2 cups)
Coarse sea salt
3 ounces bleu cheese, crumbled (1/2 cup)
1 tablespoon honey
1 tablespoon snipped chives

Directions
In a large bowl, whisk the yeast and sugar with 1/4 cup of the flour. Stir in 1/4 cup of the warm water and let stand until slightly foamy, about 5 minutes. Add the rosemary, fine salt, pepper and the remaining 1 3/4 cups of flour and 1/2 cup of water; stir until a dough forms. Turn the dough out onto a lightly floured work surface and knead until smooth, about 5 minutes. Transfer the dough to an oiled bowl, cover and let rise in a draft-free spot until billowy and doubled in bulk, about 1 hour.
Meanwhile, preheat the oven to 450°. Place a pizza stone in the bottom of the oven, and preheat for at least 30 minutes.
Turn the dough out onto a lightly floured work surface. Press and stretch the dough into a 13-inch round, then transfer to a lightly floured pizza peel. Press the grapes into the dough and sprinkle with sea salt.
Slide the flatbread onto the hot stone and bake for about 12 minutes, until the crust is golden and the grapes have begun to release some of their juices. Sprinkle the bleu cheese on top and bake for about 2 minutes longer, until the cheese melts. Slide the flatbread onto a work surface and drizzle with the honey and sprinkle with the chives. Cut into wedges and serve.

Pin It
  • Digg
  • Del.icio.us
  • StumbleUpon
  • Reddit
  • RSS

A Gaggle of Girls

I've been to alot of parties in my life.

I've planned parties right down to the last minute detail, cooked at parties, served at parties, and cleaned up at parties. Oh, wait...I don't think that counts as actually being AT the party, does it? No. Absolutely not. It's been a long, long time since I've hosted a party myself or actually been a guest at a party. I've been in the mood to party. And what a girl wants to do, a girl does.

I wanted to get my new house completely in order before I started entertaining, but are we ever completely settled? There's always something that needs to be done so I decided to get the invitations in the mail and commit to a date. Forget the fact that my window sills need to be cleaned and my closets need organizing...a party is supposed to be about good food and good friends!

The whole time I was getting ready for the big day - planning the menu, making lists, shopping, prepping, cleaning - I kept thinking that I could NEVER do this for a living again!

There were no real surprises on the menu. Since it was MY party, I wanted all of my favorites. The recipes that my catering business was initially built around and made the business a success. I've blogged about most of them before, so I've linked back to the posts and also included the ones that I've never shared with you below. I wanted things that I was comfortable with so I could enjoy my own party and not worry about how a new recipe was going to fly. There will be plenty of time to play with new recipes and have them ready for the next big event.

It was a wonderful Sunday brunch, thanks entirely to my wonderful girlfriends! We laughed, drank, gossiped, ate, and then did it all again. Everything turned out perfectly and we had so much fun!


Sunday Brunch with the Girls


Roasted Vegetable Platter
Cheese & Fruit served with Crackers
Salad with Cranberries, Bleu Cheese, Candied Pecans (recipe below), and Raspberry Vanilla Vinaigrette (recipe below)

Chocolate Chip Espresso Cookies
Chocolate Chess Tarts (recipe below)
Coconut Dream Bars (recipe below)
Iced Tea
Ginger Infused Lemonade
Blood Orange Mimosas by Canella
Bellinis by Canella

~~~~~~~~~~~~~~~~~~~~~~~~~~~~~~~~~~~~~~~~~~~~~~~~~~~~~~~~~~~~~~~

Candied Pecans (these little jewels made my salads famous!)

Amount Measure Ingredient -- Preparation Method
-------- ------------ --------------------------------
1 each egg white
2 tablespoons cold water
2 cups pecan halves
1/2 cup sugar
1 1/2 teaspoons cinnamon
1/4 teaspoon ginger
1/4 teaspoon nutmeg

Beat egg white and water until frothy. Stir nuts into mixture to coat, then drain slightly in a colander, 3-4 mins. Mix sugar and spices in a plastic bag. Add nuts and shake to coat. Spread wet nut mixture in a single layer on a microwave safe plate; microwave on high for 1-1/2 minutes, or until mixture is bubbly. Stir. Microwave another 1-1/2 minutes. Remove; stir to separate. Cool. Store in a sealed container.


Raspberry Vanilla Vinaigrette
Recipe By :Jackie Alejo (Cooking For You!)

Amount Measure Ingredient -- Preparation Method
-------- ------------ --------------------------------
1/3 cup raspberry jam
1/2 cup red wine vinegar
1/4 cup extra virgin olive oil
1/4 tsp salt
1/4 tsp vanilla
1/8 tsp freshly ground black pepper

Shake all ingredients together in a jar, until well blended. You may want to increase vanilla according to taste.


Coconut Dream Bars (one of the most requested desserts from my catering business!)

Amount Measure Ingredient -- Preparation Method
-------- ------------ --------------------------------
18 1/4 ounces yellow cake mix
1/2 cup butter
3 eggs
8 ounces cream cheese
1 pound powdered sugar
1/2 cup flaked coconut
1/2 cup chopped pecan

Beat 1 egg and butter. Add cake mix. Pat into 8x12 inch pan. Mix cream cheese, 2 eggs, and stir in sugar. Add coconut and pecans. Spread over cake. Garnish with slivered almonds. Bake at 325 for 45 mins. Cut when cool.

Chocolate Chess Tartlets

Amount Measure Ingredient -- Preparation Method
-------- ------------ --------------------------------
1 1/2 cups sugar
3 tablespoons unsweetened cocoa
1 1/2 tablespoons cornmeal
1 tablespoon all-purpose flour
2 teaspoons white vinegar
1/2 cup butter, melted
1 Dash salt
3 large eggs, lightly beaten
5 (2.1-oz.) packages frozen mini phyllo pastry shells, thawed
thawed frozen whipped topping -- for garnish

Preparation
1. Stir together first 7 ingredients until blended. Add eggs, stirring well. Spoon about 1 heaping tsp. chocolate mixture into each pastry shell, and place on 2 large ungreased baking sheets.
2. Bake at 350° for 25 minutes or just until set. Remove to wire racks, and let cool completely. Garnish, if desired.

Store tartlets in an airtight container up to 3 days.

Yield:
"72 "

Pin It
  • Digg
  • Del.icio.us
  • StumbleUpon
  • Reddit
  • RSS

Party On, Garth

In my last post, I expressed frustration over the fact that being in the catering business wasn't always about what I wanted to eat. I suppose in today's post, hard as it may be, I can admit that being self-centered isn't always a good thing.

One of my repeat clients submitted a dozen or so recipes to be used for her cocktail party a few weeks ago and after a round of testing in the catering kitchen, all but one of them were considered something I wouldn't be embarrassed/ashamed/not caught dead serving and admitting that we prepared. I even declared a couple of them as keepers to be used for future events.

I show up for the gig and strategically placed my overflowing, beautifully garnished platters of party fare around the dining area, taking special care to down-play the one "loser" recipe by trying to hide it in back of a huge floral centerpiece. And wouldn't you know it, the guests - resembling a pack of drug sniffing dogs drawn to a suspicious piece of luggage - apprehended the suspect appetizer in no time. To my horror, they started plucking the food from the platter and attempting to actually eat the weird looking little morsels. And then I heard the dreaded question.

"What is this?"

Reluctantly, I began to explain that it was a recipe that the host had chosen (making sure that I emphasized that piece of information) called Bacon Wrapped Almond Stuffed Apricots. I started to run walk away so I wouldn't have to witness the look on the guest's face - you know the one when you get something really nasty in your mouth and realize you have to keep chewing and eventually swallow so as not to gross out everyone else - when to my amazement, said guest's eyes opened wide, a smile spread across his face and the proclamation, "These are FABULOUS!" brought the rest of the dogs running. And in the blink of an eye, 30 guests obliterated nearly 200 pieces of food that I had deemed unedible and I was proven wrong. Terribly wrong.

This photo was taken during my testing phase and shows (from front to back) Parmesan Rounds, Mushroom Puffs, and a scant few of the appetizer that I tried to hide in the bushes. Since I deemed the first two as something that I'd serve again and still stand in amazement at the popularity of the third one, I'm sharing them all with you. Enjoy and party on!


* Exported from MasterCook *

Bacon-Wrapped Almond Stuffed Apricots

Amount Measure Ingredient -- Preparation Method
-------- ------------ --------------------------------
24 dried apricot halves
24 whole almonds -- lightly toasted
8 slices bacon -- cut into 3rds
3/4 cup apricot preserves
2 tablespoons soy sauce
1/8 teaspoon pepper

Fold each apricot half around 1 whole almond. Wrap 1 bacon piece around each stuffed apricot. Secure with wooden picks. Place on a wire rack in an aluminum foil lined jelly roll pan.

Bake at 375 for 20-25 minutes or until bacon is crisp, turning once.

Microwave preserves, soy sauce, and pepper in a small microwave safe bowl at medium for 1 minute or until preserves are melted. Serve dipping sauce with stuffed apricots.

Source:
"Southern Living, January 2007"
Yield:
"24 pieces"

NOTES : Serve warm - not very good at room temp.

- - - - - - - - - - - - - - - - - - -

* Exported from MasterCook *

Mushroom Puffs

Amount Measure Ingredient -- Preparation Method
-------- ------------ --------------------------------
2 packages crescent dinner rolls
8 ounces cream cheese -- room temp
4 ounces mushrooms -- drained and chopped
2 green onions -- chopped
1 teaspoon seasoned salt
1 large egg
2 tablespoons poppy seeds

Preheat oven to 375. Lay out crescent roll dough and press perforations to seal. Mix cream cheese, mushrooms, onions, and salt and spread over dough.

Roll up jelly roll fashion and slice into 1" pieces.

Brush with egg, sprinkle with poppy seeds, and bake 375 for 10 mins.

Yield:
"48 pieces"

NOTES : Can be prepared ahead up to baking point and then frozen until time to cook. In fact, the mushroom roll is easier to slice if it's frozen.

Alison's note - added a bit of roasted red bell pepper to filling for color. Okay at room temp.

- - - - - - - - - - - - - - - - - - -

* Exported from MasterCook *

Parmesan Rounds

Amount Measure Ingredient -- Preparation Method
-------- ------------ --------------------------------
2 loaves thinly sliced white bread
unsalted butter
2 packages cream cheese -- room temp
1/2 cup unsalted butter -- room temp
1/3 cup mayonnaise
6 green onions -- chopped
freshly grated parmesan cheese

Cut four 1-1/2" circles from each bread slice. Butter one side of each circle and arrange in a single layer, buttered side up, on baking sheet. Broil until lightly toasted, then turn and toast other sides. Cool on rack. Combine cream cheese, butter, mayo, and green onions. Spread 1 tsp of mixture over buttered sides of bread circles and dip into Parm cheese. Preheat broiler and arrange rounds on baking sheet. Broil until bubbly and golden, 5 mins, and serve immediately.

Source:
"Southern Living, January 2007"
Yield:
"150 pieces"

NOTES : Okay at room temp. Used lid from spice jar to cut circles.

Pin It
  • Digg
  • Del.icio.us
  • StumbleUpon
  • Reddit
  • RSS

Party for 200 in 48 hours?? No problem!


As I mentioned in my last post, I've been running the "No Day Off Anytime Soon" marathon at work. After returning from my convention, I made some personnel changes in the kitchen and I've been making my presence known by spending quite a bit of time in there myself. A little fine-tuning of the remaining staff and we'll be running smoothly once again.

A client waltzed into my office this past Thursday interested in a cocktail party for 200 people. "We'd love to help!" I told her, "what date are you interested in having your party on?" She very calmly answered "Tuesday." I politely picked myself up off the floor and regained my composure. If she could be so calm as to try and pull off a party for 200 within 2 business days, so could I. I am, after all, in the business of catering, aren't I? Since I just returned from an intense 3 day bombardment of fresh and new catering concepts, I really wanted to try and sell some of my new ideas but I knew better. I had to make arrangements for an extra food delivery, find staff, clean serving trays, and Lord only knows what else! "Stick to what you know," I told myself and I sold her on twelve of our most popular appetizers. Her menu was as follows....

Stationary hors d’oeuvres displayed on silver trays and garnished with fresh flowers

Smoked salmon spread served with Bella Cucina crackers
Endive leaves stuffed with crab salad
Bleu cheese and walnut dip served with fresh vegetable crudite
Hot spinach and artichoke dip served with pita chips

Cream cheese and bacon stuffed mushroom caps
Domestic and imported cheese board
Fresh asparagus spears encased in proscuitto
Baguette slices topped with roasted eggplant, red pepper and mozzarella

Marinated pork tenderloin medallions served on freshly baked dollar rolls
Mini croissants filled with shrimp salad
Shaved roast beef with horseradish cream sauce served on Parmesan crisps
Parmesan crusted chicken tenders served with honey dijon dipping sauce

The food was ordered, the staff was in place, and we successfully delivered the food on time. No problems...I am in the business, after all! We picked up our trays today and received alot of compliments. I'll leave you with a couple of recipes of my personal favorites from this menu....


* Exported from MasterCook *

Crab Salad on Endive

Recipe By : "Party Appetizers"
Serving Size : 12 Preparation Time :0:00
Categories : Appetizers Seafood

Amount Measure Ingredient -- Preparation Method
-------- ------------ --------------------------------
2 heads Belgian endive
6 ounces best quality crabmeat
1 tender inner celery stalk -- finely diced
2 tablespoons mayonnaise
1 teaspoon fresh lemon juice
salt
radicchio leaves or chives

Trim the base off the endives and separate the heads into leaves; rinse the leaves and pat dry. In a small bowl, mix the crabmeat, celery, mayo, and lemon juice. Season to taste with salt. Spoon the crab mixture onto the bottom 3rd of each endive leaf (about a heaping teaspoon for each). Nestle the leaves inside the larger radicchio leaves, or criss-cross two 1" pieces of chive over the crab.

With the time crunch, we weren't able to find decent looking radiccho, but I think it looks great nonetheless. I love to add fresh dill to this recipe in place of the chives.


* Exported from MasterCook *

Party Pork Tenderloins

Recipe By : "Celebrate!"
Serving Size : 24 Preparation Time :0:00
Categories : Appetizers Pork

Amount Measure Ingredient -- Preparation Method
-------- ------------ --------------------------------
MARINADE:
5 each pork tenderloin -- about 1 lb each
1 cup sherry vinegar
2/3 cup orange juice
1/4 cup honey
8 cloves garlic -- finely minced
2 tablespoons tiny capers, drained plus 2 tbsp. brine
2 tbsp extra virgin olive oil
2 tbsp ground cumin
1 tbsp dried oregano
COOKING & SERVING:
4 tbsp extra virgin olive oil

Wipe the pork tenderloins with damp paper towels and place them in two large bowls or plastic containers. Combine all the marinade ingredients with 1 cup water in a bowl and pour it over the tenderloins. Cover and marinate in the refrigerator overnight.

Transfer the tenderloins to a colander, wipe them clean of any marinade pieces, and let them drain for 15 minutes. Then pat them dry with paper towels. Strain the marinade, reserving 2 cups of the liquid. Preheat oven to 400. Heat 2 tbsp of the olive oil in each of two large nonstick skillets over medium high heat. Sear the tenderloins well all over, in batches, if necessary, turning the meat as it browns. It will take about 10 minutes per batch. Transfer the pork to two 15x10 inch shallow roasting pans (2 in one pan, 3 in the other) and add 1 cup of the reserved marinade to each pan. Roast the tenderloins until slightly pink in the center, 10 minutes. If you prefer to lose the pinkness,
cook 2 minutes more). Place the tenderloins on a cutting board and let them rest for 10-20 minutes. They will continue to cook as they rest. Cut the tenderloins into 1/2" slices and arrange them on a large round platter, overlapping the slices slightly.

I think these tenderloins are more eye appealing when sliced and fanned out on a serving tray as the recipe indicates with the dollar rolls served in a basket and little ramekins of romanesco sauce or various flavors of mustard & mayo, but our client wanted the sandwiches pre-assembled. I prep a smaller version of this recipe for an entree alot of times too. It is delish! Don't let the short roasting time and the pinkness of the finished product scare you. Since it is marinated with vinegar, the meat has a reaction with the acid and actually "cooks" while marinating. Please remember also to only marinate in glass or plastic when using an acid based marinade. Enjoy!!

Pin It
  • Digg
  • Del.icio.us
  • StumbleUpon
  • Reddit
  • RSS