RSS

I currently live in Charlotte, NC and after spending 7 years as a personal chef and caterer, I am now happy to share my love of cooking with friends and family. My heart is in the kitchen, but my soul is in the stars!

Showing posts with label snacks. Show all posts

Cleaning up my crack(er) addiction


Since starting the October Unprocessed 2013 Challenge, I feel like Old Mother Hubbard.  I can still give my dog a bone because he would sell my soul three times over for a Milkbone, but my cupboards are bare since I committed to removing what processed foods were left from my nearly year-long attempt to change my eating habits. 

You can see what my pantry looked like back in April, and I'm pleased to admit that my shelves are no longer straining under the weight and pressure of entirely too much food for one person.  Ridding my supply of processed items was a huge relief but also scared the pants off of me.  What would I reach for during those moments of weakness when I want something to eat RIGHT NOW?

More than halfway through the challenge I'm pleased to report that I haven't starved to death (yet) but it will probably take me just as long to restock my pantry with the good stuff as it did to rid it of the demons.  There's a lot of label reading involved, alot of products in the stores to weed through and one thing I've learned is that just because it's organic, all-natural or non-GMO doesn't mean it's going to taste good and I'm going to like it.  Some of the things I've tried so far, I would rather starve to death than have it in my pantry again. 

I needed to replace my crack(er) pipe addiction with an acceptable alternative quickly, before I committed really bad food-related crimes.  Of course I could make my own but who the bleep has time for that?  Triscuits were my first attempt at finding an acceptable crack alternative, but after doing some research on canola oil (one of the ingredients in Triscuits) and considering I could consume enough of them to kill a lab rat, I decided to steer clear of them.

Have you ever looked at the ingredients listed on the box of your favorite crackers?  Check out the ingredients on this box of Kashi crackers - a brand that markets itself as a healthy, nothing artificial, whole grain good-for-you product.  More than 20 items listed in something you can make at home with less than 5 ingredients.  And God only know where that "natural flavor" came from.  No thanks. 


I started paying attention to sections of the grocery store that I normally blew past, never giving a second glance or much thought to and the Jewish section yielded some really great cracker finds!  Check out the ingredients on the Streit's 100% Whole Wheat Matzo crackers and the Manischewitz brand of matzo.  Pretty simple stuff, huh?


Now check out the ingredients on the Kavli Crispy Garlic crackers.  While it does contain sugar, there's not even enough of it to even register on the RDA scale so I decided they were acceptable.


Finding good, clean, unprocessed convenience items takes a bit of effort and some thinking and looking outside the box.  If there is a questionable ingredient, look it up online and I guarantee you'll find more than you need to know about it (and if it's questionable to begin with that should tell you something, no?)

It's time to slow down, unwind, unprocess and pay attention to what goes into your mouth.  Treat your body like the temple it is meant to be instead of a make-shift pup tent.  You won't regret it and I can promise there are much-better-for-you alternatives out there to the things you currently love to eat.  If I can clean up my crack(er) addiction,  I have faith that you can too!

Pin It
  • Digg
  • Del.icio.us
  • StumbleUpon
  • Reddit
  • RSS

Polly Wants A Cracker


When I first made the decision to cut out processed foods and move toward real food, I was worried about what I would eat for snacks as the items that I once considered pantry staples/snacks started disappearing from my shelves.  I'm not a huge snacker but my weakest moments happen when I just get home from work and start preparing dinner.  

I'm slowly working my way through some real food snack recipes that I've found online to find ones that I like and I've purchased a few items like Larabars, Triscuits and roasted almonds for quick "grab a handful and go" snacks.  Of course, fresh fruits and veggies make excellent snack choices as well. 

I ran across this recipe from 100 Days of Real Food for Easy Cheesy Crackers with only three ingredients.  They're super easy to mix up, bake and have on hand for snack attacks.  They freeze well (either as an unbaked log or go ahead and slice, bake and freeze) so you can have them on hand any time you like.  They taste just like Cheez-Its or maybe like the goldfish crackers, although I haven't had one of those in eons to remember exactly what it tastes like. 

When I make these, I like to add some fresh herbs to the dough - whatever is growing plentiful in my garden at the time - and cut them really thin.  Serve on a platter with your favorite cheeses and/or fruits or just eat them for a snack all by themselves. 

Make sure you visit Lisa Leake's page 100 Days of Real Food for more great tips on how to gradually change your diet and menus to include more real food. 

Cheesy Herb Crackers
Makes about 2 dozen, depending on thickness

Inspired by Lisa Leake's Easy Cheesy Crackers

Printable Recipe

1 cup whole-wheat flour
5 tablespoons cold butter, cut into tablespoon size chunks
1 ½ cups (about 4 oz.) grated cheddar cheese
2 tablespoons fresh herbs of choice, chopped (chives or dill makes an excellent choice)
Preheat oven to 350 degrees F.
 
Combine first three ingredients in a food processor and blend until it forms a dough ball (it may take a few minutes).
 
Roll the ball into a log about 1 ½” in diameter.  Roll dough in your choice of chopped herbs, coating the outside of the whole log.  (If you'd like your herbs to be mixed into your crackers, just knead them into the dough ball as you are shaping it into the log)  You can refrigerate or freeze at this point if you'd like to wait until later to prepare.
 
Slice into ¼” thick rounds and place on an ungreased baking sheet.
 
Bake for 8 - 14 minutes or until golden brown.
 

Pin It
  • Digg
  • Del.icio.us
  • StumbleUpon
  • Reddit
  • RSS

The Way To A Man's Heart


I've always heard that the way to a man's heart is through his stomach and Lord knows I travel that route as often as I can for the Boy Toy despite his insinuations that all my cooking is making his "road" more "curvy." My mailbox overflows each month with subscriptions to various cooking magazines to ensure the road to Boy Toy's heart is traveled often, but as a woman I know the stomach isn't the only avenue to a man's heart.

A few months ago I purchased a Groupon that would grant me a year's subscription to Cosmopolitan magazine for a mere $5.  I wanted to make sure I wasn't missing out on any new tricks of the trade for wooing a man by a means other than with my cooking.  The first few editions came and I scanned through pages and pages of information and instruction hoping to find something useful.  I honestly feared most of the tricks Cosmo was touting to woo a man would land me square in the hospital with a dislocated something or other that my insurance copay would not cover.  I felt the folks at Cosmo were more concerned with how to stop a man's heart than how to find your way to it, so I was ready to toss the useless magazines into the recycle bin when I noticed - far back on those last few pages typically reserved for advertisements about psychics and online dating services - a recipe.  I ripped it from the the magazine and realized I should forget about all those other tricks and tips because surely food WAS the way to a man's heart afterall!

A quick online search of the recipe "Crispy Chicken with Rosemary Lemon Salt" shows that Giada De Laurentiis also takes credit for the published recipe in her cookbook "Weeknights with Giada" which probably proves my theory that Cosmopolitan can't come up with any original ideas on their own to win to a man's heart without making you perform like a circus pony or very minorly tweaking someone else's idea - like suggesting the chicken be served with marinara sauce and calling it their own.  I replaced the cornmeal with whole wheat bread crumbs and also had plenty of herbed salt left over so I've been using it for salads and such.  If you are focusing on "real food" for your meals, use a suitable oil such as coconut oil for frying and use organic, free-range chicken. 

In addition to serving these as an entree, these would make a great party appetizer.

Crispy Chicken with Rosemary Lemon Salt
inspired by Giada De Laurentiis/Cosmopolitan July 2012

Printable Recipe

Suitable oil, for frying
1 (6-inch) sprig fresh rosemary
1/4 cup kosher salt plus 3/4 teaspoon
Zest of 1 large lemon, divided
1 pound chicken tenders
2 cloves garlic, minced
1-1/2 tablespoons chopped fresh rosemary
1/4 teaspoon freshly ground black pepper
1/2 cup breadcrumbs (I whole wheat crumbs from my homemade bread leftovers)

For the salt: Heat 1/4-inch oil in a large, high-sided skillet over medium-high heat (the oil is hot enough when a pinch of breadcrumbs sizzles when added to the pan). Add the rosemary sprig and fry for 30 seconds until crisp. Using tongs, remove the rosemary sprig and drain on paper towels. Remove the leaves and finely chop to yield 1 tablespoon. Place the rosemary, 1/4 cup salt, and half the lemon zest in a small bowl. Mix with a fork until combined. Set aside.

For the chicken: In a medium bowl, mix together the chicken, garlic, rosemary, 3/4 teaspoon salt, other half of the lemon zest, and pepper. Add the breadcrumbs and toss until the chicken is coated. Add 1/2 the chicken to the same skillet used to cook the rosemary and fry until golden and crispy, 2 to 3 minutes on each side. Drain on paper towels. Repeat with the remaining chicken. Sprinkle with the rosemary-lemon salt and serve (with marinara, if you'd like).

Pin It
  • Digg
  • Del.icio.us
  • StumbleUpon
  • Reddit
  • RSS

It's all new to me


I've been doing really well with my weekly real food pledges and have found them to be pretty easy so far.  I breezed through week 1 dealing with fresh fruits and vegetables (and I'm proud to say I'm still conscious of making sure I get my daily quota.)

The challenge during week 2 was to move away from sodas, drink more water and only sweeten your tea or coffee with honey or 100% maple syrup (not the Ms. Buttersworth stuff) in an effort to wean yourself away from refined sugars or artificial sweeteners.  I don't drink sodas, coffee or milk but I do need to drink more water and sweet tea is my weakness.  I've tried a few times in the past to switch completely to unsweetened tea and found it to be the equivalent of drinking dirty water, so I'm not sure I can ever make that total switch (which rolls around as the challenge in week 12.)

I had to push the week 3 challenge a little further down the list simply because of time restraints right now.  The challenge was to purchase only locally raised meats and while we certainly have that option available here in Charlotte (I plan to check out Baucom's Best), I have been in the middle of home renovations and my weekends have been tied up with other obligations and that is pretty much the only time the outlets that sell Baucom's products are open.  In an attempt to totally not ignore the pledge, I purchased some organic chicken and beef, it just wasn't local. 

The pledge for week 4 was easy too because I don't eat fast food or even eat out in a restaurant very much and I don't deep fry.  I will admit to occasionally indulging in Boy Toy's fried chicken wings, just not during the pledge week.

So that brings me to the week 5 challenge which was to try at least 2 new whole foods that you've never tried before. I chose kale and quinoa.  To me, as a former caterer, kale is something that is used to garnish dinner plates or line serving platters and not something that you would actually eat.  It seems that kale chips have been all the rage for several years now and I guess I've been living under a rock because I'd never heard of such a thing until I started researching what in the world to do with garnish kale. I haven't tried the quinoa yet but I'm so glad I gave these kale chips a try because I was very surprised at how much I liked them.  It was a bit like eating crunchy fall leaves, but they were addictive and I couldn't stop eating! 

Check out this link for more ways to enjoy kale and here's a video of my girl crush Hilah Johnson making garlic sesame kale, which is next on my list of ways to try it.


Kale Chips

1 bunch fresh kale, washed and thoroughly dried
1 tablespoon olive oil
1 teaspoon salt
fresh grated Parmesan cheese

Strip the kale leaves from the "rib" and roughly tear them into pieces.  In a bowl, combine kale with olive oil and salt and toss to completely coat the leaves.

Place leaves in a single layer on a baking sheet and sprinkle with Parmesan cheese.  Bake at 350 degrees for approximately 10-15 minutes or until the edges of the leaves turn brown, shaking the pan once during cooking to redistribute the leaves and prevent them from burning (not all of the leaves will turn brown and crisp, so don't try to get them all to look the same.)

These are best when eaten the day of baking.  I had a few left over and they were a bit chewy the next day. 

Pin It
  • Digg
  • Del.icio.us
  • StumbleUpon
  • Reddit
  • RSS

Zo's Pork Heaven

This was taken 5 minutes into the party.  A quick photo snapped with my phone before these became nothing but a figment of everyone's imagination.   

A few months ago Boy Toy and I invited some friends over to watch a football game.  We had the standard party fare - his awesome chicken wings, shrimp, cheese and crackers, chips and dip, and one of my favorite party foods, mini ham and cheese rolls.  Half-time hadn't even rolled around when I realized that both pans of rolls were completely gone. There was nothing but a few crumbs left to verify their existence.

I later found out that Boy Toy's best friend Zo was the culprit for hogging all the ham rolls.  I met said friend during the summer and was really excited to do so because I knew he was Boy Toy's BFF but much to my dismay, our first few meetings were less than cordial.  The friend totally ignored me and barely said three words to me all day.   I mentioned it to Boy Toy but was reassured it was nothing to worry about. It happened the next time we saw each other and yet again a third time and so on.  I took it very personally because I wanted nothing more than to be a nice happy group of friends.  I later came to realize that Zo is just....well, he's just an odd person to say it politely, and it's not just me that he totally ignores.

So fast-forward to this party where he scarfed down 48 of my ham rolls before half-time.  It seems that I hit a soft spot within Zo with these rolls. Information was leaked to me by a reliable source that he declared these rolls "pork heaven" and I haven't been able to attend a gathering since that also included him that I wasn't requested to bring these.

So even though Zo still can't bring himself to do more than grunt a greeting to me and it's still not clear what he thinks of me as a person, it's pretty clear that he likes my cooking. Maybe it is true that the way to a man's heart is through is stomach, but it's not his heart that I'm after. A simple "hello" would totally suffice. I do still take it very personally that he is not at least friendly to me, but every time I make these rolls for him I think maybe this will be the time that he breaks down and slips me a smile or something.  I'm beginning to wonder if there are enough dinner rolls in town to make that happen. 

In addition to great party food, these rolls also work well for breakfast or brunch. I usually prepare them the night before and pour the butter mixture over them just before baking. Sometimes the right kind of dinner rolls can be hard to find - I'm only able to find them at Walmart in my neck of the woods.  The recipe as written is enough for 2 packages of rolls but you can easily cut the recipe in half.  They are good and they will go fast!  If you want to be all fancy pants, I suppose you could take these out of the foil pans and bake them in a baking dish and then serve them on a nice platter but I like the fact that they have their own built-in baking/serving dish and you don't have to worry about accidently leaving your nice stuff at the party (guilty as charged!)

These are my favorite kind of dinner rolls to use.


Mini Ham and Cheese Rolls

2 pkg (24 count) white dinner rolls
20 slices honey ham
20 slices cheese (Swiss, mozzarella or provolone)
Dijon Mustard, to taste
2 Tablespoons poppyseeds
1 stick butter, melted
2 Tablespoons dried minced onion
1 teaspoon Worcestershire sauce

Remove dinner rolls from foil package.  With a serrated knife, slice rolls in half lengthwise.  Spread Dijon mustard on both sides of rolls.  Place bottom half of rolls back into pan. 

Layer ham and cheese on bottom half of rolls and replace top half.  Using the serrated knife, cut each roll into individual sections, taking care not to cut through the foil pan.

In a small bowl, whisk together the poppy seeds and next 3 ingredients. Pour evenly over all of the sandwiches.  Bake at 350 degrees for 12-15 minutes or until cheese is melted and tops are golden brown.

Pin It
  • Digg
  • Del.icio.us
  • StumbleUpon
  • Reddit
  • RSS

A Little Help From My Friend


I was probably about 8 or 9 years old when I started showing an interest in cooking, thanks in part to the 4-H Club in my elementary school and to my mom for letting me help when she was in the kitchen.  I started out making simple things like cookies, biscuits, and corn muffins and I was also responsible for tearing up the cheese slices for my mom's homemade mac & cheese, which was a very important task because that was some seriously good stuff! 

I'm always delighted when Boy Toy's 10-year-old daughter wants to help me in the kitchen.  She already has some really good slicing, chopping and stirring skills and so far her attention span is long enough to pretty much see a project through until the end (minus the cleaning up part, of course).  She doesn't know it yet, but she's getting her own apron for her birthday in March.  Shhhh! 

When working with kids in the kitchen, you have to keep in mind that they are probably going to make a mess and it may not turn out quite the way you planned, but that's okay because the whole point is to get them involved and keep it at their level.  Show them, teach them and fine tune their skills and know that you are teaching them a life skill that will benefit them many times over. 

I had to whip up a quick appetizer for a New Year's Eve party (quick because I had totally forgotten that I was supposed to take something), and I chose these Spicy Sausage and Cheese Tarts that I found on Pinterest from Plain Chicken.  I like Plain Chicken's blog because she has alot of "Football Friday" recipes that are perfect for entertaining or watching sports and I've bookmarked alot of her stuff because Boy Toy occasionally has friends over during football and baseball season and I'm always looking for quick and easy "dude food."

My sous chef pretty much completed this task all by herself - she chopped the pepper, browned the sausage and then mixed all the ingredients together.  She did a bang up job of filling the phyllo cups and even decorated the tray and plated them.  She claimed the whole time that she didn't like sausage and even when she tried one after they were baked she said she didn't like it, but I'd almost swear I saw her sneak one later in the evening when she thought no one was looking. 

Could you say "No" to this tray of treats? I thought not. 


Spicy Sausage and Cheese Tarts
inspired by www.plainchicken.com

1 lb pork sausage
1/2 cup red bell pepper, diced small
2 cups shredded cheddar cheese
8 oz Spicy Hidden Valley Ranch dressing
5 (2.1 ounce) packages frozen mini phyllo shells

Preheat oven to 350 degrees.

Cook sausage in a large skillet, stirring until it crumbles and is no longer pink.   About halfway through cooking the sausage, add bell pepper.  Drain.

Combine the sausage, cheese and Spicy Ranch dressing in a large bowl.

Fill each phyllo shell with a heaping teaspoon of the sausage mixture. (Freeze at this point, if desired.)

Bake for 8-10 minutes, until cheese melts. (Add 2-3 minutes to baking time if baking frozen tarts.)

Makes approximately 75 tarts.

Pin It
  • Digg
  • Del.icio.us
  • StumbleUpon
  • Reddit
  • RSS

Ghosts of Halloweens Past: Caramel Corn


I'm so excited to make this caramel corn again because:

a) it reminds me of my childhood
b) I love to put things in cute little Halloween baggies
c) this stuff is so unbelievably addictingly good

Click on over to the original post and give your Halloween goblins a scary good after-school treat.

Pin It
  • Digg
  • Del.icio.us
  • StumbleUpon
  • Reddit
  • RSS

Seasonally correct salsa


It is with great sadness that I start to adjust my menus for the fall and winter seasons while the rest of the food blogging world becomes ecstatic and rejoices that these seasons have rolled around so they can once again feature the likes of pumpkins, acorn squash and root vegetables on their menus.

The fact of the matter is, I don't really enjoy the fall and winter food offerings as much as I do the summer fruits and vegetables so I try to hold on to the seasons as long as I can by eating and posting seasonally incorrect items. I'm trying to do better, though.  I really am. 

I thought I'd break myself in slowly with this salsa that seemed more appropriate for fall since it featured cranberries and I still had a few bags of fresh cranberries in the freezer left over from last season.  Even though the recipe said not to use frozen, I went with it anyway and it probably accounted for the fact that all of the ingredients in the salsa were ruby red colored - fresh cranberries wouldn't bleed as much color, if any.  In addition to the 1/3 cup brown sugar it called for, I used pretty close to another 1/4 cup to season plus a pinch or two of salt because it was VERY tart and even then it was still just a tad too tart for my taste.  But again, I'm trying.  I really am. 

This salsa appeared in the November 2008 edition of Gourmet magazine and is a good complement when served with turkey or chicken but honestly, I liked it best with good old-fashioned tortilla chips and it seemed to get better, albeit still tart, a few days after it was made.  The saltiness of the chips seemed to balance it out very nicely. 


If this is your season, I'm happy for you. I really am.  I'll just sit over here in the corner and wait patiently for my beloved season to come back around.

Cranberry Pineapple Salsa
as published in Gourmet, November 2008


  • 1 (4-pounds) pineapple, peeled, cored, and cut into 1/2-inch pieces
  • 1medium onion, chopped
  • 1 tablespoon vegetable oil
  • 1 (12-ounces) bag fresh cranberries (3 1/2 cups; not frozen)
  • 1/3 cup packed dark brown sugar, or to taste
  • 1/4 cup Seville orange juice (or 2 tablespoon each of fresh lime juice and regular orange juice)
  • 1 cup packed cilantro sprigs, coarsely chopped

  • Preheat oven to 450°F with rack in upper third.

    Toss pineapple and onion with oil and 1/2 teaspoon salt in a large 4-sided sheet pan, then roast, stirring occasionally, until charred in spots, 40 minutes to 1 hour (Alison's note: 30 minutes was plenty enough time for roasting.  I decided to let it go upwards of 40 minutes but my pineapple started turning into charcoal briquettes shortly after 30).

    Meanwhile, pulse cranberries in a food processor until coarsely chopped, then transfer to a large bowl and stir in 1/3 cup brown sugar.

    Add hot roasted-pineapple mixture, stirring until sugar has dissolved, then stir in citrus juice. Season with brown sugar and salt. Cool, then stir in cilantro. Let stand, covered, 1 hour.

    Note: Salsa, without cilantro, can be made 3 days ahead and chilled. Bring to room temperature and add cilantro before serving.
     

    Pin It
    • Digg
    • Del.icio.us
    • StumbleUpon
    • Reddit
    • RSS

    Summertime Nosh


    With the temperatures in the Queen City reaching all-time record highs of 100+ degrees these past couple of weeks, my summertime meals have become more of a nosh than an actual meal.  The heat just seems to completely zap my appetite and who wants to heat up an already blazing hot kitchen with an oven and long cooking times?

    This quick and easy recipe from Southern Living featuring two of my favorite things: cherries and bleu cheese certainly fits the bill for something light yet satisfying on a hot summer day.  The combination of the sweet cherries and honey, the salty bleu cheese and the savory rosemary and arugula sends the taste buds into deliciousness overload. 

    This is meant to be an appetizer and the kind where you can set out all the individual components and allow your guests to assemble their own crostini or you can assemble and plate in advance.  The cherry compote also keeps for at least a week in the refrigerator.  The only change that I would make from the original recipe next time is to coarsely chop the cherries and possibly even the arugula as leaving them whole made for a pretty hefty crostini and it was awkward to bite into and maintain a lady-like appearance. 

    Stay cool but don't stay out of the kitchen!

    Honey-Rosemary Cherries & Bleu Cheese Crostini
    Southern Living, December 2011

    printable recipe

    1 shallot, thinly sliced
    2 teaspoons olive oil
    1 (12-oz.) package frozen dark, sweet pitted cherries, thawed
    2 tablespoons balsamic vinegar
    2 tablespoons honey
    1/4 teaspoon chopped fresh rosemary
    1/8 teaspoon salt
    1/8 teaspoon pepper
    2 cups loosely packed arugula
    16 (1/4-inch-thick) ciabatta bread slices, toasted
    1 (8-oz.) wedge bleu cheese, thinly sliced*


    1. Drain cherries and coarsely chop, reserving the juice.  Sauté shallot in hot oil in a medium skillet over medium-high heat 2 to 3 minutes or until tender. Add cherries (and reserved liquid) and next 5 ingredients. Cook, stirring occasionally, 8 to 10 minutes or until thickened. Let stand 10 minutes.

    2. Divide arugula among toasted bread slices (you may want to coarsely chop this as well if your leaves are large). Top each with cherry mixture and 1 bleu cheese slice.

    *Manchego or goat cheese may be substituted.

    Pin It
    • Digg
    • Del.icio.us
    • StumbleUpon
    • Reddit
    • RSS

    Who's The Cheesiest?


    Just in time to try and capture the Super Bowl crowd, Domino's Pizza is advertising their Stuffed Cheesy Bread and how great it is. Their claim is that they sampled cheese bread from all the other competing pizza joints and then made theirs even cheesier.

    I've got news for you Domino's....my bread is even more cheesier than the cheesiest bread you could ever dream of creating! With a whopping 1/2 pound of melted mozzarella and Havarti oozing out of this, who could argue??

    This recipe hails from a 2008 issue of Gourmet magazine and claims to be a close replica of a traditional bread from the Republic of Georgia (the country, not the state) called khachapuri. The combination of Havarti and mozzarella is similar to the salted cow's milk cheese called sulguni used in the Georgian version of the bread. Of course we Americans are notorious for putting our own "traditional" spin on things and serving this warm, cheesy goodness with marinara sauce or a garlicky butter sauce would no doubt make this an over-the-top Super Bowl game snack.

    This bread is best right out of the oven but the dough can be made the day before and left to rise slowly in the refrigerator, so you can have a batch of this ready to bake just before kick off or during half-time if you want to avoid another display of total narcissism.


    Georgian Cheese Bread
    Serves 8

    2 1/4 teaspoons active dry yeast (a 1/4-ounce package)
    7 tablespoons warm water (105-115°F)
    1 2/3 cups unbleached all-purpose flour, divided
    3/4 teaspoon salt
    1 large egg, lightly beaten
    1/4 pound Havarti cheese, coarsely grated
    1/4 pound salted mozzarella, coarsely grated
    1 teaspoon unsalted butter, melted

    Sprinkle yeast over warm water and stir in 1 tablespoon flour. Let stand until creamy, about 5 minutes. (If yeast does not activate, start over with new yeast.)

    Stir together salt and remaining flour in a large bowl, then stir in egg and yeast mixture to form a dough.

    Turn out dough onto a well-floured surface and turn to coat with flour, then knead until smooth and elastic, about 5 minutes. Form into a ball and dust with flour. Let dough rest in a bowl, covered with plastic wrap, punching down with a wet fist every hour, at least 2 hours and up to 3.

    Preheat oven to 500°F with rack in middle.

    Turn out dough onto floured pizza pan, turning to coat, then flatten with your fingers into a 7-inch disk.

    Toss together cheeses and press into a compact 3-inch ball with your hands. Place ball in middle of dough, then gather dough up around ball of cheese, squeezing excess dough into a topknot. Press down on topknot with a damp fist to press cheese out from center. Continue to flatten dough and distribute cheese evenly, pressing outward from center, until dough is an 11-inch disk.

    Cut a 6-inch X through top of dough to expose cheese. Bake until pale golden, 10 to 12 minutes. Brush surface of dough with butter and bake until golden and cooked through, 3 to 5 minutes more.

    Cooks' note: • Dough can be made 1 day ahead and chilled in bowl (for a slow rise), covered with plastic wrap. Punch down and bring to room temperature before proceeding with recipe.

    Pin It
    • Digg
    • Del.icio.us
    • StumbleUpon
    • Reddit
    • RSS

    Grab and Go Granola: Perfect for Breakfast On The Run


    I'm stepping out of the closet just long enough to admit that I have a huge girl crush on Nigella Lawson. She is voluptuously beautiful, her show is one of the very few cooking shows worth watching on Food Network, and she has a fabulous granola bar recipe. What more could you want in a relationship?

    I struggle to find things that qualify as a healthy breakfast and can also be made ahead and taken to the office during the week. I tire easily of the same rotation of breakfast selections that I already have and these were a welcome addition. I served them with yogurt and fresh fruit. I'll admit to indulging in them as an afternoon snack as well (truth be known, I scarfed down all 16 bars within a weeks time!) They stayed fresh in a sealed container for the whole week. I'm thinking these would make an excellent after-school snack for the kiddies as well.

    These bars were very easy to put together (I adapted Nigella's original recipe, found here, to make use of what I had on hand), but they do require about an hour to bake. The instructions say to cool in the pan for 15 minutes and then cut into bars. I highly recommend doing just that ~ I was busy taking a nap during those 15+ minutes and it was like blasting concrete out of a baking dish when I finally got around to taking them out a few hours later. I'm betting they would have still been pretty pliable after 15 minutes.

    You make me swoon, Nigella, and your granola bars are the BOMB. Muah!


    Grab & Go Granola Bars
    inspired by Nigella Express by Nigella Lawson

    1 14 fluid oz can condensed milk
    1-1/4 cups rolled oats (not instant)
    1-1/4 Rice Krispie cereal
    1 cup shredded coconut
    1 cup dried berries or raisins (I used a combination of dried cranberries, dried cherries, and dried strawberries)
    1 cup sunflower seeds
    1 cup unsalted, dry roasted peanuts

    1. Preheat the oven to 250 degrees and oil a 9- x 13-inch baking pan or just use a disposable aluminum foil one.

    2. Warm the condensed milk in a large pan.

    3. Meanwhile, mix all the other ingredients together and add the warmed condensed milk, using a rubber spatula to fold and distribute.

    4. Spread the mixture into the oiled or foil pan and press down with a spatula or, better still, your hands (wearing those disposable latex CSI gloves to stop you from sticking) to make the surface even.

    5. Bake for 1 hour, remove, and after about 15 minutes, cut into four across and four down, to make 16 chunky bars. Let cool completely.

    Makes 16

    Pin It
    • Digg
    • Del.icio.us
    • StumbleUpon
    • Reddit
    • RSS

    Trick or Treat!


    When I was a kid, my grandparents would take me on a shopping trip to the mall almost every week and indulge me with gifts.  Being the only grandchild, I was spoiled rotten appreciative of everything they bought for me and one of my most favorite splurges each week was a box of caramel coated popcorn from the now non-existent KarmelKorn shop.  How sad I was when the franchise disappeared from our area malls, but according to their website, there is a location in Norfolk, NE but it only does mail order. 

    The salty-sweet smell alone was enough to draw you into the store and then you had the task of deciding which flavor of popcorn you wanted, but it was always an easy decision for me.  Now, thanks to Gina at Desperately Seeking Gina, I can have caramel corn anytime I want.  Gina made her caramel popcorn for Halloween last year and this year I decided to do the same.  It's excellent for bagging in the cute little holiday treat bags that tempt me from the shelves of my favorite Dollar Tree store and I'm currently the owner of 100 super cute Halloween cello bags. 

    The recipe is fun and simple and I'm posting Gina's version but I had to put a different spin on my treats because once I got to the grocery store, I remembered I needed "Reese's" but thought it was Reese's Pieces instead of the Reese's mini cups (I stood right there in the aisle and looked at them all the while cursing because my store didn't have Reese's Pieces).  So, I went with M&M's and candy corn, but a word to the wise:  do not mix the candy corn in with the caramel and popcorn prior to baking.  Baked candy corn is NOT pretty.  I ended up picking the melted, oozing puddles of corn goo out of the mixture and then adding more as I bagged it.  The M&M's held up sort of okay after baking but quite frankly if I did it again, I'd add those in at the end as well.  I didn't drizzle the white chocolate because I ran out of time and I also wanted to keep it as close to my beloved childhood treat as I could. 

    One batch of the corn went home with the Boy Toy to be shared with his kids but me thinks the Boy ate most of it.  He eventually started nearly cursing me via text because it was so addicting and he couldn't stop eating it.  Another batch went to the office after lunch and I had some happy coworkers by the end of the day and not just because 5 o'clock had eventually rolled around.

    You can trick all you want to this Halloween....I'll be enjoying this tasty treat!

    Caramel Corn
    posted by Gina of Desperately Seeking Gina (notes are Gina's)

    10 cups of popcorn, popped {about 1/2 cup kernels}
    1 cup brown sugar, packed
    1 stick of butter, cubed
    pinch of salt
    1/2 cup light corn syrup
    1/2 cups nuts {I used pecans}
    1 tsp vanilla
    1/2 tsp baking soda
    1/2 cup Reese's Mini pieces
    vanilla wafers or white chocolate for drizzling

    Add nuts to popcorn in a large bowl, set aside. {I divided my popcorn in two-nuts & popcorn in one bowl.  Nuts, Reese's mini pieces, & popcorn in another}

    Place brown sugar in a microwave-safe dish.  Throw in pinch of salt.  Add cubed butter.  Pour corn syrup over this mix.  Microwave on high for 30 seconds. Remove & stir.  Microwave for an additional 2 minutes. Remove & stir. Heat for another 2 minutes until mixture is hot & bubbly. Remove & stir once more.  Handle with care!!

    Add vanilla & baking soda and stir to combine. Mixture will foam, rise, and lighten in color.

    Pour mixture over popcorn and stir until all the nuts & popcorn are covered in caramel-y, gooey goodness.  If you divide your batch in two, like I did-eyeball it & add half the caramel mixture into one bowl, and half into the other bowl.

    Now to finish:

    Place caramel corn on a parchment lined baking sheet or a pan coated with butter flavored cooking spray {this is how I did it}.

    Bake at 250 {preheated} degrees:  10 minutes for chewier caramel corn, or 20 minutes for crunchier.  Stir every 5 minutes! Remove from oven.

    Melt vanilla wafers or white chocolate on high for 1 minute.  Stir to gently melt.  Drizzle over caramel corn and allow to cool.  Once the chocolate has set- break apart and serve.  Enjoy!

    Pin It
    • Digg
    • Del.icio.us
    • StumbleUpon
    • Reddit
    • RSS

    Strawberry Fields Forever


    Field-picked strawberries will always hold a special place in my heart because they remind me of my childhood, so when I had the opportunity to travel back to my hometown and attend the Strawberry Festival it was just like going home and being a kid all over again.

    The Strawberry Festival is still in the infant stages of becoming a large, well-known regional festival like our Apple Festival, but it was created in honor of a man named Wayne Scott who pioneered the strawberry movement in my hometown some 50+ years ago. The weather was not very cooperative this year and eventually put an end to the festivities early, but even still it was a fun time celebrating all things strawberry.

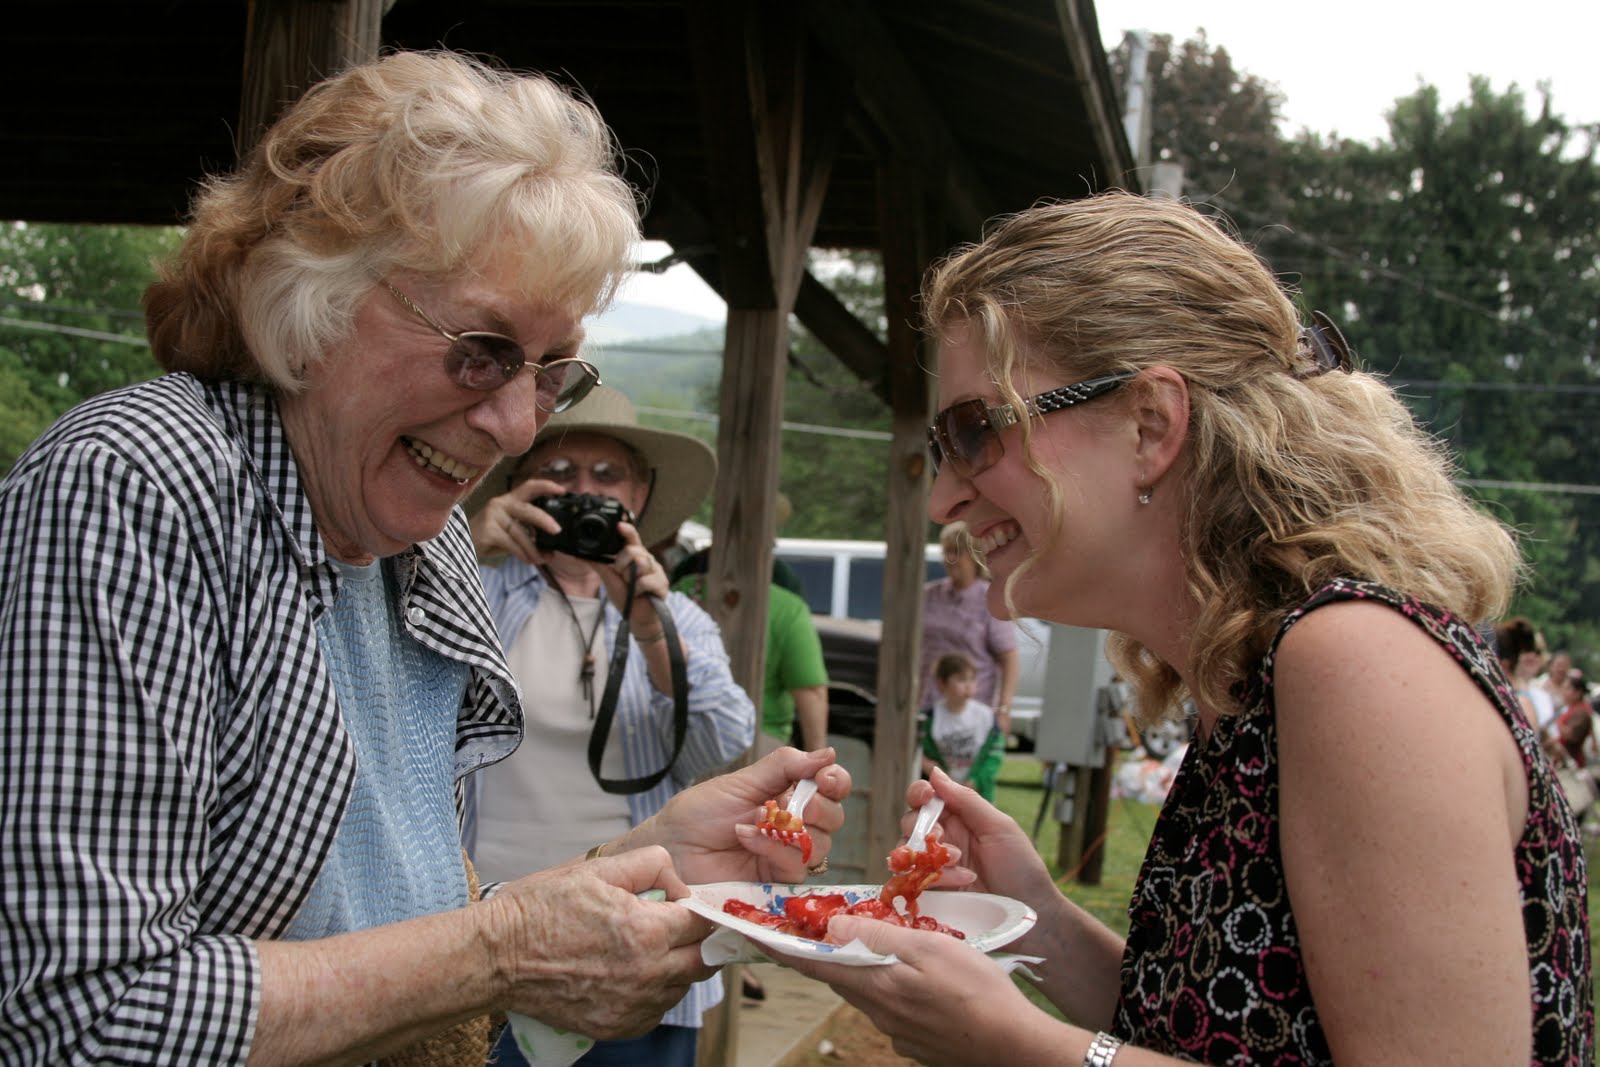
    Sharing a funnel cake top-heavy with fresh strawberries and powdered sugar with my grandmother was one of the major highlights of the festival. You can see from the photo that she had a death-grip on the edge of the plate out of fear that I'd take off running with the thing and not share (I'm not sure why we only children have such a stigma surrounding us about our inability to share.)


    I've shared a recipe for fresh Strawberry Salsa that will now become part of my strawberry season repertoire.  It was something that I tossed together to take to the second picnic gathering of the Charlotte Food Bloggers to celebrate the theme of strawberry picking. I was unable to join the group when they hit the fields to pick their own berries but that didn't stop me from enjoying the fruits of their labor. I was amazed at the creativity and beauty of the dishes brought and I suggest you check out the blogroll and take a look-see for yourself what our fabulous members bring to the table. I find them all to be such an inspiration!

    Homemade cinnamon-sugar dusted tortilla chips were the perfect accompaniment to the sweet and spicy Strawberry Salsa, and now that strawberry season is over, don't be afraid to use store-bought berries in this recipe. Those berries have a firmer texture and they actually hold up better and longer in the salsa than freshly picked berries.


    Strawberry Salsa
    Inspired by Gourmet Magazine

    Ingredients:
    2 fresh jalapeño chilies, finely chopped
    2 cups finely chopped strawberries
    1/2 cup finely chopped white onion
    6 oz. finely chopped dried pineapple
    1/4 cup chopped fresh cilantro
    1 teaspoon fresh lime juice
    1/2 teaspoon salt
    1 teaspoon sugar

    Directions:
    Combine chilies, strawberries, onion, cilantro, lime juice, salt and sugar in a medium bowl. Mix gently to combine. Salsa can be made several hours before serving and chilled. Yield: 3 cups.

    Homemade baked tortilla chips are really easy to make. I used the whole wheat variety but feel free to use the flour ones if you wish. Stack them up together and cut them into 8th ~ cut in half, then half again and then cut each quarter into halves. Brush each triangle with a bit of olive oil and sprinkle with a mixture of cinnamon and sugar. If you'd like savory chips, feel free to use any spice blend you desire! Bake in a single layer on a baking sheet at 350 degrees for approximatly 10-12 minutes or until chips are slightly browned.

    Pin It
    • Digg
    • Del.icio.us
    • StumbleUpon
    • Reddit
    • RSS

    The Cracker Crack Pipe


    Nothing good ever comes of an addiction. Cigarettes make you cough up a lung. Alcohol rots your liver. Porn scorches your eyes. And snacks...well, snacks make your jeans shrink up real tight. They make the scale tip way too far in the wrong direction. Extra pounds appear seemingly overnight. Yet despite the horrible side effects, we think nothing of bending our elbow toward our mouth for another hit from the snack crack pipe.

    My latest snack addiction is these Sensible Portions Pita Bites. You'd think they'd be all good-for-you healthy and stuff and they probably are, but the words sensible and portions should be a clue that CONTROL is key to proper addiction management. When my beloved Harris Teeter advertises these little bites of cracker meth for BOGO, you can bet my pantry is stocked for just those occasions when I'm in desperate need of a hit.

    So what do you think happened the one night that I rounded the kitchen corner, peered into the pantry and suddenly realized I was facing an empty shelf? I got an adrenaline rush, my heart raced, my blood pressure sky-rocketed, I shook like a leaf, my pupils dilated as large as saucers, my hairs stood on end, and I broke into a cold sweat. Classic symptoms of the DTs.

    Thank heavens for Smitten Kitchen's rendition of Gourmet magazine's Crisp Rosemary Flatbreads. Now I can feed the addiction any time I damn well please. If you're a straight shooter like me, you'll enjoy these on their own but they're also perfect with cheeses and any dip or spread that you can conjure up.

    Pass the pipe over this way, would ya? And get me some bigger jeans while you're at it.


    Crisp Rosemary Flatbread
    Adapted from Gourmet, July 2008
    Stolen shamelessly from Smitten Kitchen. (All notes are those of SK's)

    Nothing could be easier than making this cracker, but that doesn’t mean you shouldn’t tell people you slaved all day over it because they’re going to be impressed, really impressed, and I see no reason not to milk it.

    I think you could easily swap the rosemary for other herbs, such as thyme or tarragon, or punch it up with black pepper or other spices, but personally, I like it just the way it is here.

    1 3/4 cups unbleached all-purpose flour
    1 tablespoon chopped rosemary plus 2 (6-inch) sprigs
    1 teaspoon baking powder
    3/4 teaspoon salt
    1/2 cup water
    1/3 cup olive oil plus more for brushing
    Flaky sea salt such as Maldon

    Preheat oven to 450°F with a heavy baking sheet on rack in middle.

    Stir together flour, chopped rosemary, baking powder, and salt in a medium bowl. Make a well in center, then add water and oil and gradually stir into flour with a wooden spoon until a dough forms. Knead dough gently on a work surface 4 or 5 times.

    Divide dough into 3 pieces and roll out 1 piece (keep remaining pieces covered with plastic wrap) on a sheet of parchment paper into a 10-inch round (shape can be rustic; dough should be thin).

    Lightly brush top with additional oil and scatter small clusters of rosemary leaves on top, pressing in slightly. Sprinkle with sea salt. Slide round (still on parchment) onto preheated baking sheet and bake until pale golden and browned in spots, 8 to 10 minutes. Transfer flatbread (discard parchment) to a rack to cool, then make 2 more rounds (1 at a time) on fresh parchment (do not oil or salt until just before baking). Break into pieces.

    Flatbread can be made 2 days ahead and cooled completely, then kept in an airtight container at room temperature.

    Pin It
    • Digg
    • Del.icio.us
    • StumbleUpon
    • Reddit
    • RSS

    Life of a Pioneer

    It seems like only yesterday I thought about what I'd say if I were giving a commencement speech to the class of 2010 and here it's already time for the Class of 2011 to sharpen their pencils and break out their new Blue Horse notebook. The TV is full of back-to-school shopping ads which cause my nights, even twenty years later, to be filled with the typical first-day-of-school anxiety dreams.

    Since I've already advised last year's graduating class, allow me to start this school year off by spewing words of advice for teachers, especially history teachers. When I was a kid, we'd open our American History books to Page 1 and begin. Every. Single. Year.

    Thanks to that, I can kick some serious booty in Trivial Pursuit when it comes to questions about Christopher Columbus, Pilgrims, and pioneers. Just as we'd get to the good stuff, it was time to close the books for summer, and you guessed it....Page 1 was always waiting for us the next school year, just like we'd never seen it before in our lives. When you get past the 4th or 5th grade, there's really no need to remind us that Columbus sailed the ocean blue in 1492 and the pioneers lived in log cabins and fought Indians. Is it so wrong to skip a few chapters and learn about more recent stuff like the JKF administration, World Wars, and communist China? Evidently.

    The only pioneer I care to know anything about these days is Ree Drummond aka Pioneer Woman. You can read about PW's story, Black Heels to Tractor Wheels, as she tells it far better than I ever could, but her main claim to fame is that she was a bonafide city girl who fell in love with and married an Oklahoma rancher known as Marlboro Man and became an "accidental country girl." She, like so many of us bloggers, started documenting her thoughts and ramblings and before long she had millions (literally) of followers, a cookbook, book tour and an upcoming movie about her life (unlike so many of us bloggers). Just like the pioneers in my history book, she lives in a farmhouse (albeit a VERY NICE farmhouse) and her family works the land and farms cattle and horses.

    There are lovers and haters of Pioneer Woman and I'll admit that I don't follow her on a regular basis anymore simply because I have a short-lived attention span but you can read and decide for yourself if you think she's really "keeping it real." I fall into the category of thinking that Ree started her story as a real thing but soon realized that she had a knack for story-telling and capturing an audience and used it much to her benefit. Personally, I'm inspired by her progress and find motivation in her ability to build an empire based on herself. What she's accomplished is really no different than the likes of Martha Stewart or any other self-made female. And like all females who pioneer the frontier of breaking the glass ceiling and carving a name for themselves, she must also fight the Indians of ridicule.

    I did not feel motivated, however, to stand in line for hours and hours on end to get my copy of her cookbook signed when she recently visited the Queen City on her book tour. I left my copy at the desk for Ree to sign and picked it up a few days later. The book is beautifully illustrated and while it doesn't contain any new, earth-shattering recipes, it does bring back to mind some long forgotten favorites that have been tucked away in my recipe box for eons. Again, I bought the book simply for inspirational value and it will soon claim it's rightful place on my over-burdened cookbook shelf.

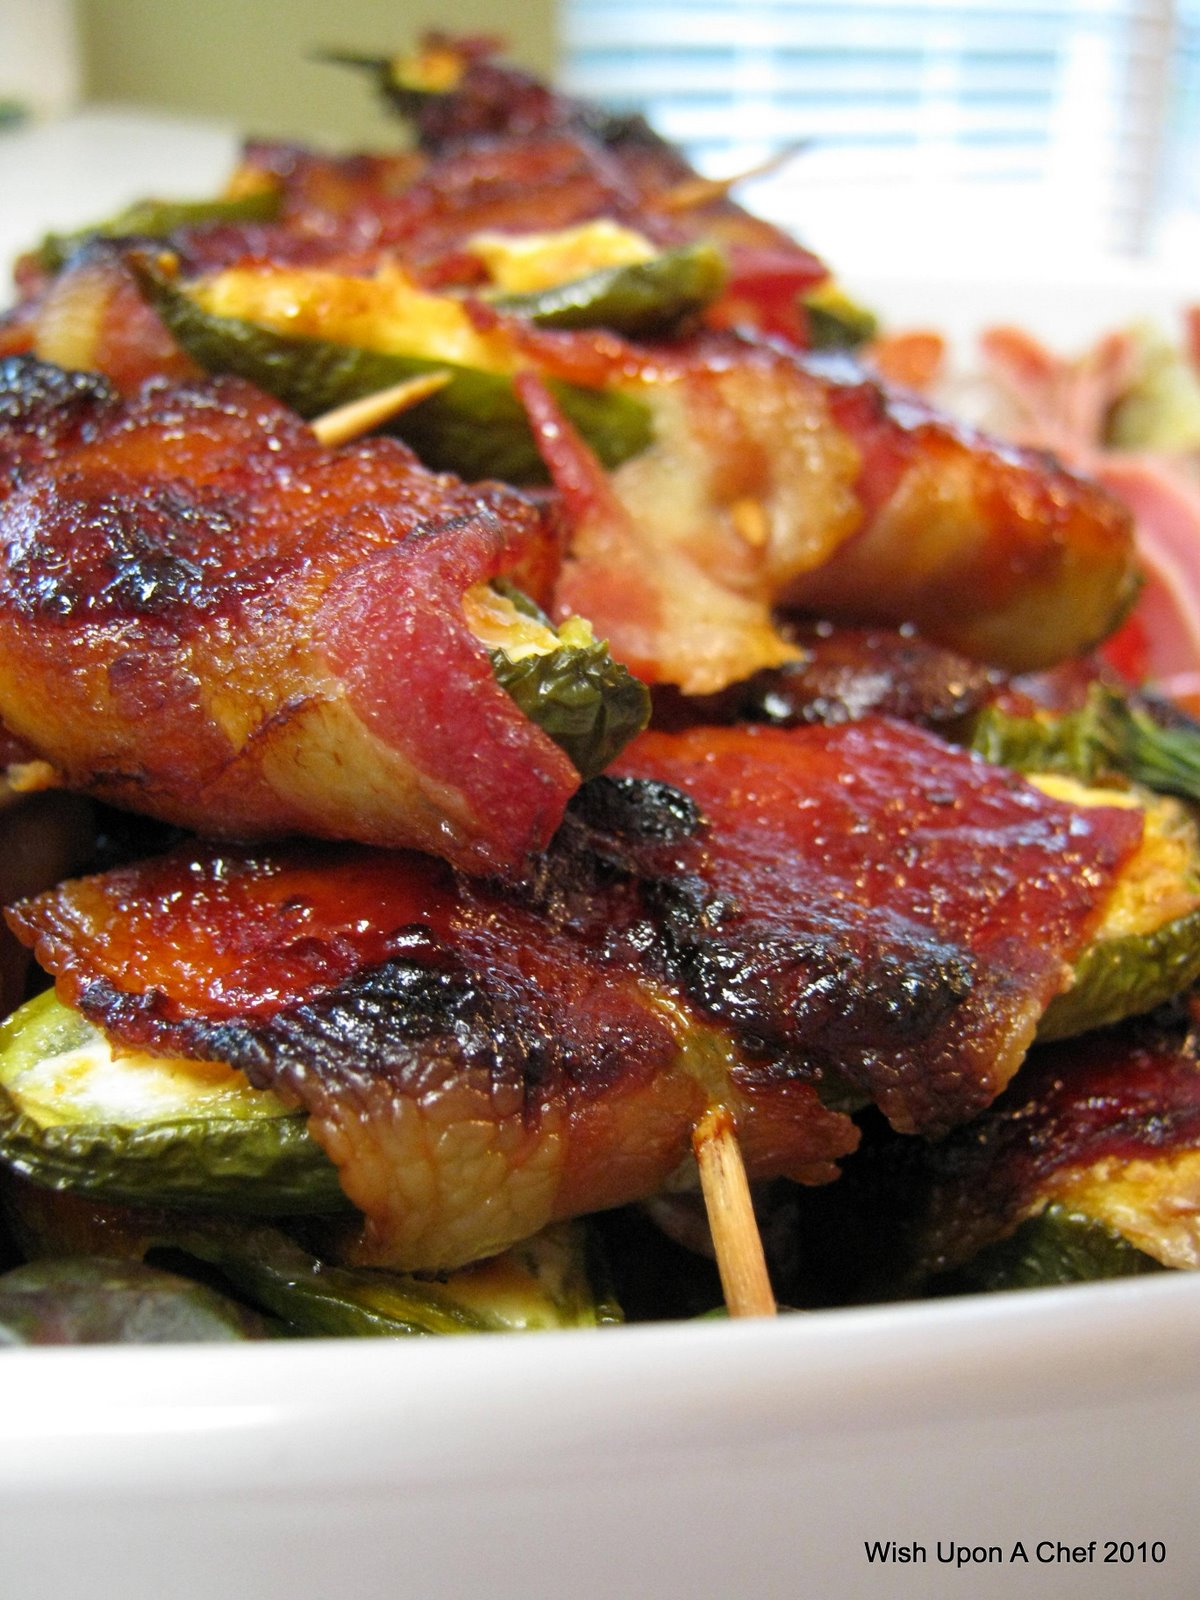
    Before I close the book on this piece of blog history, I'll leave you with Pioneer Woman's recipe for jalapeno poppers, which I made for a cookout last weekend. In an effort to "keep it real," my next post will detail how these things caused myself and all other party guests to nearly die alone on the prairie with a severe case of heartburn. Zantac anyone?

    Pioneer Woman's BBQ Jalapeno Poppers

    18 fresh jalapeños
    One 8-ounce package cream cheese
    ½ cup grated cheddar cheese
    1 green onion, sliced
    18 slices thin bacon, cut into halves
    Bottled barbecue sauce
    Toothpicks
    Rubber gloves (or plastic bags) for working with jalapeños

    Preheat the oven to 275ºF.

    Begin by cutting jalapeños in half lengthwise. Try to keep the stems intact. They look prettier that way.(Important: Wear gloves when working with fresh jalapeños or you'll curse the ground on which I walk because you'll wake up in the middle of the night with throbbing fingertips. And that's nothing compared to what happens if you accidentally scratch your eye—or worse, something else.)

    With a spoon, scrape out the seeds and light-colored membranes. Remember: The heat comes from the seeds and membranes, so if you can handle the sizzle, leave some of them intact.

    Now, in a bowl, combine the cream cheese, cheddar cheese, and chopped green onion. Mix the ingredients together gently. And don't feel you have to use an electric mixer. I do because I'm lazy and don't like to exert myself. Ever. (Too much scrubbing clothes on the washboard, I suppose.)

    Next, stuff each hollowed jalapeño half with the cheese mixture.

    Wrap bacon slices around each half, covering as much of the surface as you can. Be careful not to stretch the bacon too tightly around the jalapeño, as the bacon will contract as it cooks.

    Brush the surface of the bacon with your favorite barbecue sauce. Chutney or apricot jelly works well, too!

    Secure the jalapeños with toothpicks and pop them in the oven for 1 hour, or until the bacon is sizzling.

    Serve hot or at room temperature, and watch them disappear within seconds. I've seriously caught guests stuffing these into their purses. Sometimes I have to call law enforcement.

    Variations:

    For a simpler version, omit the cheddar and green onion from the cream cheese.

    Cut sliced peaches or pineapple into small bits and press them into the cream cheese before wrapping the jalapeños in bacon.

    Use Pepper Jack cheese in place of the cheddar cheese.

    Pin It
    • Digg
    • Del.icio.us
    • StumbleUpon
    • Reddit
    • RSS

    It really is that good......


    Granola is one of those foods that I never really liked until I started making it myself. The store bought stuff is always dry, essentially tasteless, hard as a rock, and loaded with yucky raisins. And let's face it, the stuff's not cheap. I ran across this recipe on the message forum that I mentioned in my last post and according to the poster, it is loosely based on a recipe by my idol, Ina Garten. The first time I made this granola, I decided it was a keeper so now we make it in the catering kitchen to bag and sell in the gourmet market. It's versatile in the sense that you can use whatever dried fruits that you want and the recipe can be halved or doubled, depending on how much you want to make. I revised the cooking time and temp a bit from the original version and made a few notes about the type of fruits and nuts that I used - pineapple, papaya, dried cherries, and dried blueberries (no yucky raisins!) and I picked up a can of Planter's Cashew Lover's mix.


    I made this granola at home with the good intention of storing it on my counter in a pretty glass jar and using it to spoon into yogurt (another good intention of trying to eat a little something in the mornings so my blood sugar doesn't do a nose dive before I get around to eating lunch). The stuff was so moist, tasty, and (no raisins) loaded with fruit that once I started nibbling on it, I couldn't stop!! I'm somewhat ashamed to say that the entire jar of granola was gone in only a couple of days.


    * Exported from MasterCook *

    Granola

    Categories : Breakfast

    Amount Measure Ingredient -- Preparation Method
    -------- ------------ --------------------------------
    4 cups quick-cooking oats
    2 cups sweetened coconut flakes
    2 cups favorite mix of nuts
    3/4 cup vegetable oil
    1/2 cup honey
    4 1/2 cups favorite dried fruits -- small dice

    Preheat the oven to 325 degrees F.

    In a large bowl, combine the oats, coconut, and nuts. Whisk together the oil and honey in a small bowl. Pour over the oat mixture and stir with a wooden spoon until all the oats and nuts are coated. Pour onto a 13 by 18 by 1-inch sheet pan lined with parchment paper.

    Bake, stirring occasionally with a spatula, about 15 minutes. Increase oven temp to 350 and continue cooking for 5 more mins, until mixture turns golden brown.

    Remove the granola from the oven and allow to cool, stirring occasionally. Add the dried fruit mixture and mix well. Store the cooled granola in an airtight container.

    Yield:
    "12 cups"
    - - - - - - - - - - - - - - - -


    Pin It
    • Digg
    • Del.icio.us
    • StumbleUpon
    • Reddit
    • RSS