RSS

I currently live in Charlotte, NC and after spending 7 years as a personal chef and caterer, I am now happy to share my love of cooking with friends and family. My heart is in the kitchen, but my soul is in the stars!

Showing posts with label vegetarian. Show all posts

Port Wine Cranberry Chutney


I can't help but feel a little resentment when it comes to preparing food for others for the holidays.   Boy Toy is King of the deep fryer, so for the last two Thanksgivings I've been in charge of preparing side dishes to compliment his beautiful birds.  We host his family members for the meal and I understand that my idea(s) of tradition may be somewhat foreign to others.

My family's Thanksgiving meal consisted of most things that I continue to prepare today and for two years now, most of my food has gone untouched because it is not what Boy Toy's family is used to.  As time has gone by and the more I've socialized with them around the table, I've come to realize that most of his family members are used to (and prefer) processed, packaged foods.  The mashed potatoes they know come from a box, green beans come from a can, and bread is from a plastic bag with directions to "brown and serve."  I know that people tend to stick with what they are familiar with and what they like, but it is very disheartening when my hard work and love go into food that is greeted by grimaced faces and rude comments (someone actually told me they "wouldn't cross the street" for my made-from-scratch chicken tetrazzine.  He ended up eating a sleeve of saltine crackers for dinner that day.)

Last year I made the declaration that I would no longer spend so much time, energy and money preparing what I thought was "good" food for the holiday.  But as I started giving thought to the menu for this holiday season, I had a revelation.  I decided that I would continue to make my "weird" food and they could take it or leave it.  I made reference in my last post about there being no time like the present to introduce real food to Boy Toy (who is a little more open-minded about my food) and his kids and I'm going to continue with that mindset.  I'm not going to compromise what I love about Thanksgiving - especially when I am tasked with preparing the food.  Hopefully as my food continues to appear on the table year after year, someone will give in, try it, and decide it's not so bad after all.

This year I'm arriving at the Boy Toy home loaded down with cornbread dressing, creamed corn, spinach casserole, made-from-scratch green bean casserole, sweet potato casserole, pumpkin pie, cranberry tart.  and this port wine cranberry chutney.

I will be thankful for the opportunity to spend time in my kitchen preparing the things that I love and everyone else can be thankful that McDonald's is open!

Port Wine Cranberry Sauce 
servings = makes about 2 cups

½ cup ruby port
Zest of 1 orange
½ cup fresh orange juice
12 ounces fresh cranberries
¼ cup honey
2 tablespoons candied ginger, chopped

In a medium saucepan, combine port wine with orange zest and orange juice and bring to a boil. Add the cranberries, honey and ginger and simmer over medium-low heat until the sauce is jam-like, about 15-20 minutes. Transfer to a serving bowl and serve warm or at room temperature.

Can be made ahead and refrigerated for up to 2 weeks.

Pin It
  • Digg
  • Del.icio.us
  • StumbleUpon
  • Reddit
  • RSS

Something old, something new


At the first of the year, I vowed to move my diet away from processed and non-organic foods and toward more real and organic items.  I'm nine months into the change and if I had to grade myself on my progress, I'd have to admittedly give myself a solid "C."  Sometimes I think I'm doing good/above average and sometimes I feel like a complete failure.  I applaud myself for being more conscious of the things that I buy - I no longer fall victim to the buy one, get one free schemes at the grocery store because most of those items are not suitable to a real food lifestyle.  My biggest problem was/is that my pantry was already so full when I started the challenge and being the frugal gal that I am, I didn't want to just toss it all out and start fresh.  I had the attitude that I would work my way through it and slowly replace my pantry staples with suitable things.  But can you believe that nearly nine months later I am STILL eating my way through most of those items?! 

I'm starting to see organic items take the place of my most frequently used items like diced tomatoes, beans and olive oils.  I've stopped buying sugar, white flour and other baking supplies that used to populate my shopping lists.  I've started purchasing local meats from Windy Hill Farm and organic produce from Simply Fresh. But I'm in a quandary as to what to do with the non-local/organic meats in my freezer and processed items still in my pantry - at the rate that I'm going, I'm still going to be eating processed food items in the year 2037.  I have half a mind to pull everything out and segregate it into a box and anytime I need to prepare food for someone other than myself, I'll use those items. 

I've also been challenging myself to try new things and it was back in March that I took this challenge to try quinoa.  I tried a cold salad recipe that incorporated feta cheese and fresh cherries - two things that I absolutely love on their own but it was not a hit when combined with the quinoa.  I ended up picking out and only eating the fruit and cheese so I tabled the quinoa challenge for awhile but was determined not to give up. 

And then I found this recipe in a Martha Stewart magazine for Quinoa and Spinach Pilaf and it instantly made a quinoa lover out of me.  I loved the simplicity and the savory flavors.  The recipe made alot more than what I consider four servings, so I portioned it up for the freezer, which made me love it even more!


Quinoa and Spinach Pilaf
Serves 4
recipe from Martha Stewart

Printable Recipe

1 tablespoon unsalted butter
1 finely chopped small yellow onion
1 minced clove garlic
1 cup rinsed quinoa
1 1/4 cups water
5 cups baby spinach (5 ounces)
1 tablespoon grated lemon zest

In a large saucepan, melt butter over medium. Add onion and garlic; cook until soft, about 4 minutes. Add quinoa and cook 1 minute. Add water and bring to a boil. Reduce heat and simmer, covered, until water is absorbed, about 20 minutes. Stir in spinach and lemon zest, then season with salt and pepper.

Pin It
  • Digg
  • Del.icio.us
  • StumbleUpon
  • Reddit
  • RSS

Got Eggplant?


Despite a ridiculously rainy summer, this year's garden bounty was still fairly decent and it's a good thing too, because I put alot of money and effort into revamping my garden space earlier this year. 


The Boy Toy was kind enough to haul my 300 pounds of crap and I nearly chopped off a few appendages and almost destroyed my fence while using my birthday present (thanks Pop!)
 

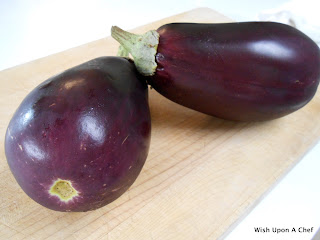
Unfortunately, my squash and zucchini never lived to see the light of day thanks to hungry wascally wabbits and some of my tomatoes fell victim to the monsoon conditions, but overall I was still happy with the results.  I was so excited to see these two lovely eggplants and the first order of business was to transform them into one of my all-time favorite dishes:  Eggplant Parmesan.  I'm even more excited that there are more eggplants coming along in the garden and they're slated for this fear inducing Ina Garten recipe.


Always quick and easy to prepare, this dish is also freezer-friendly.  Just prepare it up to the point of baking and pop it into the freezer to be thawed and prepared at a later date. 


Eggplant Parmesan
Serves 6

Printable recipe

1 large eggplant
flour
salt and pepper
2 eggs, beaten
2/3 cup vegetable oil
1 6-oz can tomato paste
2 16-oz cans diced tomatoes
1 cup water
fresh parsley, chopped
1-1/2 cup mozzarella cheese
2 cups freshly grated Parmesan cheese

Combine tomatoes, tomato paste, water, and parsley in a medium sauce pan.  Season with salt and pepper.  Simmer, uncovered, about 1 hour or until thickened, stirring often.

Prepare two plates:  one with flour seasoned with salt and pepper and the other with eggs.  Peel and slice the eggplant into 1/4" thick slices.  Season each slice liberally with flour, shaking off excess.  Dip slices into egg.

Heat oil in large skillet and fry slices a few at a time until golden brown, turning once.  Drain well on paper towels.

Spoon a thin layer of sauce in a baking dish  Arrange half of the eggplant slices, overlapping, over sauce.  Top with more sauce and half of the mozzarella and Parmesan cheeses.  Repeat layers.

Bake 400 degrees for 20-30 minutes or until sauce is bubbly and cheese is melted.  

Pin It
  • Digg
  • Del.icio.us
  • StumbleUpon
  • Reddit
  • RSS

I'm learning to love you


Sweet potatoes are something that I've had to learn to like through the years.  Held in a higher regard and deemed healthier than white potatoes,* I used to only enjoy sweet potatoes when baked and slathered with mounds of butter and honey (and no Thanksgiving or Christmas dinner is complete without a sweet potato casserole piled high with melted gooey marshmallows, am I right?)  But surely all of the added fat, sweetness and calories cancels out anything remotely healthy about the tubular root. 

Up until a few weeks ago, I would've described my feelings for sweet potatoes as "Take 'em or leave 'em.  I just eat them because they say I should."  But then I started ordering organic produce from Backyard Produce and having it delivered right to my door.  I included something called garnet sweet potatoes in one of my orders and fully expected a bunch of impressive looking gourmet ruby-colored potatoes to show up on my doorstep.  Instead, they were your Average Joe regular looking sweet potatoes.  But as I sat down to enjoy my dinner that evening, I realized they were far from just an average sweet potato that had done nothing much to win my affections before. 

A garnet sweet potato, I learned after a bit of research, gets its name not because of its flesh color but instead its skin has a more reddish hue than other varieties of potatoes.  And let's just say that I was blown away by the amount of flavor packed into these spuds.  Organic foods have more flavor than non-organic or genetically modified items because they aren't pumped full of the equivalent of steroids to make their production larger and bulkier. When you interfere with the natural process, you essentially grow any flavor right out.  These potatoes had the perfect amount of  sweetness and flavor and I chose to roast them with fresh rosemary and a drizzle of olive oil which concentrated the flavors even more. 

Thank you Backyard Produce for delivering right to my door and for introducing me to how sweet sweet potato love can be!  To find out more about Backyard Produce's delivery service and see if you are in one of their many delivery zones, check out their website and get signed up today. 


Roasted Sweet Potatoes with Fresh Rosemary

Printable Recipe

Sweet potatoes, peeled and cut into medium-sized chunks
Olive oil for drizzling
Kosher salt and freshly ground pepper
Fresh rosemary, leaves removed from stem and chopped

Preheat oven to 400 degrees.  Drizzle potatoes with olive oil (about 2 or 3 tablespoons, depending on how many potatoes you use.  You just want a light coating of oil) and sprinkle generously with salt, pepper and fresh rosemary.  Toss potatoes to coat and spread them on a baking sheet in a single layer. 

Roast for about 15-20 minutes, stirring once, or until potatoes start turning golden brown.  Season with more salt and pepper, if desired. 


*When the health benefits of a sweet potato versus a white potato are studied a bit closer, it seems that both have benefits in their own right and one isn't necessarily more healthy than the other.  There is not alot of difference between the spuds nutritionally - calorie, fat and protein counts are relatively similar.  Sweet potatoes contain anti-oxidants, beta-carotene and Vitamin C whereas white potatoes contain folate and have more dietary fiber.  The glycemic index of both depend on how it's prepared for consumption.  I may not be a doctor and I've certainly never played on on TV, but I'm prescribing my theory of "all things in moderation" when it comes to incorporating either sweet or white potatoes into my diet. 

Pin It
  • Digg
  • Del.icio.us
  • StumbleUpon
  • Reddit
  • RSS

Meatless Monday


I cannot stress how much I LOVE summer produce.  Meats become pretty much non-existent in my summertime meals because I prefer to feast mainly on the bounty of fresh fruits and vegetables available from farmers markets and from my Backyard Produce delivery service. 

Eggplant Caprese may be considered just a snack or appetizer for some folks but combined with some freshly baked hearty bread, it makes an entire meal for me.  Choose the best quality ingredients you can find because the sum of this dish is only as good as its individual components.  Pull out your best EVOO, choose the ripest heirloom tomato and the freshest Mozzarella and savor the flavors of summer!

I'm sharing my quick trick for turning a not-so-expensive balsamic vinegar into an expensive tasting one and it only takes about 5 minutes of your time.  It takes this fresh combination of flavors totally over the top!


Eggplant Caprese

Printable Recipe

Ingredients: 
1 small-medium eggplant
1 large ripe tomato
1 ball of fresh Mozzarella
1 to 2 tablespoons extra-virgin olive oil
Salt & freshly ground black pepper
Chopped fresh basil
Balsamic vinegar*

Preheat your oven to 500 degrees (or use the "broil" setting).

Wash the eggplant and cut it into 1/2" inch thick slices.  Slice the tomato and Mozzarella in slices as well.

In a large skillet, heat olive oil over medium heat.  Season eggplant slices with salt and pepper and place the eggplant slices into the pan.  Drizzle with a little more oil, if needed.  Fry eggplant, turning once, for about 2 minutes or until golden brown, but not too soft.  Remove eggplant from the pan and place in an ovenproof dish. Top each slice with a slice of tomato and a slice of Mozzarella. Season with more salt & pepper. Place dish in the oven for about 2 minutes or until Mozzarella starts melting. Remove from the oven, sprinkle with some chopped basil and a little balsamic vinegar.

*If you're using an inexpensive balsamic vinegar and would like to turn it into a delicious and expensive tasting vinegar, just pour about 4 times as much vinegar as you're going to need into a small saucepan.  Bring to a boil and allow vinegar to simmer for about 2-4 minutes.  Allow it to reduce until it's slightly thinner than what you want because it will continue to reduce after you take it off the heat.   Drizzle over meat, fish, fruits or vegetables. 

Pin It
  • Digg
  • Del.icio.us
  • StumbleUpon
  • Reddit
  • RSS

It's all new to me


I've been doing really well with my weekly real food pledges and have found them to be pretty easy so far.  I breezed through week 1 dealing with fresh fruits and vegetables (and I'm proud to say I'm still conscious of making sure I get my daily quota.)

The challenge during week 2 was to move away from sodas, drink more water and only sweeten your tea or coffee with honey or 100% maple syrup (not the Ms. Buttersworth stuff) in an effort to wean yourself away from refined sugars or artificial sweeteners.  I don't drink sodas, coffee or milk but I do need to drink more water and sweet tea is my weakness.  I've tried a few times in the past to switch completely to unsweetened tea and found it to be the equivalent of drinking dirty water, so I'm not sure I can ever make that total switch (which rolls around as the challenge in week 12.)

I had to push the week 3 challenge a little further down the list simply because of time restraints right now.  The challenge was to purchase only locally raised meats and while we certainly have that option available here in Charlotte (I plan to check out Baucom's Best), I have been in the middle of home renovations and my weekends have been tied up with other obligations and that is pretty much the only time the outlets that sell Baucom's products are open.  In an attempt to totally not ignore the pledge, I purchased some organic chicken and beef, it just wasn't local. 

The pledge for week 4 was easy too because I don't eat fast food or even eat out in a restaurant very much and I don't deep fry.  I will admit to occasionally indulging in Boy Toy's fried chicken wings, just not during the pledge week.

So that brings me to the week 5 challenge which was to try at least 2 new whole foods that you've never tried before. I chose kale and quinoa.  To me, as a former caterer, kale is something that is used to garnish dinner plates or line serving platters and not something that you would actually eat.  It seems that kale chips have been all the rage for several years now and I guess I've been living under a rock because I'd never heard of such a thing until I started researching what in the world to do with garnish kale. I haven't tried the quinoa yet but I'm so glad I gave these kale chips a try because I was very surprised at how much I liked them.  It was a bit like eating crunchy fall leaves, but they were addictive and I couldn't stop eating! 

Check out this link for more ways to enjoy kale and here's a video of my girl crush Hilah Johnson making garlic sesame kale, which is next on my list of ways to try it.


Kale Chips

1 bunch fresh kale, washed and thoroughly dried
1 tablespoon olive oil
1 teaspoon salt
fresh grated Parmesan cheese

Strip the kale leaves from the "rib" and roughly tear them into pieces.  In a bowl, combine kale with olive oil and salt and toss to completely coat the leaves.

Place leaves in a single layer on a baking sheet and sprinkle with Parmesan cheese.  Bake at 350 degrees for approximately 10-15 minutes or until the edges of the leaves turn brown, shaking the pan once during cooking to redistribute the leaves and prevent them from burning (not all of the leaves will turn brown and crisp, so don't try to get them all to look the same.)

These are best when eaten the day of baking.  I had a few left over and they were a bit chewy the next day. 

Pin It
  • Digg
  • Del.icio.us
  • StumbleUpon
  • Reddit
  • RSS

Are you meeting your quota?


Last week I announced my plan to move toward more real food and away from processed ingredients. Real food can be defined as a "product of nature more so than a product of industry." It is whole fruits and vegetables, whole grains, nuts and seeds. It is organic and humanely raised meats and wild-caught seafood.  Whole dairy products are also in this category. It is the way our predecessors ate before the rise of manufacturing, industry and government took over our food production. You can think of real food as something that comes from the ground or from a plant or tree or as something that has a mother.

Real food does not contain preservatives and ingredients that you cannot pronounce. It is not artificially colored, flavored or sweetened. It does not have the shelf-life of a millennium. Real food is not dispensed from a drive-thru window.

Most times when you make a decision to change, the first impulse is to discard everything that has to do with the old habit and make a complete and immediate 100% change in every aspect.  Quite frankly, this is nothing but a set up for failure.  Making a lifestyle change is something that takes time and should be a gradual change so that it is not so much of a shock to your system.  Kitchen Stewardship sums it up best by equating your real food journey to learning to read and write.  As a child you didn't just one day pick up a pencil or book and start to read and write.  You learned to recognize letters.  Learned what sound they made.  Learned how to write them.  Learned to put letters together to form words.  And before you knew it, you were reading and writing for the rest of your life!  Although we are far from being little kids now, the fundamentals are still the same:  take small steps and learn as you go.  I won't be immediately clearing out all processed food ingredients from my pantry and refrigerator and completely changing my diet right away - I plan to use up what I have and replace it with more suitable items as I progress. 

100 Days of Real Food has done an excellent job of taking the overall move to real food and breaking it down into smaller, easy to follow steps.  I'm currently working my way through the 14 weeks of mini-pledges.  The week 1 pledge asks that you incorporate at least two different fruits/vegetables with each meal.  I was always under the assumption that I ate alot of fresh fruits and veggies, but do I meet the quota of at least two per meal? No. This pledge made me mindful of doing so.  Lunch and dinner aren't so much of a problem for me, but breakfast is tough because I'm not a big fan of breakfast and a piece of raw fruit will sometimes upset my stomach. It is also hard to continuously think of healthy and easy things to eat when you are a desk-jockey limited to a toaster and a microwave. I do try to throw in a few extra pieces of fruit during the day as a snack, so I think it all balances out in the end. 

Fresh vegetables are so easy to incorporate into your meals - they can take mere seconds to prep and only minutes to cook.  I wanted to share a few of my favorites with you although there is no actual recipe for any of them.  I roast alot of my veggies and I could literally eat an entire pound of roasted asparagus myself.  Snap the tough woody ends from the stalks (about 1 or 2-inches from the bottom), wash and dry them well.  Arrange the stalks in a single layer on a baking sheet and drizzle them with olive oil  (1 to 2 teaspoons), sprinkle with salt and pepper.  Roast for about 8-10 minutes at 400 degrees.  Give the pan a good shake at least once to make sure the asparagus isn't sticking or getting too done in one spot.  Once it comes out of the oven, grate some fresh lemon zest over the top and if I'm feeling all fancy schmancy, I'll crumble some creamy tangy goat cheese on top.  Yum!


I use the same technique for cauliflower, broccoli and whole cloves of garlic except they need to roast just a little bit longer, maybe more like 12 to 15 minutes.  If you have some baby carrots, throw those in as well.  They are pretty much the same density and take about the same amount of time to roast.  When you put them into the serving bowl, make sure you get all of the olive oil from the baking pan as well.  I usually finish this off with a sprinkle of sea salt.
 

I love this medley of vegetables that I call "farmstand saute."  You can adapt it to use pretty much any combination of fresh veggies that you have on hand.  I usually have squash, zucchini, bell peppers, onions and cherry tomatoes.  Add about 2 teaspoons of olive oil in a non-stick skillet (sometimes I add just a bit of butter too) and bring to medium-high heat.  Add your veggies along with some salt and pepper and any seasonings that you'd like.  If you use dried herbs, you can add them now but if you use fresh ones, wait until the last minute or so of cooking.  I use either dried Italian seasoning or fresh dill that grows rampant in my yard and flower beds.  Saute for about 8 to 10 minutes or until the veggies are crisp-tender (if you are using cherry tomatoes, add them about when there's only about 5 minutes left to cook as you don't want to overcook them).  Now here's the best part....

During the last minute of cooking, add a splash of vinegar - my favorite is rice wine vinegar, but you can use any kind of flavored vinegar that you'd like.  It adds a bit of unexpected freshness to your veggies.  I get rave reviews every time I prepare it. 


See?  It's as easy as that to add real food to your diet.  Don't be afraid to try different techniques of preparing vegetables - roasting, sauteing, or steaming - as each method brings out different flavors in whatever you are cooking.  Go forth and experiment and have some real food!

Pin It
  • Digg
  • Del.icio.us
  • StumbleUpon
  • Reddit
  • RSS

Seasonally correct salsa


It is with great sadness that I start to adjust my menus for the fall and winter seasons while the rest of the food blogging world becomes ecstatic and rejoices that these seasons have rolled around so they can once again feature the likes of pumpkins, acorn squash and root vegetables on their menus.

The fact of the matter is, I don't really enjoy the fall and winter food offerings as much as I do the summer fruits and vegetables so I try to hold on to the seasons as long as I can by eating and posting seasonally incorrect items. I'm trying to do better, though.  I really am. 

I thought I'd break myself in slowly with this salsa that seemed more appropriate for fall since it featured cranberries and I still had a few bags of fresh cranberries in the freezer left over from last season.  Even though the recipe said not to use frozen, I went with it anyway and it probably accounted for the fact that all of the ingredients in the salsa were ruby red colored - fresh cranberries wouldn't bleed as much color, if any.  In addition to the 1/3 cup brown sugar it called for, I used pretty close to another 1/4 cup to season plus a pinch or two of salt because it was VERY tart and even then it was still just a tad too tart for my taste.  But again, I'm trying.  I really am. 

This salsa appeared in the November 2008 edition of Gourmet magazine and is a good complement when served with turkey or chicken but honestly, I liked it best with good old-fashioned tortilla chips and it seemed to get better, albeit still tart, a few days after it was made.  The saltiness of the chips seemed to balance it out very nicely. 


If this is your season, I'm happy for you. I really am.  I'll just sit over here in the corner and wait patiently for my beloved season to come back around.

Cranberry Pineapple Salsa
as published in Gourmet, November 2008


  • 1 (4-pounds) pineapple, peeled, cored, and cut into 1/2-inch pieces
  • 1medium onion, chopped
  • 1 tablespoon vegetable oil
  • 1 (12-ounces) bag fresh cranberries (3 1/2 cups; not frozen)
  • 1/3 cup packed dark brown sugar, or to taste
  • 1/4 cup Seville orange juice (or 2 tablespoon each of fresh lime juice and regular orange juice)
  • 1 cup packed cilantro sprigs, coarsely chopped

  • Preheat oven to 450°F with rack in upper third.

    Toss pineapple and onion with oil and 1/2 teaspoon salt in a large 4-sided sheet pan, then roast, stirring occasionally, until charred in spots, 40 minutes to 1 hour (Alison's note: 30 minutes was plenty enough time for roasting.  I decided to let it go upwards of 40 minutes but my pineapple started turning into charcoal briquettes shortly after 30).

    Meanwhile, pulse cranberries in a food processor until coarsely chopped, then transfer to a large bowl and stir in 1/3 cup brown sugar.

    Add hot roasted-pineapple mixture, stirring until sugar has dissolved, then stir in citrus juice. Season with brown sugar and salt. Cool, then stir in cilantro. Let stand, covered, 1 hour.

    Note: Salsa, without cilantro, can be made 3 days ahead and chilled. Bring to room temperature and add cilantro before serving.
     

    Pin It
    • Digg
    • Del.icio.us
    • StumbleUpon
    • Reddit
    • RSS

    Orzo. Be Afraid.


    Years ago when I first started my catering business, I was so excited to share the same foods that I loved with my clients.  It took me a few times of developing menus for potential parties to learn that not everyone likes what I like and I remember one client commenting that I must also own a goat farm because her menu was so laden with dishes containing my beloved goat cheese.  To this day I'll never understand anyone who doesn't like that stuff. 

    One summer, I picked up a lucrative contract to provide box lunches for several weeks to school teachers who were attending training seminars.  We did several varieties of the boxes but they all included the standard fare you see in those types of meals:  sandwich, side salad, and dessert.  I prepared this lovely recipe from Ina Garten, The Barefoot Contessa for roasted vegetables with orzo as a side dish for one round of the box lunches.   When the call came to place the next order, the person followed up by saying, "Please don't send any more of that orzo stuff."   I immediately went into panic mode thinking something had been wrong with the food and when I asked why, she simply said, "They were afraid of it."

    Afraid. 

    Of pasta. 

    I was in such disbelief I couldn't even laugh at the ridiculousness of that statement.  But I giggle now every time I make this dish because I can't help but remember that conversation. 

    So consider yourself warned, faint-of-heart readers, because here's the recipe for Orzo with Roasted Vegetables.  I promise it's nothing to be afraid of and it's very simple to make.  Choose a good olive oil because it is really the star ingredient of the dish.  Most times I leave the pine nuts out because my grocery store insists on hiding them from me.  And I've heard rumors that goat cheese works well in place of the feta.  


    Orzo with Roasted Vegetables
    Recipe courtesy of Ina Garten as published in Barefoot Contessa Parties!

    1 small eggplant, peeled and 3/4-inch diced
    1 red bell pepper, 1-inch diced
    1 yellow bell pepper, 1-inch diced
    1 red onion, peeled and 1-inch diced
    2 garlic cloves, minced
    1/3 cup good olive oil
    1-1/2 teaspoons kosher salt
    1/2 teaspoon freshly ground black pepper
    1/2 pound orzo or rice-shaped pasta

    For the Dressing:
    1/3 cup freshly squeezed lemon juice (2 lemons)
    1/3 cup good olive oil
    1 teaspoon kosher salt
    1/2 teaspoon freshly ground black pepper
    4 scallions, minced (white and green parts)
    1/4 cup pignolis (pine nuts), toasted
    3/4 pound good feta, 1/2-inch diced (not crumbled)
    15 fresh basil leaves, cut into julienne

    Preheat the oven to 425 degrees F. Toss the eggplant, bell peppers, onion, and garlic with the olive oil, salt, and pepper on a large sheet pan. Roast for 40 minutes, until browned, turning once with a spatula.

    Meanwhile, cook the orzo in boiling salted water for 7 to 9 minutes, until tender. Drain and transfer to a large serving bowl. Add the roasted vegetables to the pasta, scraping all the liquid and seasonings from the roasting pan into the pasta bowl.

    For the dressing, combine the lemon juice, olive oil, salt, and pepper and pour on the pasta and vegetables. Let cool to room temperature, then add the scallions, pignolis, feta, and basil. Check the seasonings, and serve at room temperature.

    Pin It
    • Digg
    • Del.icio.us
    • StumbleUpon
    • Reddit
    • RSS

    Meatless Monday


    There are times that I just cannot fathom eating another piece of meat. After I've made the dinner round of beef, chicken, pork and seafood each week, I'm just plain tired of anything with a face.

    I don't have alot of vegetarian recipes in my repertoire ~ something that I need desperately to change, but rest assured this fabulous recipe for Provolone Stuffed Eggplant "Meatballs" will be immediately filed away as a must-always-have-in-the-freezer vegetarian menu option. I found this recipe when I stumbled across Lauren's blog, Healthy. Delicious, a few weeks ago and the blog has been duly bookmarked for some great new menu ideas.

    As much as I love eggplant Parmesan, there was no question as to whether I'd like these or not. They were very easy to put together and I love the fact that they are freezable so I can pull a portion out whenever I want. My eggplant weighed about 2-1/2 pounds and I had a couple of small zucchini in the fridge that needed to be used, so I added them to make up the difference. I also used mozzarella cheese in place of the provolone, again because it was on-hand. A couple of my "meatballs" blew a cheese gasket during baking but I was able to form them back into the semblance of a ball while they were still warm. You could serve these as a toasted "meatball" sub sandwich or with pasta.

    Quick. Easy. Delicious. Satisfying.


    Provolone Stuffed Eggplant "Meatballs"
    recipe by Lauren of Healthy. Delicious

    Ingredients

    2 Globe Eggplants (about 3 pounds total)
    1/2 cup Italian Seasoned Breadcrumbs
    1/4 cup Grated Parmesan Cheese
    1 Egg, slightly beaten
    1/8 pound Provolone

    Directions

    Preheat oven to 350.

    Peel the eggplant, then use the coarse side of a box grater to shred it. Toss the shredded eggplant with 1 tsp kosher salt. Use your hands to squeeze out as much moisture as you can.

    Discard the liquid and add the shredded eggplant to a bowl with the breadcrumbs, Parmesan cheese, and egg. Use your hands to mix the ingredients together. The mixture should be moist, but not too soggy - add more bread crumbs if needed.

    Arrange the provolone into a stack, then cut it into 12 cubes.

    Divide the eggplant mixture into 12 equal portions. Form each portion into a ball. Use your thumb to make an indentation in each ball and tuck a portion of the provolone inside. Roll the balls to seal the provolone inside.

    Place the eggplant balls on a baking sheet. Bake for 15 minutes, or until the bottoms have turned golden brown. Turn the eggplant balls and bake for an additional 10 minutes to brown the other side.

    Serve with your favorite pasta sauce.

    Pin It
    • Digg
    • Del.icio.us
    • StumbleUpon
    • Reddit
    • RSS

    In A Pickle


    I've never eaten so much yellow squash in my entire life as I have this summer, thanks to my garden.  I'm sure by now you are as tired of reading posts and recipes about it here as I am of eating it!  It appears that I'm nearing the end of the Summer Squash Diet because the plants have nearly (finally) exhausted themselves, but over the weekend I was faced with what to do with the 20+ little yellow buggers laying on my kitchen counter. Having already sauteed, fried and Parmesan'd the hell out of them, the only thing left to do was pickle them.  I scrounged around in the garage until I uncovered my grandmother's water bath canner, cleaned it up and also dusted off my mother's Ball Blue Book canning guide.  Believe it or not, I even found a dozen canning jars under a few inches of dust!

    The act of making the pickles themselves wasn't bad at all because slicing up the squash, onions, and bell peppers and making the sweet and sour brine didn't take very long ~ the worst part about all of it was waiting for the water in the canner to boil.  Not only does a watched pot never boil, but one left on the stove for nearly 2 hours doesn't either!  So a word to the wise....start your water to boil long before you even think about making the pickles.

    The texture of a pickled squash is a bit different than a cucumber pickle because squash have a more spongy texture.  Slice them as thin as you can and the difference in texture won't be as noticeable.  After they are processed in the canner, give them at least a few days to soak up the tasty brine before you pop a top and enjoy.  Use them straight from the jar, on a sandwich, served as a side with barbecue, as part of an antipasta platter or even garnish a garden salad with them. 

    Squash Pickles
    Courtesy of about.com

    Ingredients:

    •8 cups yellow summer squash, sliced
    •2 cups sliced sweet onion
    •1 tablespoon non-iodized salt
    •1 cup diced green bell pepper
    •1/2 cup diced red bell pepper
    •2 cups cider vinegar
    •3 1/2 cups sugar
    •1 teaspoon celery seeds*
    •1 teaspoon mustard seed*

    *I used 2 teaspoons pickling spice instead because it's what I had on hand, left over from another project.


    Preparation:

    Combine squash and onion slices in a large enamel kettle; sprinkle with salt. Let stand 1 hour. Add green pepper, vinegar, sugar, celery seeds and mustard seeds and bring to a boil. Pack in sterilized canning jars (I ended up with 3 quarts loosely using the measurements of this recipe). Bring water to a boil in a boiling water-bath canner. Place hot filled jars in rack and into the water. Starting timer when water returns to a boil with jars in it; process for 5 minutes, or 10 minutes for altitudes of 1,001 to 6,000 feet. Over 6,000 feet, process for 15 minutes.
     
    Makes approximately 6 pints or 3 quarts.

    Pin It
    • Digg
    • Del.icio.us
    • StumbleUpon
    • Reddit
    • RSS

    Fresh from the Farm


    One of my most favorite summertime side dishes to prepare is this fresh Farmstand Saute, not only because it's easy and versatile and compliments everything but because it uses the over-abundant vegetables from my garden.  Feel free to use whatever combination of veggies and herbs you have on hand (I even use a sprinkle of dried Italian seasoning in the rare instances where I don't have fresh herbs on hand), but don't leave out the "secret" ingredient ~ the splash of vinegar at the end of cooking.  Vinegar elevates the flavor of the veggies and adds just a bit of Oomph!

    This recipe is just a guideline so let your imagination run wild and use fresh corn cut from the cob or maybe even green beans.

    Farmstand Saute
    Serves 4

    2 teaspoons olive oil
    2 medium yellow squash, sliced on the bias
    2 medium zucchini, sliced on the bias
    1/2 cup onion, vertically sliced
    1 bell pepper (any color), sliced
    1-1/2 cup tomatoes, chopped & seeded (if you use cherry tomatoes, just slice them in half)
    1 tablespoon chopped fresh basil or parsley
    salt & pepper, to taste
    2 teaspoons white wine or rice wine vinegar

    Heat oil in a large skillet over medium heat.  Add squash, zucchini, onion and bell pepper and a saute approximately 7 minutes.  Add tomatoes and season veggies with salt and pepper.  Saute approximately 2-3 minutes more or just until tomatoes are heated through.  During the last minute of cooking, add vinegar and stir well.  Remove from heat and add fresh herbs.  Taste for seasonings.

    Pin It
    • Digg
    • Del.icio.us
    • StumbleUpon
    • Reddit
    • RSS

    How Does Your Garden Grow?

    This year, I planted a vegetable garden for the first time in many years. A few years of living in a condo with no space for a garden coupled with spending several years married to someone who stroked out at the mere thought of someone walking on his precious grass, let alone striking a shovel into the ground pretty much put my green thumb on the back burner.
    But now I have my own yard and I can stomp on the grass if I want or I can dig up a corner of the back yard and plant a garden if I damn well please. And that is exactly what I did. My dear friend Chris spent an afternoon helping me till up the rock-hard ground and putting together a 4x4 raised garden bed that I bought from Home Depot ~ well, actually he did all the work and I watched because he had just
    given me a lecture some friendly advice about needing to appear more vulnerable and alot less stubborn and independent. When all was said and done, I acted so pitiful and helpless that he ended up using some scrap lumber and maxing out my garden space. Is he awesome or what??

    When I bought my plants back in the spring, I'll admit to being overly excited because it had been so long since I'd planned a garden. In hindsight, I'm thinking 5 eggplant plants were about 4 too many and now that I'm afraid that I'll be strangled in the middle of the night by one of my rogue yellow squash plants, I'll scale back to only one plant next year. I have serious thoughts of tossing squash into the car windows of passers-by just to get rid of them! Some of the veggies did exceptionally well while some weren't as plentiful as I had hoped and I grew broccoli for the first time ever. I'm looking so forward to researching things for a winter garden as I've never done that either. In the meantime, enjoy some quick and easy recipes that show off your garden bounty, starting with Panzanella. Panzanella is also an excellent way to use up leftover bread that may be lingering on your kitchen counter or taking up precious space in your freezer!


    Panzanella Bread Salad Recipe
    from Simplyrecipes.com

    As you cut the tomatoes, remove some of the seeds and liquid. Your panzanella will be juicy enough. Leave the crusts on the bread chunks; they will stay chewier and give the panzanella more substance.

    Ingredients:
    4 cups tomatoes, cut into large chunks
    4 cups day old (somewhat dry and hard) crusty bread (Italian or French loaf), cut into chunks the same size as the tomatoes*
    1 cucumber, skinned and seeded, cut into large chunks
    1/2 red onion, chopped
    1 bunch fresh basil, torn into little pieces
    1/4 to 1/2 cup good olive oil
    Salt and pepper to taste
    * If you don't have hard old bread sitting around, you can take fresh crusty bread, cut it into big cubes, lay the cubes out on a baking sheet, and put in a 300°F oven for 5-10 minutes, until the outer edges have dried out a bit (not toasted, just dried). If you use fresh bread without doing this, the bread may disintegrate into mush in the salad.

    Method:
    Mix everything together and let marinate, covered, at room temperature for at least 30 minutes, up to 12 hours. Do not refrigerate or you will destroy the texture of the tomatoes.

    Serve at room temperature.

    Yield: Serves 6-8.

    Pin It
    • Digg
    • Del.icio.us
    • StumbleUpon
    • Reddit
    • RSS

    He likes it! Hey Mikey!


    Back in the glory days of catering, I was guilty of strictly promoting menu items that appealed to my personal tastes. Menus were designed based on the foods that I would like to have at a party if I were a guest and I would always be baffled when the client would come back and request totally different selections. It was a bitter pill to swallow when I realized not everyone loves goat cheese and eggplant Parmesan as much as I do. How can that be??

    So I share with you yet another Rachel Ray recipe (and then I promise I'll get off my RR soapbox), even though it was not one of my favorites. I felt the Gorgonzola cheese was a bit over-powering even though I only used 5 oz. and not the full 8 oz. called for in the recipe. You have to be a real lover of the stuff for this. It's very rich and I'll admit to adding a bit of jarred spaghetti sauce (go ahead and judge me for not slaving over the stove and making it from scratch) just to tone down the creamy, moldy richness of the sauce. But hey, just because I don't like it doesn't mean you won't think it's the best thing since sliced bread, right?

    Grab your EVOO and your garbage bowl and enjoy Rachel's Spinach and Mushroom Lasagna Roll-ups with Gorgonzola Cream Sauce.

    Ingredients

    * 16 crimini caps, cleaned with a damp towel and finely chopped in food processor
    * 1 small yellow onion, finely chopped
    * 2 cloves garlic, minced
    * 2 tablespoons extra virgin olive oil (EVOO)
    * 1 package frozen chopped spinach (10 ounces), defrosted and squeezed dry
    * Salt and pepper
    * 1/4 teaspoon nutmeg, ground or freshly grated
    * 2 cups part-skim ricotta
    * 8 curly edge lasagna noodles, cooked to al dente (12-14 minutes)
    * 1 cup fat-free chicken broth
    * 8 ounces Gorgonzola cheese, crumbled
    * 1/2 cup heavy cream
    * 1-1 1/2 cups mozzarella cheese, shredded

    Preparation

    In a medium skillet over moderate heat, sauté mushrooms, chopped onions and garlic in EVOO until mushrooms give off their juices and darken and onions are tender, about 7-8 minutes. Season with salt and pepper; the salt will help draw water out of the vegetables as they cook.

    Add dry chopped spinach to the pan and heat through for about 1 minute. Adjust seasonings with salt, pepper and a little nutmeg. Add ricotta and stir into mixture to heat cheese through, about 1 minute longer. Remove pan from heat but leave in the warm skillet.

    Heat broth in a small pan over moderate heat. Melt Gorgonzola into broth and bring liquid to a bubble. Stir in cream and thicken sauce, about 2 minutes.

    Place cooked lasagna noodles on a large work surface or cutting board. Spread lasagna noodles with a layer of spinach-mushroom filling. Roll up pasta and arrange the eight bundles in a shallow casserole dish. Pour warm sauce over roll-ups and top with mozzarella. Place casserole under broiler to melt cheese.

    Pin It
    • Digg
    • Del.icio.us
    • StumbleUpon
    • Reddit
    • RSS

    Forgive me Rachael


    I felt sort of bad about bashing Rachael Ray in my last post, so I thought I'd make it up by paying homage to a few more of her recipes.

    The Spinach Artichoke Calzone is a great recipe that can be tweaked to accommodate any combination of ingredients that you want to use for filling ~ make them vegetarian or load them up with your favorite Italian meats. I was a little short on artichokes but had some sun-dried tomatoes and pepperoni on hand so I tossed those in as well. I picked up prepared pizza dough from the deli section of the grocery store instead of the tube variety and used it to make four huge calzones. After baking and cooling completely, these store well in the freezer.

    Have fun and let your imagination run wild!

    Rachael Ray's Spinach Artichoke Calzones
    Makes 4

    Ingredients

    * 2 cups part skim ricotta
    * 1/4 teaspoon nutmeg, freshly grated or a few pinches ground
    * A few grinds black pepper
    * 1/2 cup (a couple of handfuls) grated Parmigiano, plus extra, for sprinkling
    * 1 (10-ounce) package frozen chopped spinach, defrosted and squeezed dry
    * 1 (15-ounce) can quartered artichoke hearts, drained and coarsely chopped
    * 2 cloves garlic, finely chopped
    * 2 (10-ounce) tubes refrigerated pizza dough
    * 2 cups shredded mozzarella
    * 2 cups tomato sauce, marinara or pizza sauce, for dipping or Five Minute Spicy Marinara, recipe follows

    Directions

    Preheat oven to 425 degrees F.

    Combine first 7 ingredients in a bowl. Roll each pizza dough out on a cookie sheet, and halve each cross-wise. Spread 1/2 cup mozzarella and up to 1/4 of filling on each rectangle. Work on just half of the surface of each rectangle of dough, then fold dough over top of filling and pinch edges firmly to seal. For a half-moon "pizza parlor" look to your calzones, mound filling into a half-moon shape, fold dough over top trim edges of dough to follow the rounded shape, then seal edges.

    If your dough tears, remove a little of the filling and repair. Repeat the process, spacing the calzones evenly on baking sheet. Bake the calzones for 12 to 15 minutes or until golden brown all over. Serve calzones with warm tomato or pizza sauce for dunking.

    Rachael's Note: Freeze any remaining filling in a small plastic container and use it to stuff a chicken breast on another day.

    Pin It
    • Digg
    • Del.icio.us
    • StumbleUpon
    • Reddit
    • RSS

    Is it Friday yet?

    Not quite my dears, but have no fear - the holiday weekend is right around the corner and that means an extra day of rest and relaxation! I plan to take full advantage of the three day weekend, having worked hard in the kitchen all week. My personal kitchen, that is. With a whole week of menu planning and prep almost under my belt, I have enough food in my fridge to feed an army!

    Thursday's menu was quite simple and featured yet another of Bon Appetit's recipes. I think I should probably broaden my horizons and subscribe to another magazine or else get a job as a recipe tester for BA. I wonder if they pay well?

    Penne with Greens, Feta, & Olives was a light and tasty vegetarian dish (dare I even say it seemed to taste better when I had it for lunch the next day?) and is perfect for summer. It's quick and easy so you're not toiling over a hot stove during the sweltering summer heat. Can you believe the temps have already reached 91?? I loved the saltiness of the Kalamata olives and I decided to add just a bit of lemon juice and a pinch of red pepper flakes for a little extra zing. Just make sure you wash your spinach really well if you aren't purchasing the prewashed bagged kind.

    * Exported from MasterCook *

    Penne with Greens, Olives & Feta

    Serving Size : 4
    Categories : Pasta,Vegetarian

    Amount Measure Ingredient -- Preparation Method
    -------- ------------ --------------------------------
    1/4 cup chopped fresh Italian parsley
    1 teaspoon finely grated lemon peel
    2 garlic cloves, minced
    1/2 lemon -- juiced
    1/4 teaspoon red pepper flakes
    1 large bunch spinach greens (about 10 cups packed) -- washed, and stems removed
    12 ounces penne
    3 tablespoons extra-virgin olive oil
    1/2 cup coarsely chopped pitted Kalamata olives
    1/2 cup crumbled feta cheese (about 3 ounces)

    Mix parsley, lemon peel in small bowl; set aside.

    Bring large pot of salted water to boil. Add greens and cook just until tender, 1 to 6 minutes, depending on type of greens. Using skimmer or slotted spoon, transfer greens to colander to drain. Return water to boil. Add pasta and cook just until tender but still firm to bite, stirring occasionally. Drain, reserving 3/4 cup pasta cooking liquid. In the meantime, saute garlic in a bit of oil. Return pasta to pot; add greens oil, garlic, red pepper flakes and toss. Stir in olives, feta, lemon juice and enough reserved pasta cooking liquid by 1/4 cupful to moisten. Season with salt and pepper. Transfer to bowl. Sprinkle with parsley mixture and serve.

    Source:
    "adapted from Bon Appetit, April 2008"
    - - - - - - - - - - - - - - - - - - -


    NOTES : Tasted better the next day!

    Pin It
    • Digg
    • Del.icio.us
    • StumbleUpon
    • Reddit
    • RSS