RSS

I currently live in Charlotte, NC and after spending 7 years as a personal chef and caterer, I am now happy to share my love of cooking with friends and family. My heart is in the kitchen, but my soul is in the stars!

Is it Friday yet?

Not quite my dears, but have no fear - the holiday weekend is right around the corner and that means an extra day of rest and relaxation! I plan to take full advantage of the three day weekend, having worked hard in the kitchen all week. My personal kitchen, that is. With a whole week of menu planning and prep almost under my belt, I have enough food in my fridge to feed an army!

Thursday's menu was quite simple and featured yet another of Bon Appetit's recipes. I think I should probably broaden my horizons and subscribe to another magazine or else get a job as a recipe tester for BA. I wonder if they pay well?

Penne with Greens, Feta, & Olives was a light and tasty vegetarian dish (dare I even say it seemed to taste better when I had it for lunch the next day?) and is perfect for summer. It's quick and easy so you're not toiling over a hot stove during the sweltering summer heat. Can you believe the temps have already reached 91?? I loved the saltiness of the Kalamata olives and I decided to add just a bit of lemon juice and a pinch of red pepper flakes for a little extra zing. Just make sure you wash your spinach really well if you aren't purchasing the prewashed bagged kind.

* Exported from MasterCook *

Penne with Greens, Olives & Feta

Serving Size : 4
Categories : Pasta,Vegetarian

Amount Measure Ingredient -- Preparation Method
-------- ------------ --------------------------------
1/4 cup chopped fresh Italian parsley
1 teaspoon finely grated lemon peel
2 garlic cloves, minced
1/2 lemon -- juiced
1/4 teaspoon red pepper flakes
1 large bunch spinach greens (about 10 cups packed) -- washed, and stems removed
12 ounces penne
3 tablespoons extra-virgin olive oil
1/2 cup coarsely chopped pitted Kalamata olives
1/2 cup crumbled feta cheese (about 3 ounces)

Mix parsley, lemon peel in small bowl; set aside.

Bring large pot of salted water to boil. Add greens and cook just until tender, 1 to 6 minutes, depending on type of greens. Using skimmer or slotted spoon, transfer greens to colander to drain. Return water to boil. Add pasta and cook just until tender but still firm to bite, stirring occasionally. Drain, reserving 3/4 cup pasta cooking liquid. In the meantime, saute garlic in a bit of oil. Return pasta to pot; add greens oil, garlic, red pepper flakes and toss. Stir in olives, feta, lemon juice and enough reserved pasta cooking liquid by 1/4 cupful to moisten. Season with salt and pepper. Transfer to bowl. Sprinkle with parsley mixture and serve.

Source:
"adapted from Bon Appetit, April 2008"
- - - - - - - - - - - - - - - - - - -


NOTES : Tasted better the next day!

Pin It
  • Digg
  • Del.icio.us
  • StumbleUpon
  • Reddit
  • RSS

And the second runner up is......

{drum roll, please} Chicken Waldorf Salad.

Why is it that even though I've found what I consider THE perfect recipe for something, I'm still compelled to try others? Maybe I just need to be reassured that it is, in fact, THE perfect recipe. Maybe I think I'll find a MORE PERFECT recipe. Is there such a thing? I think not. Case in point....

Last summer I posted my all-time favorite recipe for chicken salad but when I saw this recipe in the December 2007 Bon Appetit, I just had to try it. Could it be better than mine, I wondered? There was only one way to find out and so it rolled around on my marathon menu plan for this week.

Wednesday's menu was supposed to be Chicken Waldorf Salad and a dessert called Floating Islands with Lemon-Scented Custard Sauce and Raspberries (sounds absolutely DIVINE, doesn't it?). Notice I say supposed to be. See that lovely drink in the background? It's called a "Blue Lagoon Martini" but we can just call it the "After Two (okay, three) of These, There Ain't No Way I Can Make Dessert" martini. Let's just say that I had a really bad day yesterday, and a drink (times three) was well deserved.

I was quite pleased with the outcome, but only after the flavors had a chance to meld (I seem to be a huge fan of day old food, eh?). You should plan to make this early in the day - or even the day before you plan to eat it. I was a little leery of the red onion so I only used about half of what was called for but was pleasantly surprised by the little burst of savory it added to the sweetness of the fruit. I still think my chicken salad is better, but this ranks right up there as a close second. Maybe it will become your numero uno chicken salad recipe. And just in case that it turns out that you've had a really bad day, go ahead and have yourself one of these little blue beauties with it....

Chicken Waldorf Salad by Bon Appetit

Dressing:
1 cup pineapple juice
1 cup apple juice
1/4 cup mayo
2 tablespoons honey
2 tablespoons Dijon mustard
1/2 teaspoons turmeric
1/2 cup olive oil
Salad:
4 cups cooked chicken, cubed (I used a rotisserie chicken from the deli)
1-1/2 cup diced Granny Smith apple
1-1/2 cup halved red seedless grapes
1 cup celery, diced
1/2 cup very thinly sliced red onion (I only used about 1/4 cup)
1/2 cup walnuts, toasted
spring lettuce mix

Boil apple juice and pineapple juice until reduced to 2/3 cup (about 10 minutes). Cool completely.

Whisk mayo, honey, mustard, and turmeric in bowl. Gradually whisk in juice, then oil. Season with salt and pepper.

For salad, mix first 5 ingredients in large bowl. Add dressing and toss to coat. Serve salad over spring greens and garnish with walnuts.

Blue Lagoon Martini

1/2 ounce Blue Curacao
1-1/2 ounce vodka
1 ounce freshly squeezed lemon juice
1 ounce simple syrup

Shake all ingredients with ice. Strain into a martini glass. Kick back and enjoy!

Pin It
  • Digg
  • Del.icio.us
  • StumbleUpon
  • Reddit
  • RSS

Dining Alone

As a person who spends copious amounts of time alone, eating alone is something that I've grown accustomed to doing. Most people will tell you they detest sitting alone in a restaurant while other patrons are partnered up, eating and enjoying the company and conversation of another. People who dine alone at home often say that they don't even bother with preparing an actual meal, opting to just snack instead, because it's too much trouble for just one person. I'd venture to say that most don't even bother sitting down to eat. I like to cook and I like to eat. So much so, that I wouldn't dream of denying myself the pleasure of a good meal just because there isn't another person around. I usually keep a magazine or book in my car to occupy myself with when I'm alone in a restaurant. And as far as dining alone at home, that never happens because I always have the company of my taste testers. And I bet if I looked closely enough, I could find a few others who are willing to share my table. Only today I found these lovelys willing to keep me company.....


Bambi

The Geico Guy


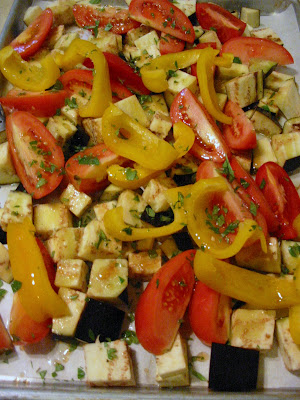
I mentioned yesterday that I was on a roll with my menu planning and I'm proud to admit that I'm holding steady to my plan of action. Today's menu wasn't quite as involved as yesterday's, but I enjoyed it much more. I decided to go vegetarian with a recipe loosely based on one clipped from Bon Appetit called Herb-Roasted Eggplant with Tomatoes & Feta. I had a few extra veggies in the fridge and decided to throw those into the mix as well and I only roasted them for about 30 minutes because I like just a bit of crunch and texture. To make clean up a little easier, put a piece of parchment paper down on the roasting pan before you toss the veggies.

my bounty before it went into the oven

Dinner is served....

Roasted Vegetables with Greek Feta

1 large eggplant, cut into 1" cubes
4 large Roma tomatoes, cored, quartered lengthwise
1 yellow bell pepper, cut into strips
5 or 6 whole cloves of garlic, peeled
1/4 cup olive oil
1/8 cup sherry vinegar
3 tablespoons chopped fresh oregano
salt and pepper, to taste
1/2 cup crumbled feta cheese (I used the one with Greek herbs)

Preheat oven to 450. Place parchment paper on roasting pan and toss veggies together with oil, vinegar, oregano, salt and pepper. Roast for about 30 minutes, stirring occasionally.

Sprinkle with feta cheese. Serve over couscous with a garden salad and enjoy the company of others, no matter who they are!

Pin It
  • Digg
  • Del.icio.us
  • StumbleUpon
  • Reddit
  • RSS

These Cookies Kick Butt!

How many times do you flip through a cooking magazine, see a recipe that you think you want to try, dog-ear the page and lay the magazine in a (already mile high) stack and never get back to it? Or worse yet, actually want to go back to the recipe but can’t remember which magazine (in the ever growing pile) it was? As a long time sufferer of this problem, I finally wised up and decided to just rip the page right out of the magazine and keep the pages versus the whole magazine. I’ve found that I actually make it a point to work my way through the stack of pages and I've tried more new recipes than I would have otherwise. I ripped this little jewel out of a November or December 2007 issue of Bon Appetit but instead of being an actual BA recipe, it was part of an advertisement for butter. It's not very often that I'm totally bowled over by all aspects of a recipe, but let me tell ya....these cookies kick some major BOOTY! And since this post falls into the theme of "Bookmarked Recipes", a blog event hosted by Ruth over at Ruth's Kitchen, I've decided to submit it for next week's event.

The cookie dough was of the basic shortbread variety but I was mostly intrigued by the infusion of rosemary into the caramel and it is definitely a combination that I will use again. When I made the caramel, evidently my "medium heat" was a little too high and these little black clumps started to appear and I was so sure that I had scorched it.


Luckily, it wasn't scorched and the caramel came together nicely. I ate almost all of these cookies myself, so in addition to kicking booty, they also enlarged my booty! I was a little disappointed that my photo turned out blurry so I guess I'll have to make another batch to re-photograph! :)

Head on over to Ruth's blog to check out the other great entries!

* Exported from MasterCook *

Rosemary Caramel Sandwich Cookies

Categories : Cookies

Amount Measure Ingredient -- Preparation Method
-------- ------------ --------------------------------
1 c. butter , divided
1/2 c. sugar
1 egg, beaten
1 tsp. Vanilla extract
2 c. flour
1/2 tsp. baking powder
FOR THE CARAMEL :
1/2 c. butter
3 sprigs fresh rosemary
1 c. brown sugar
1/2 c. corn syrup
1 c. sweetened condensed milk
1 tsp vanilla extract

To Make Cookies :

Melt 1/2 c. butter in a sauce pan until browned, do not burn. Cool.

Cream together 1/2 c. butter and and sugar until light and fluffy. Add browned butter and mix well. Add egg and vanilla; beat until blended. Add flour and baking powder, blend. Flatten dough into a disk and chill 1 hr. in plastic wrap.

Preheat oven to 350.

Roll out dough and cut into 2 in. scalloped rounds and bake 8 - 10 min.

FOR ROSEMARY CARAMEL :

Flatten rosemary between 2 sheets of wax paper. Melt butter in sauce pan and add herbs..Cook over low heat for 10 min. then discard rosemary.Add remaining ingredients, mix well. Bring to a boil, stirring frequently then reduce to a medium heat and continue to stir. Using a candy thermometer, bring temp to 242 degrees, stirring frequently and remove from heat. Use caramel and cookies to make sandwiches...these keep at room temp for a week.

Source:
"Bon Appetit 2007 (November or December)"
Yield:
"3 dozen"

Pin It
  • Digg
  • Del.icio.us
  • StumbleUpon
  • Reddit
  • RSS

Pie Oh My!

Lordy, lordy I'm behind on my posting yet again! I've had a busy few weeks in the catering kitchen but I have to blame this lapse on pure old age because it was my birthday last week, you know. My parents came for a visit and we spent most of the time tooling around in the big city, eating and shopping for birthday girl gifts, of course. I don't care how old I get or how unavailable my mother may be, it is MANDATORY that she visits on my birthday. Why? Because she has to make my birthday pie, that's why! And not just any old pie - it has to be my beloved Cherry O' Cream Cheese Pie.

Oh sure...I can make the pie for myself, and I can make it any time of the year that I darn well please but I have to have it for my birthday and it always tastes better when Mom makes it. To be honest, I never, ever make the pie for myself any other time of the year because I look so forward to my birthday pie and nothing makes me savor each and every bite like knowing it will be a whole year before I get it again. You have to be pretty darn special to be rewarded with a sliver of my birthday pie - and I do mean "sliver" in the truest sense of the word. I'm in charge of cuttin' the pie, and I do ration it out! Captain Sturm nearly met his fate this year when he sneaked and cut his own piece before I came into the kitchen.

This recipe was one of those on-the-back-of-the-label recipes from a can of Eagle Brand Sweetened Condensed Milk and who knows when it was originally published but when my Granny passed away some years ago and I came into possession of her cookbooks and recipe clippings, I found the recipe published in a circa 1965 pamphlet from Eagle Brand. It has simple ingredients and it quick to put together but I double dog dare ya not to spend all day thinking about eating that pie while it's chilling in the fridge!

* Exported from MasterCook *

Cherry O Cream Cheese Pie

Amount Measure Ingredient -- Preparation Method
-------- ------------ --------------------------------
1 each 9 inch graham cracker pie crust
8 ounces cream cheese
15 ounces Eagle Brand Sweetened Condensed Milk
1/3 cup lemon juice
1 teaspoon vanilla extract
1 can cherry pie filling

Let cream cheese soften to room temp; beat until fluffy. Gradually add condensed milk while mixing, stir until blended. Add lemon juice & vanilla extract; blend well. Pour into prepared crust. Chill 2-3 hours before garnishing top of pie with cherry pie filling. Hint: chill can of pie in the fridge too.

Source:
"circa 1965 recipe booklet for Eagle Brand Milk found in Granny Dover's stuff"
- - - - - - - - - - - - - - - - - - -

Pin It
  • Digg
  • Del.icio.us
  • StumbleUpon
  • Reddit
  • RSS

Food In Progress....


A few weeks ago, the sky opened up and blessed us with several beautiful, warm and sunny days in a row. Spring was finally here! The trees and flowers budded, bloomed, and spewed forth enough pollen to coat the world yellow. After a few days of wallowing in a stuffed up, swollen, pollen-induced coma, I hacked and sneezed my way to the pharmacy for my annual purchase of Claritin D. Once the yellow haze started to disappear, I could think a little clearer and remember what it is that I love about Spring....

One of my favorite things to do this time of year is revitalize my herb garden. I manage to keep some of my herbs growing outdoors year round thanks to the somewhat warm climate here in the Land of Nowhere but I always delight in digging in the dirt when the weather turns warm and depositing some new, tender plants. I usually reserve planting for a day when I'm most stressed about something because I work out alot of my aggressions while digging. It's just one of those things that I find soothing and peaceful. My rosemary, chives, garlic, and parsley have been with me for several years now and this year my new additions include peppermint, lemon balm, purple ruffled basil, sage, sweet basil, thyme, oregano and cilantro.


Herb gardening is fun because it's not overly complicated nor does it require alot of space. Even though I live on about 2 acres of land, my herb garden exists on a small patch of grass right outside my patio door. Most people cultivate herbs in pots, and quite frankly that's the only way I've had luck growing them too. One year after we first moved here, I scratched out a nice patch of dirt and deposited my sweet little herb babies straight in the ground. What the squirrels didn't demolish was left to shrivel up in the rock hard Arkansas clay. Herbs like direct sunlight and they like to be abused just a bit. I don't mean that you need to go out in the yard and yell or swat at them a couple of times a day, but instead they like to be crowded, neglected, and watered very little. The perfect garden for a busy person such as myself! I had some old galvanized tubs left over from a long ago catering gig that I drilled some holes in the bottom of so the soil could drain well and they worked perfectly.

It will only take a couple of weeks before you start the reap the benefits of growing your own fresh herbs - just tonight I snipped some fresh parsley and basil to garnish my chicken Parmesan and very soon you'll be reaping the benefits of some great recipes featuring my home-grown bounty, so stay tuned. In the meantime, this website offers some great tips on planting, identifying, and harvesting herbs and I suggest you check it out and derive your own stress-relieving pleasure from digging in the dirt!

Pin It
  • Digg
  • Del.icio.us
  • StumbleUpon
  • Reddit
  • RSS