RSS

I currently live in Charlotte, NC and after spending 7 years as a personal chef and caterer, I am now happy to share my love of cooking with friends and family. My heart is in the kitchen, but my soul is in the stars!

The House of Mouse


"I only hope that we don't lose sight of one thing - that it was all started by a mouse."
Walt Disney, 1954

My first visit to Disney World was in 1971 when I was a whopping 6 months old.  A few years later, my family bought a summer home in Florida and we visited the parks almost every summer.  Then adulthood and life kicked in and the little house was sold and it would be nearly 15 years before I visited the happiest place on Earth again. 

The Boy Toy, his two kids, his father and I were at Disney World in August and it occurred to me that the whole "happiest place on Earth" tag line may very well be just a marketing ploy.  While standing in lines for what seemed like eternity for a ride that lasts 4-1/2 minutes, I started observing people around me.  Adults were weary and hot.  They had that look in their eyes that said they were tired of keeping up with kids, tired of standing in line, and beyond tired to know they still had two of the six lands to visit in order to get their (lots of) money's worth out of the day.  Kids were hot, moody and in desperate need of a nap.  Their attention span rendered them incapable of understanding why they had to wait in a long line for instant gratification.  The most ironic thing I overheard was a pushed-to-the-limit parent telling their pouty kid, "It cost alot of money to come here.  You're going to have a good time and I. MEAN. IT!"

The happiest place on Earth?  It is questionable for some.

Like everyone else, we were tired, hot and sweaty.  The kids were impatient at times, but I'm pleased to report that we had a really great visit.  We came away with good memories of a nice family vacation and I scored some really sweet souvenirs!

Anyone have the time?

The Mickey watch was a splurge for me and I picked up a really nice Christmas ornament at the Christmas shop in Liberty Square but there was one more thing I wanted - a cookbook to add to my already overburdened cookbook shelf.  It wasn't until we wandered through the Emporium on Main Street on our way out of the park that I found the one that I wanted.  Chef Mickey Treasures from the Vault & Delicious New Favorites contains recipes from various restaurants and resorts from both Disneyland and Disney World as well as from their cruise line.  I liked that it contained recipes from places that no longer exist within the Disney empire. 

It was hard to choose which recipe I wanted to try first, but I settled on Grilled Chicken with Sun-Dried Tomato and Goat Cheese Polenta ('cause you know I love me some goat cheese) as featured at Mama Melrose's Ristorante Italiano at Disney's Hollywood Studios.  I made it as written once (you can find that recipe here) but then changed it up by using shrimp and basil pesto from my freezer and decided it was one of the best meals I'd created in a long time. 

A great vacation, fun souvenirs and an awesome meal....it is the happiest place on Earth!


Sauteed Shrimp with Sun-Dried Tomato and Goat Cheese Polenta
Inspired by Chef Mickey Treasures from the Vault & Delicious New Favorites
Serves 4

Printable Recipe


Sun-Dried Tomato and Goat Cheese Polenta
1 cup chicken broth
1/4 cup heavy cream
1/2 cup water
1/2 cup cornmeal
1 small clove of garlic, chopped
1/2 teaspoon chopped thyme
1/4 cup chopped sun-dried tomatoes
1/4 cup goat cheese
1 tablespoon butter
1/2 teaspoon chopped basil
1/2 teaspoon salt

Shrimp and Asparagus
1 pound medium shrimp, peeled and deveined
Extra Virgin Olive Oil
16 fresh asparagus spears
Coarse salt and freshly ground black pepper, to taste
1/4 cup diced tomatoes
1/4 cup basil pesto, prepared or make your own

For Asparagus:

Preheat oven to 400.  Lay asparagus on baking sheet in a single layer.  Drizzle with olive oil (about a tablespoon or so) and season with salt and pepper.  Roast for approximately 15-20 minutes. 
 
For Sun-Dried Tomato and Goat Cheese Polenta:

Combine chicken broth, heavy cream, and water in a large pot over medium heat and bring to a simmer.

Slowly whisk in cornmeal, stirring constantly until thickened.  Don't whisk too fast or lumps will form.

Stir in garlic, thyme and tomatoes; add goat cheese and butter, stirring until cheese and butter melt.

Add basil and season to taste with salt and pepper.  Continue to stir and cook until cornmeal is creamy.

For Shrimp:

Heat olive oil (about a tablespoon) in a saute pan over medium high heat.

Add shrimp, tomatoes and 2 -3 tablespoons basil pesto.  Cook, stirring occasionally, about 7-10 minutes or until shrimp turn pink and tomatoes have cooked down a bit.

Put 4 spears of asparagus on each plate and top with 1/2 cup polenta.  Place shrimp and tomatoes on top of polenta. 


Pin It
  • Digg
  • Del.icio.us
  • StumbleUpon
  • Reddit
  • RSS

Got Eggplant?


Despite a ridiculously rainy summer, this year's garden bounty was still fairly decent and it's a good thing too, because I put alot of money and effort into revamping my garden space earlier this year. 


The Boy Toy was kind enough to haul my 300 pounds of crap and I nearly chopped off a few appendages and almost destroyed my fence while using my birthday present (thanks Pop!)
 

Unfortunately, my squash and zucchini never lived to see the light of day thanks to hungry wascally wabbits and some of my tomatoes fell victim to the monsoon conditions, but overall I was still happy with the results.  I was so excited to see these two lovely eggplants and the first order of business was to transform them into one of my all-time favorite dishes:  Eggplant Parmesan.  I'm even more excited that there are more eggplants coming along in the garden and they're slated for this fear inducing Ina Garten recipe.


Always quick and easy to prepare, this dish is also freezer-friendly.  Just prepare it up to the point of baking and pop it into the freezer to be thawed and prepared at a later date. 


Eggplant Parmesan
Serves 6

Printable recipe

1 large eggplant
flour
salt and pepper
2 eggs, beaten
2/3 cup vegetable oil
1 6-oz can tomato paste
2 16-oz cans diced tomatoes
1 cup water
fresh parsley, chopped
1-1/2 cup mozzarella cheese
2 cups freshly grated Parmesan cheese

Combine tomatoes, tomato paste, water, and parsley in a medium sauce pan.  Season with salt and pepper.  Simmer, uncovered, about 1 hour or until thickened, stirring often.

Prepare two plates:  one with flour seasoned with salt and pepper and the other with eggs.  Peel and slice the eggplant into 1/4" thick slices.  Season each slice liberally with flour, shaking off excess.  Dip slices into egg.

Heat oil in large skillet and fry slices a few at a time until golden brown, turning once.  Drain well on paper towels.

Spoon a thin layer of sauce in a baking dish  Arrange half of the eggplant slices, overlapping, over sauce.  Top with more sauce and half of the mozzarella and Parmesan cheeses.  Repeat layers.

Bake 400 degrees for 20-30 minutes or until sauce is bubbly and cheese is melted.  

Pin It
  • Digg
  • Del.icio.us
  • StumbleUpon
  • Reddit
  • RSS

Composting IV: Harvesting your compost


Sometimes the Boy Toy will entertain me with a story from his younger years - a scuffle with rowdy patrons in a bar or a crush he had on a girl with green hair and who wore "gobs" of mascara - and I wonder how in the world he ended up with the likes of boring ole' me. 

I'm a 40-too-many-year-old, childless, drama free, sedan driving girl who works a steady job, pays her bills on time and goes to bed every night by 11pm (okay, okay, I'll admit to dozing off around 10:15 on most nights.)  Given the choice, I'd prefer to stay home in my stretchy pants and play in my kitchen or work in my garden versus going out for a night on the town.  I'm thinking, though, that I'm the type of girl that a guy like Boy Toy (who's had about all the drama he can stand for one lifetime) seeks out at a certain point in life and (hopefully) ends up living happily ever after with.  And I don't see it as a bad thing at all that someone has "settled" for me because I'm interested in spending my days with someone who's worked through all the rowdiness and green-haired girls and can appreciate a good stable girl like myself. 

Probably the most exciting thing about me is that I have a worm farm (and I secretly believe that's what keeps him so attracted to me.)  People get a little weirded out when I talk about my worms - they give me that look like I've just told them a story about being abducted and probed by aliens and I'm trying to find my way back from the mothership.  They are secretly thinking to themselves what a kook I am but it's just because they just don't understand the excitement of composting. 

It was just a little over a year ago that I took a free vermicomposting workshop at the local library and learned that for very little cost I could create a "worm farm" and turn my kitchen scraps into nutrient-rich fertilizer for my flower and vegetable gardens.  I discussed setting up a compost bin in this post and about introducing worms to their new home and then I talked about feeding and maintaining the worms, so if you need to get all caught up with the program go right ahead because the time has come to harvest the compost. 

I harvested once before but I was too lazy to document the process and now that I've done it once, I realize what an undertaking it is and have decided that I will probably only do it twice a year from now on because it takes just as much time to harvest a little bit of compost as it does to harvest alot.  I'll be honest and say this is my least favorite part of composting only because it is time consuming but at the same time it is the most rewarding because your plants will soon perk up and flourish with the addition of the rich soil. 


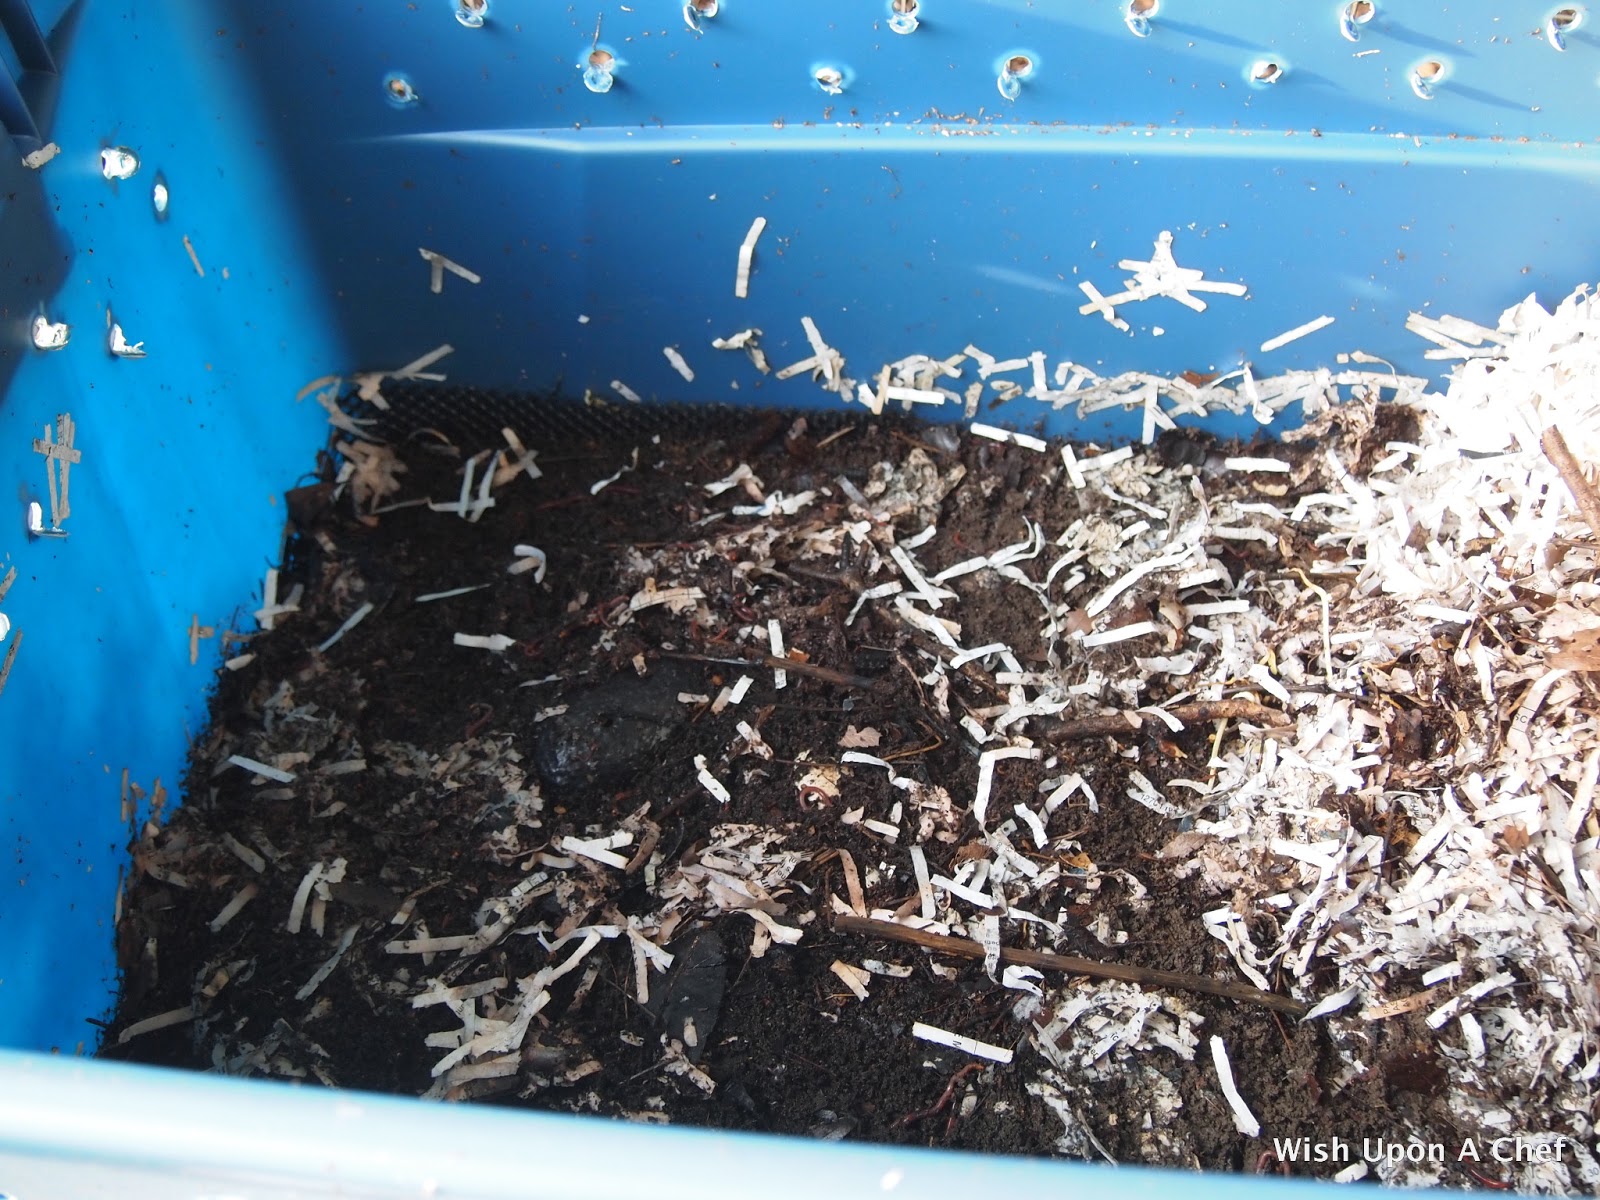
A few weeks before you want to collect your compost, start feeding the worms on only one side of the bin.  This will force the worms to migrate to that side of the bin and allow you to collect from the other side and not have to deal with separating so many of the worms (there will still be plenty to deal with that don't get the memo that they need to relocate.)  Push the paper shreds away until you see the dark, rich soil. 


Using trash bag or something disposable of the sort, scoop out a workable amount of the compost and lay it on the bag. You are basically going to be sorting through the compost to separate the worms and put them back into the bin.  You may also have some bits of scraps that aren't fully composted yet (I had alot of egg shells) that you'll want to pick out and throw back into the bin.  And yeah, you'll want to wear some rubber gloves. 


You'll notice at first that the worms are intermingled at the top of the pile of compost but leave them alone for a few minutes and they'll migrate down through the dirt to get away from the light.  Scrape off a layer of compost and let the worms migrate a little further down and scrape again.  It's a slow process, but you what else to you have to do on a Sunday afternoon?


There will be plenty of worms who sacrifice their lives for the cause of harvesting great compost because if you're like me, you'll start out lovingly returning the worms to the bin and after realizing that you are spending the day sorting through the worm crap of life, you won't give a flip if one or ten or fifty worms lose their life.  Most of my compost was added to my garden beds and much to my amazement I had ten thousand tomato plants spring up from the seeds that were in the compost.  Had I not already been up to my eyeballs in ripening tommy toes, I would have left them but a girl can only eat so many tomatoes.  What compost I didn't spread in my beds, I kept to make "worm tea" for my house plants.

So, yeah.  I'm the kooky girl with the worm farm but I've got some wicked awesome plants and I know you secretly find that attractive. 


How to create tea from worm casings

You will need: collected compost from a worm bin, cheesecloth, a large bucket, some water, and a squirt bottle.  You will use about a cup of compost per gallon of water for this "recipe."

You can start with this simple brewing process by following these easy steps:

  1. Use enough cheesecloth to tie the compost in "tea bag" fashion.
  2. Submerge the bag in a bucket of water.  It is best to use collected rainwater but if you are using regular tap water, let the water sit for a day or two so the chlorine with dissipate. 
  3. Dip the bag into the water a couple of times to aerate the solution and allow the nutrients to be diluted into the water.
  4. As soon as the dilution process is finished (the water will turn an amber color), you can then transfer the tea into a spray bottle.
  5. You can spritz your plants with this liquid fertilizer or water them directly. 

Pin It
  • Digg
  • Del.icio.us
  • StumbleUpon
  • Reddit
  • RSS

The postman always rings twice


When I was a kid, I had a fascination with receiving things in the mail.  One time, when I was about 10 or so years old, I subscribed myself to the ubiquitous Columbia House Record Company.  You know, the "Receive 11 records for only a penny!" scam deal.  I was so excited waiting for those records to arrive and when they did, I was stoked until the point that my mom made me use my allowance money to mail the records back to Columbia House along with a letter confessing that I was only a kid and not legally authorized to spend my daddy's paycheck on records. What a bummer.

Another time, I mailed off for yet another "only pay shipping & handling!" deal and I received a plastic hinged box that would hold stacks of cards that would come each month and educate me on different plant species (what kid wouldn't want that?!)  I'm quite sure that was promptly sent back using my hard earned allowance too. 

In adulthood, there are very few suprises that arrive in the mail.  Unless of course you consider the arrival of a bill you weren't expecting or the ever-present junk mail (excuse me, third-class mail) in your box each week.  One of the good things about being an adult is that I can subscribe to or order any darn thing that I want to and not have my mom make me send it back.  And yes, I belong to an underwear of the month club just because I can!  And I had an "Act now! Don't delay!" moment when I first heard about Green PolkaDot Box a few weeks ago. 


Green PolkaDot Box  combines my love of food with the love of receiving things in the mail.  Green PolkaDot Box sells natural, organic, non-GMO foods for about the same price (sometimes a bit lower) as what you would pay at the grocery store.  I like the fact that I don't have to spend time standing in the grocery aisles reading labels because you can trust that the products GPDB sells meets all the standards of wholesome eating.  Each of their products lists the ingredients and is coded to let you know if it's vegan, gluten-free, etc.   Orders of $75 or more get free shipping (and who doesn't spend at least $75 at the grocery store anyway?) but there is a packaging surcharge for refrigerated/frozen products.  Ordering online is a much easier option for me because I spend all day on the computer and it seems like there is never enough time in the week to get everything done, like grocery shopping. 


I've placed two orders with GPDB and have been pleased with everything so far.  There is a membership fee to join (think of it as being like Sam's Club or Costco) and they have a trial membership level that you can start out with if you're unsure of how it will work for you.  They occasionally send out emails with discount codes and between the two orders I've placed, I've already recouped my membership fee. 


If you're pressed for time, hate reading labels, looooove getting things in the mail (well okay, maybe that isn't a requirement), and want to feed your family natural, wholesome, non-GMO, organic foods then I highly recommend Green PolkaDot Box.  It's like having your own personal shopper!

Pin It
  • Digg
  • Del.icio.us
  • StumbleUpon
  • Reddit
  • RSS

Crockin' on!

 
I've been on a slow cooker roll here lately!  It seems that after I griped about the lack of things to prepare in my pot, recipes started jumping out at me left and right and from behind bushes.  And I recently came into possession of my 92-year-old grandmother's Crock-Pot and I'm totally digging the whole retro vibe of it.  I also scored her 1960's (I think) era combination slow cooker/fryer  called   Hy-Fry which looks just like this one.  It's never been used and she still had the original instruction booklet where she had penciled the date of December 25, 1974 which means she got it as a Christmas gift when I was 3 years old.  Call me sappy, but I'm hugely sentimental about things like that. 


I found a marinara recipe on Budget Bytes, which is a neat site that features really great recipes that are budget friendly.  Beth estimates this recipe costs a little over $5 to prepare - of course that's going to depend on prices in your geographic area and other variables like coupons, sale prices, etc. but even if it's a few cents more, it's still a pretty sweet deal.

I love having my freezer stocked with things that I can pull out last minute, thaw and have a good home cooked meal on the table without much effort at all and this fits the bill perfectly.  After the sauce cools, portion it up into 1/2 cup or 1 cup servings and freeze.  In addition to serving over pasta, this makes a great marinara for pizza (try this one topped with bacon, cheese and pepperoni or throw your favorite veggies on this homemade pizza dough.)

Slow Cooker Marinara
approximately 13 servings (1/2 cup)

Printable Recipe

2 (28 oz.) cans crushed tomatoes
1 (6 oz.) can tomato paste
1 onion, diced
1/2 Tablespoon garlic, minced
2 bay leaves
1 Tablespoon dried basil
1/2 Tablespoon dried oregano
1 Tablespoon brown sugar
1 Tablespoon balsamic vinegar
salt and freshly ground pepper, to taste

Add all ingredients to your slow cooker, cover and cook on low for 8 hours.  When done, stir the sauce and remove the bay leaves.  Season with more salt and pepper if needed. 

Pin It
  • Digg
  • Del.icio.us
  • StumbleUpon
  • Reddit
  • RSS