RSS

I currently live in Charlotte, NC and after spending 7 years as a personal chef and caterer, I am now happy to share my love of cooking with friends and family. My heart is in the kitchen, but my soul is in the stars!

Meatless Monday


I cannot stress how much I LOVE summer produce.  Meats become pretty much non-existent in my summertime meals because I prefer to feast mainly on the bounty of fresh fruits and vegetables available from farmers markets and from my Backyard Produce delivery service. 

Eggplant Caprese may be considered just a snack or appetizer for some folks but combined with some freshly baked hearty bread, it makes an entire meal for me.  Choose the best quality ingredients you can find because the sum of this dish is only as good as its individual components.  Pull out your best EVOO, choose the ripest heirloom tomato and the freshest Mozzarella and savor the flavors of summer!

I'm sharing my quick trick for turning a not-so-expensive balsamic vinegar into an expensive tasting one and it only takes about 5 minutes of your time.  It takes this fresh combination of flavors totally over the top!


Eggplant Caprese

Printable Recipe

Ingredients: 
1 small-medium eggplant
1 large ripe tomato
1 ball of fresh Mozzarella
1 to 2 tablespoons extra-virgin olive oil
Salt & freshly ground black pepper
Chopped fresh basil
Balsamic vinegar*

Preheat your oven to 500 degrees (or use the "broil" setting).

Wash the eggplant and cut it into 1/2" inch thick slices.  Slice the tomato and Mozzarella in slices as well.

In a large skillet, heat olive oil over medium heat.  Season eggplant slices with salt and pepper and place the eggplant slices into the pan.  Drizzle with a little more oil, if needed.  Fry eggplant, turning once, for about 2 minutes or until golden brown, but not too soft.  Remove eggplant from the pan and place in an ovenproof dish. Top each slice with a slice of tomato and a slice of Mozzarella. Season with more salt & pepper. Place dish in the oven for about 2 minutes or until Mozzarella starts melting. Remove from the oven, sprinkle with some chopped basil and a little balsamic vinegar.

*If you're using an inexpensive balsamic vinegar and would like to turn it into a delicious and expensive tasting vinegar, just pour about 4 times as much vinegar as you're going to need into a small saucepan.  Bring to a boil and allow vinegar to simmer for about 2-4 minutes.  Allow it to reduce until it's slightly thinner than what you want because it will continue to reduce after you take it off the heat.   Drizzle over meat, fish, fruits or vegetables. 

Pin It
  • Digg
  • Del.icio.us
  • StumbleUpon
  • Reddit
  • RSS

My Daily Bread


There is a great debate about the healthiness of grains in our diet. Some schools of thought believe our grain supply has been genetically modified to the point that grains are more harmful and no longer beneficial to our bodies. Others argue that whole grains are a good source of energy and fuel for our bodies and offer some health benefits in the form of reducing heart disease, risk of stroke, and controlling diabetes. Many people suffer from symptoms that require them to adhere to gluten-free diets, and there of those of us (me) who believe all things in moderation is key to maintaining a healthy balance to diet and life.
 
I'm a sucker for really good bread and there is no way I could completely cut it out of my diet, short of being required to because of allergies or sensitivities. Always tempted by the smell of artisan breads from the bakery section of my beloved Harris Teeter and Publix, the sample tray lures me in every single time.  But the problem that I have with those purchased artisan breads is that a) I can never eat all of it in one sitting (nor should I) and it never seems to be as good and fresh the next day, b) I think it's expensive to purchase if I'm not going to reap the full benefit of eating it all, and c) now that I'm focusing more on real food, I prefer to make my own bread and have control over what is in it.

This recipe from A Little Bit Crunchy A Little Bit Rock and Roll isn't an artisan style bread and it's 100% whole wheat (something I've never really cared for with store-bought breads before), but I can promise that it is good bread.  Really good bread. 

I've always struggled with making homemade bread, failing more often than not, but this bread was simple to make and I nailed the results on the first try.  The best part about the recipe - it makes two loaves!  One for now and one for later.  I froze my second loaf in a large Ziploc bag for a couple of weeks and it was just as fresh as the loaf I ate straight out of the oven. The bread was soft unlike many other whole wheat bread recipes I've tried (my last attempt could have been used as a wheel chock for a dump truck) and there was a deliciously slight taste of honey.  This will definitely now be my go-to recipe for bread. 

A Little Bit Crunchy A Little Bit Rock and Roll is a great blog to read - full of healthy real food recipes and a few indulgent ones too.  Head on over and check her out!


Soft 100% Whole Wheat Bread
from A Little Bit Crunch A Little Bit Rock and Roll

Printable Recipe

Ingredients:
4 1/2 teaspoons dry yeast
1/4 cup warm water (*105-115 degrees F)
1/4 cup vital wheat gluten (such as Bob's Red Mill)
1/4 cup ground flax seed
1 tablespoon Himalayan pink sea salt (or any salt)
1/4 cup oil (vegetable or grape seed)
1/2 cup raw honey + 1 tablespoon (or molasses or a combination of both)
2 1/2 cups warm water*
6-7 cups whole wheat flour

Directions:
1. In a small bowl, add 1/4 cup warm water, yeast, and 1 tablespoon honey. Stir together and allow the yeast to bloom for about 10 minutes. (The yeast will become active and puffy if it's alive.)
 
2. Meanwhile, in the bowl of your Kitchen Aid Mixer, add 6 cups of flour, vital wheat gluten, flax seed, and salt. With your dough hook attachment on, turn on the mixer to stir the ingredients together.
 
3. Add the bloomed yeast mixture and 2 1/2 cups warm water. Add oil and honey.  Turn on the mixer to #2 and allow the dough to knead for about 5 minutes. Gradually add in more flour, 1/4 cup at a time, until the kneaded dough just begins to pull away from the side of the bowl.

4. Grease a large mixing bowl. With wet hands, scrape the dough into the greased mixing bowl. Lightly grease a piece of plastic wrap and cover the bowl. Put the dough in a warm place for about an hour. (Until it has doubled in size.)
 
5. On a lightly floured counter, turn out your dough and give it a quick knead. Divide the dough into two equal pieces. Lightly roll out one of the pieces until it is about 12-14 inches long.  Roll up the dough and place seam side down in a greased loaf pan. Repeat with the second piece of dough. Cover both pans with a piece of greased plastic wrap. This step may seem unnecessary, but this is what will give your bread a nice swirl pattern on the inside.

6. Place the loaves in a warm place so they can rise for a second time. Let rise for about 30 minutes. Preheat oven at 350 degrees F and let dough continue to rise for another 20 minutes while the oven preheats.

7. After the oven is preheated, remove the plastic wrap and bake for about 40 minutes.

Pin It
  • Digg
  • Del.icio.us
  • StumbleUpon
  • Reddit
  • RSS

Being "Real" is Hard


I'm a couple of months into my real food journey and some days I feel like I'm trucking along pretty good and other days I feel like I've stalled out on the side of the road.  As I mentioned in this post, changing your eating habits to include more real food is not something you can just wake up one morning and decide to do and go at it 110%.  It takes planning and thought (both of which I'm good at doing) and patience (which I'm not so good at having) but it just cannot be done overnight and is not the easiest thing I've ever done.  Check out this article for some tips on getting yourself started in the right direction and budgeting for eating healthier and more real. 

My pantry still contains some processed food from previous shopping trips and I do still use them because I don't want to be wasteful, but as they are being depleted I am buying more suitable real food options.  Can you imagine how long it has taken/will take just one person to deplete the overloaded pantry shown above??  I no longer buy the various brands of crackers that I loved, instead opting for Triscuits since they contain whole wheat and less than five ingredients (and I've even started making my own crackers).  I've added coconut oil, whole wheat flour, and honey to my staples. I snack on nuts and seeds now instead of chips and cookies. I have only purchased one bag of sugar since early December and that was used to prepare treats for Boy Toy's kids (as I don't intend to push my eating habits/beliefs on kids who aren't my own.)


I've also started purchasing meats from Windy Hill Farm, a small family-owned farm located in New London, NC.  They focus on humanely raising animals with no antibiotics or growth hormones.  They offer a CSA program (where you basically invest in a share of the farm in exchange for receiving a share of the crops) or you can shop their products online and have them delivered to one of the three drop-off locations nearest you.  They are also available at area farmers markets (check their website for schedules and locations.)  The folks from Windy Hill were super nice when I met them for pickup and they told me that the whole chicken that I ordered had just been processed a few hours prior.  How's that for fresh??  Check out their products online and make plans to stock your refrigerator and freezer with fresh eggs and meats. 


Another service that I'm currently trying out is ordering organic and locally grown produce and having it delivered right to my door each week from Backyard Produce.  They've got a very wide delivery range including Wilmington, Triangle, Triad, Charlotte, Fayetteville, Jacksonville, Greenville,New Bern and Richmond (check to see if you are in a delivery zone.)  They offer several different levels of service and each week you shop with points that you accumulate according to your specific plan.  I get a box every other week simply because it takes me awhile to eat all of what I receive, and that's one of the great things about Backyard Produce - you can put your orders on hold any time you need to.  Their offerings change based on the season and availability.  It's not just produce either - they have North Carolina-made products like cheese, bread, salsa, granola, etc. 

Using these two services has made it much easier for me to make the change to natural, organic meats and produce because I am not tempted to shop strictly based on price for the cheaper non-organic and natural items in the grocery store.  In actuality, I don't feel that I pay any more for these conveniences than I would if I were making weekly trips to the grocery store.

Stay tuned for some fun recipes using the Backyard Produce items and Windy Hill meats. 

Pin It
  • Digg
  • Del.icio.us
  • StumbleUpon
  • Reddit
  • RSS

Polly Wants A Cracker


When I first made the decision to cut out processed foods and move toward real food, I was worried about what I would eat for snacks as the items that I once considered pantry staples/snacks started disappearing from my shelves.  I'm not a huge snacker but my weakest moments happen when I just get home from work and start preparing dinner.  

I'm slowly working my way through some real food snack recipes that I've found online to find ones that I like and I've purchased a few items like Larabars, Triscuits and roasted almonds for quick "grab a handful and go" snacks.  Of course, fresh fruits and veggies make excellent snack choices as well. 

I ran across this recipe from 100 Days of Real Food for Easy Cheesy Crackers with only three ingredients.  They're super easy to mix up, bake and have on hand for snack attacks.  They freeze well (either as an unbaked log or go ahead and slice, bake and freeze) so you can have them on hand any time you like.  They taste just like Cheez-Its or maybe like the goldfish crackers, although I haven't had one of those in eons to remember exactly what it tastes like. 

When I make these, I like to add some fresh herbs to the dough - whatever is growing plentiful in my garden at the time - and cut them really thin.  Serve on a platter with your favorite cheeses and/or fruits or just eat them for a snack all by themselves. 

Make sure you visit Lisa Leake's page 100 Days of Real Food for more great tips on how to gradually change your diet and menus to include more real food. 

Cheesy Herb Crackers
Makes about 2 dozen, depending on thickness

Inspired by Lisa Leake's Easy Cheesy Crackers

Printable Recipe

1 cup whole-wheat flour
5 tablespoons cold butter, cut into tablespoon size chunks
1 ½ cups (about 4 oz.) grated cheddar cheese
2 tablespoons fresh herbs of choice, chopped (chives or dill makes an excellent choice)
Preheat oven to 350 degrees F.
 
Combine first three ingredients in a food processor and blend until it forms a dough ball (it may take a few minutes).
 
Roll the ball into a log about 1 ½” in diameter.  Roll dough in your choice of chopped herbs, coating the outside of the whole log.  (If you'd like your herbs to be mixed into your crackers, just knead them into the dough ball as you are shaping it into the log)  You can refrigerate or freeze at this point if you'd like to wait until later to prepare.
 
Slice into ¼” thick rounds and place on an ungreased baking sheet.
 
Bake for 8 - 14 minutes or until golden brown.
 

Pin It
  • Digg
  • Del.icio.us
  • StumbleUpon
  • Reddit
  • RSS

Severe Storm Preparedness

Pleasing a teenager is like predicting the weather.  Temperatures and moods can swing wildly from warm and cheerful to cold and frosty at any given time and with no warning.  Even with the best means of prediction, a raging hormonal storm can take you by surprise when you least expect it. 

I've learned that I can somewhat protect myself from impending Teenage Boy Doom by wielding food when I show up to Boy Toy's house.  So far I've managed to thwart a mood swing with chocolate chip cookies, Country Club Chicken, and this Chicken Cordon Bleu casserole. 

This casserole can be made ahead, which I often do and send home with Boy Toy to have for dinner after those long days spent on the baseball field.  After serving it the first time and having the remaining 2/3rds of the pan fall victim to whomever raids the refrigerator in the middle of the night (hmmm...I wonder?) and a request to prepare it again, I knew I had another storm preparedness item on my hands. 

You can take the quicker and easier route to making this dish by using two cans of cream of chicken (or mushroom or celery) soup instead of making the sauce from scratch but in my effort to steer clear of so many processed foods, I've found that it doesn't take very long to whip up a basic cream sauce and I think spending the few extra minutes is worth it.  I also used brown rice for the base and whole wheat bread crumbs for the topping as a way of sneaking in a few health(ier) ingredients. 

Here's how to prepare yourself for Teenage Boy Doom in six easy steps:

Layer about 4 cups of cooked rice in the bottom of a pan
 
Add a layer of cooked, diced chicken

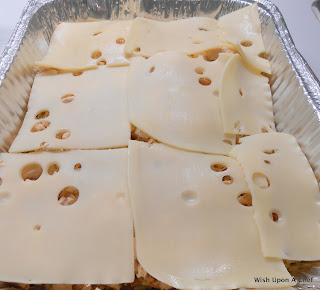
Layer the chicken with Swiss Cheese


Next comes a layer of chopped deli ham

Top it all off with homemade cream sauce (or a couple of cans of cream soup)

The finishing touch of bread crumbs before baking


Chicken Cordon Bleu Casserole
adapted from www.tastykitchen.com

Printable Recipe

FOR THE CASSEROLE:
4 cups cooked rice
5-6 cups cooked, diced chicken (rotisserie chicken works great)
1/2 pound deli-style ham, chopped
1/4 pound sliced Swiss cheese
FOR THE SAUCE:
4 tablespoons butter
4 tablespoons flour
3-1/4 cup milk
2 tablespoons fresh lemon juice
1 tablespoon Dijon Mustard
1-1/2 teaspoon salt
1/2 teaspoon paprika
1/4 teaspoon white pepper
FOR THE TOPPING:
6 tablespoons butter
1-1/2 cup toasted bread crumbs
3/4 teaspoons seasoned salt
1-1/2 teaspoon dried parsley

Grease a 9x13 baking pan.  Spread cooked rice in the bottom of the dish. Top rice with cooked chicken.  Scatter the ham over top of the chicken.  Lay cheese slices on top of the ham. 

For the sauce:
Melt the butter in a large sauce pan over medium heat.  Stir in flour and cook for about 1 minute, but do not brown.  Slowly add milk and whisk constantly until smooth.  Cook over medium heat, stirring constantly, until sauce thickens.  Stir in lemon juice, mustard, salt, paprika and pepper.  Bring sauce just back to a low boil and remove from heat.  Pour sauce evenly over casserole, making sure you cover the edges.

For the topping:

Melt butter in the microwave in a microwaveable bowl.  Stir in bread crumbs, seasoned salt and parsley.  Sprinkle over top of casserole.

Bake uncovered for about 45 minutes at 350 degrees.  Casserole will be bubbly and topping should be golden brown.  Remove from oven and allow to cool about about 5 minutes.


Pin It
  • Digg
  • Del.icio.us
  • StumbleUpon
  • Reddit
  • RSS