RSS

I currently live in Charlotte, NC and after spending 7 years as a personal chef and caterer, I am now happy to share my love of cooking with friends and family. My heart is in the kitchen, but my soul is in the stars!

Showing posts with label just for fun. Show all posts

Chacewater Winery offers organic wine


The Boy Toy and I just returned from a much needed week long vacation of swirling and sipping our way through the California wine country. Not long before we started planning this trip, I accepted a job at a North Carolina wine and beer distributor and I soon found out that being “industry” ensured that the wine flowed and preferential treatment ensued during our winery visits. And I was not one bit ashamed of throwing my business card around - tastings and tours in Napa and Sonoma can get pretty pricey and we visited eight different wineries.

We also spent a couple of days seeing the sights of San Francisco since we were so close and Boy Toy had never been there. I took over 400 photos! I managed to whittle them down to a select 156 few and you can view them all here if you’d like.It’s been really hard to get out of vacation frame of mind and back into real life – I’m still pretending to be in the wine country each evening by pouring me a glass of wine while preparing dinner and trying to dissect its nuances.

Of the eight wineries we visited, six were suppliers that my company represents, which meant that I didn’t need to bother with buying their wine to bring home if we enjoyed it – I can just call out to the warehouse and have it brought to me. And you would think with that job perk, I wouldn’t need to buy wines from any other source. But there was one winery that I WANTED to buy from called Chacewater. Their grapes are grown organically and farmed bio-dynamically and their products carry a certified organic label. I had high hopes of coming back to work and spreading the good word about Chacewater in anticipation of adding them to our distributor portfolio, but my boss informed me that the word “organic” on a wine label is the kiss of death.  I was shocked to learn that – I know there aren’t many organic wines on the market but I would think with more and more people migrating to an organic and real food lifestyle it would be a growing part of the industry.  But then again, I also know that the concept only appeals to a minority.  So I’m singing the winery’s praises here and hoping it benefits someone looking for organic wines.  
 
We found ourselves at Chacewater’s tasting bar one afternoon based on a recommendation from my doctor.  In addition to a wine tasting, we were also offered an olive oil tasting.  It was here that we learned California wineries do not offer by- the- glass purchases of wine to enjoy after a tasting like we are used to here in North Carolina but Ryan, our pourer, allowed us to “revisit” as many wines as we wanted.   Each of their wines was very impressive and I liked them all – I walked away with a bottle of Highlander Red and I don’t even consider myself a lover of red wine!  I also brought home the four-bottle sample pack of olive oils and a bar of lavender mint scented soap.  


The founders, Paul and Kellye Manuel, had been tending to vineyards for nearly twenty years and selling the organically grown grapes to Fetzer when they had the opportunity to purchase 10 acres of vines in Lake County from the monks of Saint Gregory of Sinai Monastery.   Shortly thereafter, they built Chacewater and the name plays homage to Manuel’s ancestral town of Chacewater in England.

It wasn’t long before Chacewater’s winemaking portfolio gained recognition and in addition to wine, they produce certified bottles of award-winning Tuscan extra virgin olive oils and citrus infused oils from 8 varieties of olives grown on site.  Any of their olive oils that are two years or older in age are sent out and returned in the form of luxurious EVOO-based scented soap products.

Chacewater olive oils, wines, and soaps are not distributed in states other than California but they may be purchased online.  Once my funds recover from vacation spending, I plan to stock my wine refrigerator with more of Chacewater’s products.

If you happen to be visiting the Lake County area, their tasting room is open Monday – Sunday from 11am to 5pm.  They are located at 5625 Gaddy Lane, Kelseyville, CA .

Pin It
  • Digg
  • Del.icio.us
  • StumbleUpon
  • Reddit
  • RSS

12 Days of Cookies: Gingerbread Houses


Some 30+ years ago, my mother attended a holiday workshop hosted by the Sullivan County Extension Homemakers (which is the grown-up version of 4-H) to learn how to make gingerbread houses. She came home that evening sporting her decorated house, the recipe for gingerbread dough and a cut-out pattern for future constructions of the house. As a kid, I was mesmerized by her cute little bungalow-style house smothered entirely in candy and sugary sweet icing and to this day I'll admit to still being verklempt anytime I see gingerbread construction.

It wasn't something we did together every year, but I can remember my mom and I making the houses together a few times and giving them as gifts to my school teachers, grandmothers, and some very close friends. If you got one of our houses, you were somebody special because this project was very detailed, time-consuming, expensive and alot of hard work.  I see these all-inclusive gingerbread house kits in the stores with everything already baked and candy and icing included, but I cannot and will not succumb to buying them because for me, it's a labor of love and a tradition to make them with my own two hands.


This year I am so excited to share my and my mom's tradition of decorating gingerbread houses with Boy Toy's daughter and some of her friends (I was probably more excited than they were!)  I volunteered to host a building and deocorating party for them this past Saturday afternoon and everyone had a great time - even the grown men who originally thought candy and icing was only for girls! 


I prepared the dough and baked the houses a week ahead of time because I've found that if you construct the houses right after baking, the pieces are soft and are easier to break or crumble.  I leave the pieces out on the counter for a few days to let them harden. 


The windows are made with crushed Jolly Rancher candies and I make some of them solid colors but I love the stained glass window effect of mixing two colors together in the same window.  When making the windows, make sure you use plenty of candy - it's okay if it's heaped up just a bit because it will melt and fill the space nicely (just make sure you don't get any bits of candy on the walls.)  I purchased 12" x 36" pieces of white styrofoam and cut them into thirds to act as the base for the house and I used Wilton Meringue powder to make the royal icing but you can make your own per the recipe below. 


Waiting for the decorators to arrive
The party guests ranged in age from 9 to 11 so I went ahead and constructed the houses about an hour before they arrived so the icing would have time to dry a bit before adding the candies.  I feared the kids' attention span wouldn't allow for the construction AND decorating and I was right - they were all about the candy and icing.  A great time was had by all and I'm hoping it is something that will become a holiday tradition in the Boy Toy household.

The gingerbread 'hood
Visit this post for my tried and true gingerbread dough recipe and to see some of my past housing creations.  I've included below another copy of the pattern that I've used every year as I noticed the link on my original post is no longer valid (and I'm too lazy to try and fix it). 


If you'd like even more ideas, check out my Flickr slideshow from last year's gingerbread house competition at the Ballentyne Resort here in Charlotte. 

Pin It
  • Digg
  • Del.icio.us
  • StumbleUpon
  • Reddit
  • RSS

12 Days of Cookies: Canine Cookies


Don't forget about man's best friend this holiday season - after all, our four-legged friends give so much unconditional love to us and work really hard (like dogs, practically) protecting and guarding the homestead.  My little guy can make a full day of work out of guarding the comforter on my his king-size bed and protecting it from being used by anyone else. 


Sometimes the work is very grueling and tiresome, but nevertheless he's always there keeping my side of the bed warm and making sure no one else sneaks in and steals it.


These canine cookies from Tasty Treats for Demanding Dogs are really simple to make and if your kids are getting bored and a bit unruly during their holiday break, turn them loose in the kitchen to make these.  Most likely you already have everything in your pantry to make them with the exception of the baby food (unless of course you have a two-legged baby too).  If your dog is sensitive to store-bought brands of treats, this is a great book to have because the recipes are really simple and alot of them use regular people food.  It is available on Amazon.com for really cheap.   And wouldn't this make a great Christmas gift for pup!


The cookies do puff a bit during baking so make sure to only roll them about 1/4" thick.  I used a medium-sized bone shaped cookie cutter and got approximately 50 cookies.


You will be tempted to give Fido a cookie straight away as soon as they cool (especially if he's a moocher like my boy), but he'll be happier than a kid at Christmas if you let them dry overnight because they become hard and crispy just like the store-brand cookies that Santa usually brings.


Canine Cookies
yield: approximately 50-90 cookies, depending on size of cutter

2 cups whole-wheat flour
1/2 cup unbleached all-purpose flour
1/2 cup nonfat dry milk or whey powder
1/2 tsp garlic powder
1 large egg
1 TBLS molasses (optional)
4.5 oz jar chicken-soup baby food
3/4 cup broth or drippings, or sufficient for forming dough

Postition rack in the center of the oven and preheat to 400 degrees.  Lightly grease or use parchment paper to line two cookie sheets or baking trays.

In a large bowl, using a fork or wire whisk, blend the flours, dry milk and garlic powder.

In a medium bowl, using a wire whisk or electric mixer on medium speed, beat the egg until foamy before beating in the molasses, baby food and broth.

Using a large spoon, spatula or your hand, combine the two mixes, blending until the mixture pulls away from sides of the bowl and forms a soft dough.  If the mixture seems a little dry, add a little broth, a tablespoon at a time.

Turn the dough onto a lightly floured flat surface, and using a rolling pin, roll out to 1/4" thick.  Use a 1-1/2" round cookie cutter to cut out as many cookies as you can, reworking the scraps as you go.  The doug will become still as it is reworked.

Place the cookies side by side on the prepared cookie sheets or baking trays.  Bake for 15-20 minutes or until the cookies appear very dry and the edges are light golden brown.  Remove the trays from the oven and cool to room temperature.  Turn off the oven.

When the cookies have cooled completely, put all of them on a single baking tray and return them to the cooling oven.  Leave them undisturbed, without opening the oven door, for 8 to 16 hours. 

Please note:  Some dogs may be allergic to garlic or sensitive to dairy products. 

Merry Christmas to all and to all a good night!

Pin It
  • Digg
  • Del.icio.us
  • StumbleUpon
  • Reddit
  • RSS

Summer Recap

My favorite photo from this summer, taken during our trip to Litchfield Beach.


Where does the time go?

It seems like only a few days ago I was excited for the beginning of summer and here I am doing an end of summer recap.  I can remember as a kid thinking the summers seemed to fly by and school started way too soon and now that I feel that way even as an adult, I wonder if I'm going through my second childhood?

It has been a month since I've posted here at Wish Upon A Chef and while I never want to feel like this blog is an obligation and something that I absolutely have to do, I do always feel better when I write here and for my various other online sources.  But it's been a busy summer and while there has been alot of activity in my kitchen, other things sometimes take precedence over styling my food for a pretty photo and keeping up with the recipe to be recounted here.  I know everyone else is in the same situation trying to juggle summertime activities, vacations, and getting ready for back-to-school. 

I've spent a great deal of time this summer bonding with the Boy Toy's children and I'm pleased to report that things seem to be going well.  Food always seem to bring people together whether they are preparing it together or gathering around the table to enjoy the final product.  I'm lucky that Boy Toy's daughter likes to work as my sous chef and he and his son love indulging in the fruits of our labor.  Cooking with kids can be so rewarding - I believe that when children see what goes into their food and make an effort to help prepare it, they have a much better appreciation of what goes into their bodies.  A couple of weeks ago, we prepared these beef tips which are loaded with mushrooms and I was nervous because I've never met a kid yet that claimed to like them.  When my sous chef  spotted the shrooms in my frig, she immediately wanted to know if they were going into our recipe and I got the obligatory "Yuck!" when she found out the answer.  The same thing happened when we mixed up the milk, mustard and cornstarch - it was deemed "gross."   But imagine my delight when, as she was pushing the fungus around on her plate and I reminded her how hard she worked to slice them, she agreed to try one and decided it "wasn't that bad."  She also went into great detail telling her brother (who had two generous helpings minus the shrooms) about how we made gravy out of milk and mustard.

It was a beautiful moment.     

We also made Rachael Ray's sloppy joes and while I got some up-turned noses at the mere mention of sloppy joes, there was absolutely nothing left over to photograph.  We've done No Bake Cookies which contained dreaded oatmeal but were declared a winner and peanut butter cookies which disappeared rather quickly too.  I've made alot of pimiento cheese for their dad as it seems to be his favorite for parties, beach trips, and any day that ends in "Y."  And I did knock his socks off one date night with my shrimp and grits.  It pretty much sealed the fate of him loving me forever! 

Now that school has started its regularly scheduled program, hopefully I'll get back to pumping some new and exciting things out of the kitchen to share with you and I hope you enjoyed Summer 2012!

Pin It
  • Digg
  • Del.icio.us
  • StumbleUpon
  • Reddit
  • RSS

Composting III: Feeding Your Worms

Now that you've built your composting bin and introduced your worms to the bin and allowed them to adjust to their new surroundings, it's time to make them fat and happy.  They will start turning their bedding and food scraps into compost immediately and after several months you will be able to harvest some compost for your flower and vegetable garden.  It won't take long before you notice the increased growth and vigor of plants treated with your homemade vermicompost. 

Your worms will eat most anything that was once growing.  I've included a list of items below that are compostable but it's in no way a complete list.  You will soon learn what your little buddies like to eat best and how quickly they can process the amount you are giving them.  I keep a one gallon resealable container in my refrigerator that I add my food scraps to as I'm preparing dinner and I'm honestly amazed at how much stuff I collect in a week that would normally go straight into the trash. 

A few tips to keep in mind when feeding the worms: 

You don't need to feed your worms every day.  I've started out feeding once a week and will adjust accordingly as I see how quickly the worms process.  If you have a foul odor or notice flies, gnats, or maggots in your bin, that is a sign that you are feeding too much/too often and your worms cannot keep up.  You will notice other insects in your bin and that's totally fine.  The more the merrier when it comes to breaking down the items into compost.  Do make sure your lid stays on tight (consider a bungee strap if there is a chance it could easily be removed) to prevent intruders such as raccoons, opossums, etc. 

When collecting your vegetable/fruit scraps, chop them into smaller bits so it's easier and quicker for the worms to work through them.  When adding the food to the bin, don't just scatter it all over the top of the bedding as worms will migrate to the source of food so the idea is to get them all to migrate to one area of the bin at the same time and have them all working together.  If the food is scattered, your worms will be scattered and it will take longer.  Work your way around the bin by feeding in each of the four corners and then in the middle of the bin each time you add food.  Raise the bedding just a bit and place the food just under the shredded paper and cover it back over.  Worms like to burrow into darkness and won't be too happy to have to rise to the surface for food.  Remember to check the bedding for moisture and use a spray bottle to wet it if it's drying out.

Compostable Items

Fruits
Vegetables
Newspaper
Cardboard
Office paper
Coffee grounds
Tea leaves/bags
Paper towels/napkins
Leaves
Grass clippings (avoid if you have your lawn chemically treated for weeds)
Sawdust (non-treated, non-aromatic woods only)

Do not include items such as meat, dairy products, oily foods, spicy or salty foods.  Some citrus is okay, but don't add alot at one time.  I read that it can have the same effect on the worms as the feeling of getting lemon juice into a cut on your skin.  OUCH! 

The easiest and best way to use your compost is to top dress the soil around your plants with a thin layer of the castings.  A 1/4" deep layer on top of the soil has been proven to increase plant growth by as much as 25%.  The castings can also be added to water and used as foliage spray and has been shown to drastically reduce plant pests, including aphids.  To make the worm "tea," add about a cup of castings to a gallon of water and allow to steep for 24 hours.  It can then be sprayed on the leaves or used to feed/water the plants.  You should see results in about 3 days. 

When I first started this project, I was afraid that the thought of hundreds of worms in my backyard would freak me out.  But if I had to be honest, I now worry about my worms almost like I do my dog.  Are they too hot or cold outside?  Are they happy and well fed?  I check on them daily and will continue to sporadically report their progress as my project moves along.  If you are also vermicomposting, please leave me a comment and let me know how it's working for you!


Pin It
  • Digg
  • Del.icio.us
  • StumbleUpon
  • Reddit
  • RSS

Composting II: Introducing Worms to Your Bin

Last week I shared details on building a compost bin to be used for vermicomposting. Now we're ready for the next step of making the bedding for the worms and introducing them to the bin. 


It was suggested by the instructor of the free library workshop that I attended that Red Wigglers are the best type of worms to be used for vermicomposting and he recommended starting with a pound of worms.  These can be purchased online from various sources or from any place that sells fishing bait.  My container is a bit larger than the one our instructor demonstrated in the workshop, but I've decided to stick with using a pound of worms because after reading the literature given to us, I found out there are at least 500 worms in a pound and that, if happy in their conditions, they can multiply really quickly and I'd be lying if I said I wasn't a little creeped out thinking about potentially having hundreds of worms in my back yard.  It is undecided at this point if I will ever sleep well again knowing that.  I purchased my worms online from Worms, Etc., located in Greer, SC.  My worms arrived alive and well the day after they were shipped. 


Shredded newspaper and cardboard are used for the worm bedding.  You can rip the paper into shreds yourself or if you have access to a paper shredder, that does the trick too.  I used two daily editions and a Sunday edition of my local newspaper to start with.  Once the papers are shredded, soak them in water until they are thoroughly wet and then squeeze the water out before adding it to the bin (pull the paper apart just a bit and fluff it so it's not one big wet clump).  You will need to make sure your bedding always stays moist (but not dripping wet) in the bin so keep a spray bottle handy in case you need to add moisture.  The worms prefer dark and moist conditions and will not survive long if their bedding dries out. As you are adding the shredded wet paper, also toss in a couple of handsful of dirt here and there.  The worms require this to help process and digest the food scraps.  The bedding will eventually be broken down and become part of the composting process so you'll need to add more bedding as needed.  Think about shredding and saving your junk mail, napkins, and paper towels. 


When the bedding is done, it's time to add the worms.  Worms prefer to live and work in darkness, so after you put them into their new home, leave the lid off for a bit to force them to burrow into the bedding.  It will take a little while for them to get used to their new surroundings so you'll want to wait a day before feeding them.  In the meantime, save some of your vegetable and fruit scraps from the kitchen for a couple of days prior to adding your worms so you'll have something for the first feeding.  The next post will discuss in more detail what you can feed your worms and how often you should feed them.

My bin is now situated in the far corner of my yard, next to my garden and under a shade tree. 

Pin It
  • Digg
  • Del.icio.us
  • StumbleUpon
  • Reddit
  • RSS

Composting I: Building Your Bin

Gardening has always been a hobby of mine but until recently I haven't had much time or space to dedicate to it. My maternal great-grandmother had a green thumb and I was lucky enough to inherit her same love of plants and flowers through the years. I bought a house back in the mid '90s that had established flower beds but then later moved into a condo for several years with no outdoor space and then the conditions in that other not-to-be-mentioned place where I lived weren't right for gardening at all ~ too shady, too many deer and a spouse who didn't want me to make "a mess" in his yard. Now that I am the woman of the house, I can make as big of a mess in my yard as I want to!

Last year was my first attempt at vegetable gardening after a long absence and this year I've also added alot of flowers and herbs to the beds in the back of my house.  During the winter I started adding my fruit and vegetable scraps to my garden area in the hopes of enriching the soil and when I saw that my local library was offering a free one-hour workshop on composting, I decided to check it out and see what I could learn.  The workshop focused on vermicomposting, which is the process by which worms are used to break down food scraps and other items such as grass and leaves that are added to their territory.  The result is a rich earthy matter that can be added to soil.  With the exception of one or two items, I had everything already on hand to put together a composting bin so I was eager to get started.  I will attempt to share my composting experiences with you through a series of blog posts, and today we'll focus on building a bin.

The idea behind this method of composting is that you can do it anywhere so if you are limited on space the bin can be kept on a patio, in a garage, or in a laundry/mudroom room inside your house.  Keep in mind that there are worms involved and supposedly they won't leave the confines of the bin, but I'm not sure how comfortable I am knowing there would be hundreds of worms in my laundry room ~ sounds to me like a possible remake of the movie Attack of the Killer Tomatoes ~ so my bin is going to be kept in the far corner of my back yard.


 Items you will need:

A container with a lid  (I used a Rubbermaid plastic tote)
Bungee cord (to secure lid), optional
Drill with drill bit (I used 3/4" bit)
Styrofoam packing peanuts
Landscape fabric (the stuff you put down to keep weeds from growing)
Plastic garden fencing
Shredded newspaper
A couple scoops of potting soil or garden dirt


Use the drill to drill holes in the lid and around the container, about 1" or 2" below the rim. You can also drill them in the bottom if you plan to put the container outside. (It may be helpful to know at this point that there is a "forward" and a "reverse" on the drill.  It works much better if you have it in "foward" as I found out about halfway around the tub.)


Fill the tub with a couple of inches of packing peanuts. Cut the plastic fencing to fit and lay over the peanuts and then cover the fencing with a piece of landscaping fabric. This creates a false floor for your bin and allows an area for any drainage that may occur.  If you need to remove the contents of your bin at any time, you can just pick up the fencing and pull it out of the bin easier.

At this point you're ready to use the newspapers and potting soil to make bedding for the worms, add the worms and start feeding them scraps.  I will continue with these steps in the next post.

Pin It
  • Digg
  • Del.icio.us
  • StumbleUpon
  • Reddit
  • RSS

All Ramped Up

Listerine's next ad campaign

When I tell all of my city slicker friends that I went home to Tennessee for the Ramp Festival, they have no clue what I'm talking about. I think they envision me on a gnarly skateboard doing some smooth Tony Hawk moves on a steep ramp in a bitchin' park. Either way, their expression is just as perplexed as if I were actually doing just that. Maybe you know the ramp as Allium tricoccum, but I bet not. How about a wild leek or wild onion? Yeah...now you're getting the picture.

A ramp grows in the wild in North America as far south as South Carolina all the way up into areas of Canada (but only on the somewhat shady northern side of the areas where it's found to be growing) and is harvested in the spring. There are festivals, websites and even Facebook pages dedicated to "The King of Stink" and it has recently made a resurgence into upscale restaurants and local cuisines. Where I come from though, we don't worry about fancyin' up no ramps when we eat 'em!  We fry 'em up in some grease with some taters and serve 'em alongside pinto beans, chow chow and streaked meat.  (In order to appear as if you really know what you're talking about here, you have to make the word "streaked" into two syllables.  Say it with me:  Stree-ked.  "Stree" with a long "e" sound and "ked" just like the shoes. )

Streaked Meat

That's some good eatin' right there, my friends!

For those of you who've never tried them before, there is one caveat when it comes to ramps ~ when cooked, they are as mild and delicious as a what we know as a scallion or onion or shallot but when consumed raw....well, I feel sorry for anybody standing within a 10-foot radius of you. Raw ramps are potent as evidenced in this setup for the ramp eating contest. Each contestant gets a pack of gum to help alleviate the after effects. One brave woman volunteered to enter the contest much to the horror of her husband because he knew he'd have to enter too just to be able to tolerate her for the next few days! My grandmother tells a story of my uncle eating ramps when he was young, coming home and going into his room for bed and shutting the door behind him. When she opened the door the next morning to wake him, the fumes nearly knocked her down.

In addition to delicious, down-home cooking, the ramp festival held in Flag Pond, TN featured music from local musicians, t-shirts for purchase and a chance to catch up with people I haven't seen in ages. It was an excellent trip home and a chance to get back to the roots of my heritage.

Even after 40+ years of blissful, happy marriage there are some things even my mother won't do for my dad.

Pin It
  • Digg
  • Del.icio.us
  • StumbleUpon
  • Reddit
  • RSS

The Cupcake Truck

I'm going to a monster truck rally on May 19th. A line up of trucks with large wheels and modified suspensions. They'll do some mud-bogging, car crushing and tractor pulling, and if we're lucky, we might see a car-eating robot truck. A monster truck rally is motorized professional wresting at its finest.

Actually, no. It's not that kind of truck rally at all. It's the Chow Down Uptown Food Truck Rally to be held on May 19th from 5:00pm - 9:00pm in the parking lot on Seventh St. across from the old Reid's Fine Foods location near Dixie's Tavern and Levine Museum of the New South (don't you just love the way I give directions? "Go down that one road where that place used to be and you'll see it there somewhere...")

The rally will be an eclectic collection of Charlotte area food vendors dispensing their culinary talents through a pop-out window in their horse-powered kitchens and the list of participants is still being determined, but I'm going to the rally to cheer on my new friend, Emma.

Known as the Southern Cake Queen, Emma can't help but draw attention to herself when she rolls up in her flaming pink mobile cupcakery. The first time I met her, I was sitting at a picnic table in the park having lunch with friends when all of a sudden, everyone at the table jumped up and ran to the parking lot. I seriously thought there was some car-jacking going on but when I turned around, I saw what all the excitement was about.


As the window cranked out and the sign advertising the day's flavors went up, a crowd of adults and children started to draw. This was just like the ice cream truck only better because you didn't have to hurry and eat your treat before it melted in the heat. Emma sells the freshly baked treats for $3 each and I chose the Passion Fruit cupcake from her list of flavors. Both the cake and the buttercream icing was light and airy and the cake-to-icing ratio was right on target. The passion fruit flavor was subtle and perfect for a hot summer day.


The mobile cupcakery is available for private parties ~ would you not be the bestest mom or dad in the world if this truck showed up for your kid's birthday party and parked in the cul-de-sac? How about wedding cupcakes? If you're not too keen on riding away from the reception in the big pink truck, just ask her to bake the cupcakes and park the truck around the block when she delivers, but I can guarantee that your guests would totally remember your reception!

Look for the Southern Cake Queen on Facebook or around town or follow her Twitter feed to find out where she's parking next. Alot of times she can be found at Price's Chicken Coop at 1614 Camden Road. Good luck with your new venture, Emma!


**Thanks to Becky for suggesting that this post be submitted to How Sweet The Sound's Pink Saturday Meme!

Pin It
  • Digg
  • Del.icio.us
  • StumbleUpon
  • Reddit
  • RSS

Just Baked Cupcakes


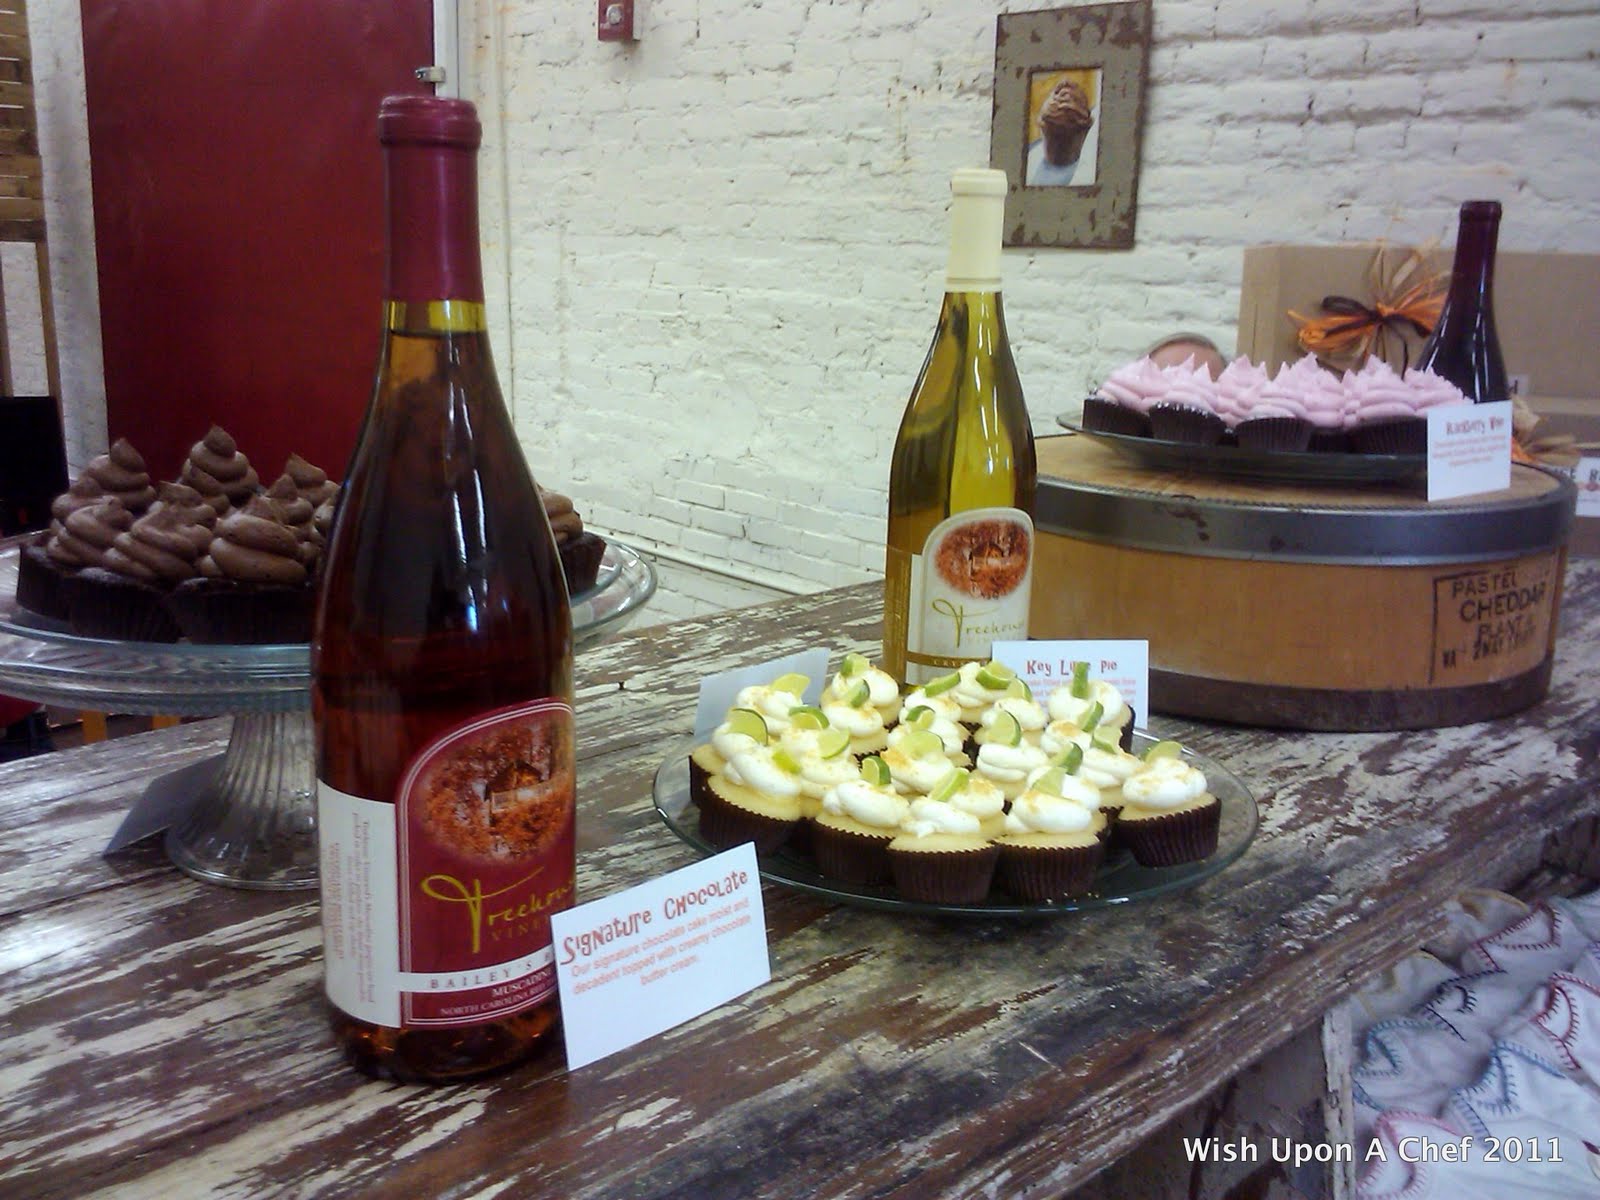
If you're looking for something to satisfy your sweet tooth, check out Just Baked Cupcakes located in Cornelius, NC. Located in the quaint Oak Street Mill, Just Baked was opened about a year ago by Chris and Missy Wallace and features an ever changing menu of gourmet freshly baked cupcakes.  Like their page on Facebook and you too will be tempted by their daily postings of flavors and scrumptious photos just like I am. 


Just look what they posted today:

Just Baked Cupcakes

Today's Flavors: Black Bottom Cheesecake, Pink Champagne, Red Velvet, Sugar Cookie, Signature Chocolate, Chocolate Maple Bacon and Brown Butter Pecan. We also have mint brownies, Mixed Berry Muffins and Chocolate Chip Scones :)


When you walk in to the spacious setting, you're greeted by paintings from local artists hanging on the walls, shabby chic decor throughout and the sweet aroma of the day's flavors. In addition to cupcakes, Just Baked usually has brownies, scones, or muffins to choose from too.  A selection of specialty drinks and coffees is also available to compliment your sweet treat.


Some friends and I visited Just Baked last week during their wine and cupcake pairing, which is held on the first Tuesday of each month.  For the bargain-basement price of $5, we sampled five different cupcakes and five different Moscato wines from Treehouse Vineyards in Monroe, NC.  The cupcake were bite-sized versions of their regular offerings but after five of them, you're guaranteed to be in a sugar coma.  They were over-the-top delicious and moist which, in my experience, is sometimes hard to pull off with a cupcake.  My favorite was the Key Lime and I'll admit to sneaking a second sample of that one (sorry guys!) because the candied slice of key lime garnish counter-balanced the sweetness.  I didn't sample all of the wines because after getting the first pour, we had to wait in a line of about 40 people to get the second one and I just wasn't up to doing that for the remaining four samples.  Hopefully next time they'll have the wine tastings pre-poured and sitting alongside the cupcakes for the taking. 


If you're craving a sweet treat, indulge with Just Baked Cupcakes in Cornelius and keep them in mind for parties, special occasions, or weddings too!

Pin It
  • Digg
  • Del.icio.us
  • StumbleUpon
  • Reddit
  • RSS

Let them eat cake!

It's been Party Central around here the last few months with so many of my close friends celebrating monumental birthday milestones, and I am all about finding the perfect cake to commemorate the occasion.   A truly unforgettable themed cake that reflects the personality of the birthday guy or gal always makes the party a hit, and those who secretly wish to forget the fact that another year has lefts its indelible mark on their face are especially thankful for a cake that captures the complete attention of guests.

The party started with this awesome creation for the beloved Greek Goddess.  Those of us who know her well also know about her infinite love of shoes.  "The higher the heel, the closer to God!" she always says.  The Jimmy Choo replica was made by a friend of a friend of a friend named Kathy who lives here in Charlotte.  Kathy is unbelievably talented when it comes to making these realistic looking cakes that taste equally as awesome.

There couldn't have been a cake more perfect for my friend The Girl Watcher unless this vintage bottle had actually been full of Bacardi 8 and these cigars the real McCoy.  And talk about drawing attention to itself!  The guests went totally ga-ga over this creation by Kathy for the longest time before tearing into it and leaving not one evidence of a crumb behind.  On the way to the party, I had the thought that the cake was too beautiful to eat, but in the end it was worth the destruction just to see the delight on the birthday boy's face as he sliced into and served it.


My friend Mary's love of all things chocolate and wine was mirrored in this wine bottle replica nestled in the most unbelievably dense, rich and moist chocolate cake you have ever put into your mouth.  It was a recipe handed down through Kathy's family and even though I know Kathy would never divulge her top secret recipe to me, I so hope she passes it down to someone else in the family because this recipe does not need to be one that goes to the grave with her.  Mary is really lucky there wasn't a piece missing out of her cake because it took every fiber of my being to not sample while the cake was in my care.


I've known Karen (and Mary too, for that matter) since the beginning of time and I needed a cake to induct her into the Forties Hall of Fame.  This cougar-on-the-prowl cake was designed by Teresa's Custom Cakes in my hometown of Erwin, TN and goes a long way, I think, toward helping Karen embrace her cougarness. I tried to be totally tasteful with the cake and celebration choices for my friends knowing that my birthday odometer will soon roll over and possibly leave me vulnerable to the butt of many "Old Maid" jokes. I'm thinking seriously of leaving the country for an extended period of time....


Pin It
  • Digg
  • Del.icio.us
  • StumbleUpon
  • Reddit
  • RSS

Grand Strand Sabbatical


This 4th of July holiday I was one of the multitudes of people headed to Myrtle Beach, SC for some fun in the sun. Despite being one of the main attractions of the SC coast, there is just no easy way to get to Myrtle Beach no matter which direction you are traveling from. Seeing long stretches of nothingness with a spot of destitute here and there was nothing new for me ~ it reminded me of where I’d been for the past 6 years and how far I’d traveled to be where I ultimately wanted to be. It gave me plenty of time to reflect on the past 9 months of my new life and how unbelievably stress free, carefree and happy I’ve become. It also gave me time to catch up on inspiration for some of my writing that I’ve been neglecting. The ideas starting flowing as the miles ticked by…

You may never take cooking advice or recipes tips from me, but if you can take just one thing away from your time here with me, please let it be this….when you find yourself on this same journey toward the sand and surf, PLEASE obey the speed limit through those little non-coastal towns. If you’re not careful, you won’t even realize that in a blink of an eye the 60mph limit suddenly dropped to 45mph and in another blink down again to 35mph. Nope, you won’t even know until you find yourself sitting on the side of the road surrounded by flashing blue lights and handing over $250 of your beach spending money to whatever municipal that the man in the uniform represents. And don’t feel bad when it happens to you because it happens to almost all travelers through the area ~ even the speed conscience Captain Sturm got a ticket once and although I was asleep in the passenger seat when it happened, somehow it was my fault.

The Grand Strand hasn’t changed much in my nearly 7 year absence. The landscape is more dotted with high rise condos, hotels, and beach houses but what I love most about Myrtle Beach is even though there is a certain level of classiness about the place, there is also a good dash of cheesiness mixed in. Tacky t-shirt and souvenir shops line the south end of Ocean Avenue where airbrushing is still all the rage. You can get a henna tattoo, hermit crabs, a belly button piercing and a newspaper thin beach towel for $1.99. The cheesiness works and it’s there for those who have not yet grown to appreciate the finer things in life. It’s for those who will develop an innate fear of throwing up on amusement park rides. It provides an atmosphere conducive to passing out from too much...uh...heat exhaustion. Yeah, heat exhaustion. Uh huh. And many a naïve young girl will sell her soul during a game of putt-putt to an Italian man during a weekend rendezvous.


But not me ~ I’m down on the classy north end of town because I've finally outgrown the lures of the south end of the Strand. This trip, I could be found enjoying some great seafood at Sara J’s located at 314 Atlantic Ave, Murrells Inlet, SC. It was a tough decision, but finally I decided on the crabcakes and was rewarded with 3 huge cakes served with a side of orange marmalade. They had more of a crispy deep fried appearance instead of the typical bread crumb exterior and there was very little filler, instead they were chock full of flaky sweet crab. An excellent choice indeed!

Murrells Inlet is also home to Spuds Waterfront Dining where I found myself on the 4th of July feasting on grilled shrimp and scallops before the big fireworks extravaganza. Both were cooked to perfection and the outdoor patio provided an excellent view of the 4th of July boat parade.


As a true Southern girl, I'd be remiss if I didn't mention that both meals were served with the deep fried delicacies known as hushpuppies. Dipped in honey butter, they're the perfect appetizer for any meal served by the ocean or otherwise.

My sabbatical ended with a fabulous fireworks display at the Surfside Beach pier that continued through the evening along the beach. It was the end to the perfect weekend that served the purpose of rejuvenating and inspiring my soul.

Pin It
  • Digg
  • Del.icio.us
  • StumbleUpon
  • Reddit
  • RSS