RSS

I currently live in Charlotte, NC and after spending 7 years as a personal chef and caterer, I am now happy to share my love of cooking with friends and family. My heart is in the kitchen, but my soul is in the stars!

Showing posts with label composting. Show all posts

Composting IV: Harvesting your compost


Sometimes the Boy Toy will entertain me with a story from his younger years - a scuffle with rowdy patrons in a bar or a crush he had on a girl with green hair and who wore "gobs" of mascara - and I wonder how in the world he ended up with the likes of boring ole' me. 

I'm a 40-too-many-year-old, childless, drama free, sedan driving girl who works a steady job, pays her bills on time and goes to bed every night by 11pm (okay, okay, I'll admit to dozing off around 10:15 on most nights.)  Given the choice, I'd prefer to stay home in my stretchy pants and play in my kitchen or work in my garden versus going out for a night on the town.  I'm thinking, though, that I'm the type of girl that a guy like Boy Toy (who's had about all the drama he can stand for one lifetime) seeks out at a certain point in life and (hopefully) ends up living happily ever after with.  And I don't see it as a bad thing at all that someone has "settled" for me because I'm interested in spending my days with someone who's worked through all the rowdiness and green-haired girls and can appreciate a good stable girl like myself. 

Probably the most exciting thing about me is that I have a worm farm (and I secretly believe that's what keeps him so attracted to me.)  People get a little weirded out when I talk about my worms - they give me that look like I've just told them a story about being abducted and probed by aliens and I'm trying to find my way back from the mothership.  They are secretly thinking to themselves what a kook I am but it's just because they just don't understand the excitement of composting. 

It was just a little over a year ago that I took a free vermicomposting workshop at the local library and learned that for very little cost I could create a "worm farm" and turn my kitchen scraps into nutrient-rich fertilizer for my flower and vegetable gardens.  I discussed setting up a compost bin in this post and about introducing worms to their new home and then I talked about feeding and maintaining the worms, so if you need to get all caught up with the program go right ahead because the time has come to harvest the compost. 

I harvested once before but I was too lazy to document the process and now that I've done it once, I realize what an undertaking it is and have decided that I will probably only do it twice a year from now on because it takes just as much time to harvest a little bit of compost as it does to harvest alot.  I'll be honest and say this is my least favorite part of composting only because it is time consuming but at the same time it is the most rewarding because your plants will soon perk up and flourish with the addition of the rich soil. 
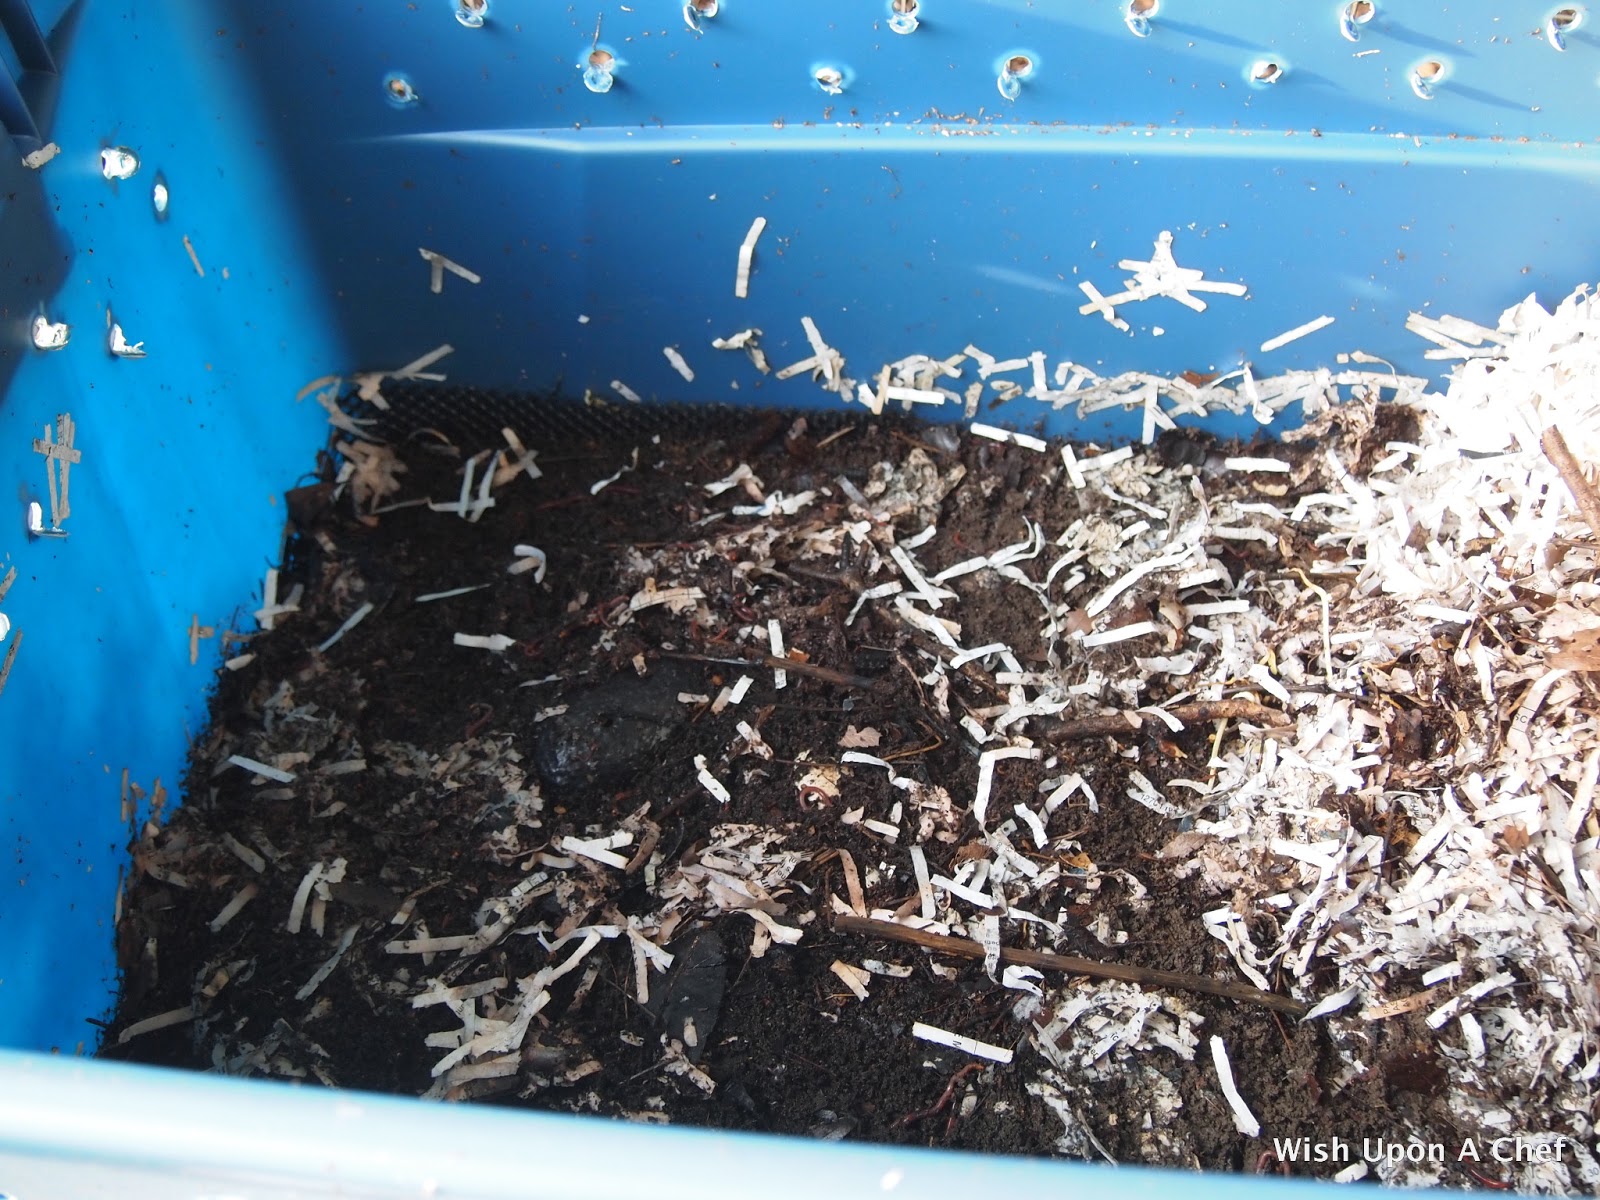

A few weeks before you want to collect your compost, start feeding the worms on only one side of the bin.  This will force the worms to migrate to that side of the bin and allow you to collect from the other side and not have to deal with separating so many of the worms (there will still be plenty to deal with that don't get the memo that they need to relocate.)  Push the paper shreds away until you see the dark, rich soil. 


Using trash bag or something disposable of the sort, scoop out a workable amount of the compost and lay it on the bag. You are basically going to be sorting through the compost to separate the worms and put them back into the bin.  You may also have some bits of scraps that aren't fully composted yet (I had alot of egg shells) that you'll want to pick out and throw back into the bin.  And yeah, you'll want to wear some rubber gloves. 


You'll notice at first that the worms are intermingled at the top of the pile of compost but leave them alone for a few minutes and they'll migrate down through the dirt to get away from the light.  Scrape off a layer of compost and let the worms migrate a little further down and scrape again.  It's a slow process, but you what else to you have to do on a Sunday afternoon?


There will be plenty of worms who sacrifice their lives for the cause of harvesting great compost because if you're like me, you'll start out lovingly returning the worms to the bin and after realizing that you are spending the day sorting through the worm crap of life, you won't give a flip if one or ten or fifty worms lose their life.  Most of my compost was added to my garden beds and much to my amazement I had ten thousand tomato plants spring up from the seeds that were in the compost.  Had I not already been up to my eyeballs in ripening tommy toes, I would have left them but a girl can only eat so many tomatoes.  What compost I didn't spread in my beds, I kept to make "worm tea" for my house plants.

So, yeah.  I'm the kooky girl with the worm farm but I've got some wicked awesome plants and I know you secretly find that attractive. 


How to create tea from worm casings

You will need: collected compost from a worm bin, cheesecloth, a large bucket, some water, and a squirt bottle.  You will use about a cup of compost per gallon of water for this "recipe."

You can start with this simple brewing process by following these easy steps:

  1. Use enough cheesecloth to tie the compost in "tea bag" fashion.
  2. Submerge the bag in a bucket of water.  It is best to use collected rainwater but if you are using regular tap water, let the water sit for a day or two so the chlorine with dissipate. 
  3. Dip the bag into the water a couple of times to aerate the solution and allow the nutrients to be diluted into the water.
  4. As soon as the dilution process is finished (the water will turn an amber color), you can then transfer the tea into a spray bottle.
  5. You can spritz your plants with this liquid fertilizer or water them directly. 

Pin It
  • Digg
  • Del.icio.us
  • StumbleUpon
  • Reddit
  • RSS

Composting III: Feeding Your Worms

Now that you've built your composting bin and introduced your worms to the bin and allowed them to adjust to their new surroundings, it's time to make them fat and happy.  They will start turning their bedding and food scraps into compost immediately and after several months you will be able to harvest some compost for your flower and vegetable garden.  It won't take long before you notice the increased growth and vigor of plants treated with your homemade vermicompost. 

Your worms will eat most anything that was once growing.  I've included a list of items below that are compostable but it's in no way a complete list.  You will soon learn what your little buddies like to eat best and how quickly they can process the amount you are giving them.  I keep a one gallon resealable container in my refrigerator that I add my food scraps to as I'm preparing dinner and I'm honestly amazed at how much stuff I collect in a week that would normally go straight into the trash. 

A few tips to keep in mind when feeding the worms: 

You don't need to feed your worms every day.  I've started out feeding once a week and will adjust accordingly as I see how quickly the worms process.  If you have a foul odor or notice flies, gnats, or maggots in your bin, that is a sign that you are feeding too much/too often and your worms cannot keep up.  You will notice other insects in your bin and that's totally fine.  The more the merrier when it comes to breaking down the items into compost.  Do make sure your lid stays on tight (consider a bungee strap if there is a chance it could easily be removed) to prevent intruders such as raccoons, opossums, etc. 

When collecting your vegetable/fruit scraps, chop them into smaller bits so it's easier and quicker for the worms to work through them.  When adding the food to the bin, don't just scatter it all over the top of the bedding as worms will migrate to the source of food so the idea is to get them all to migrate to one area of the bin at the same time and have them all working together.  If the food is scattered, your worms will be scattered and it will take longer.  Work your way around the bin by feeding in each of the four corners and then in the middle of the bin each time you add food.  Raise the bedding just a bit and place the food just under the shredded paper and cover it back over.  Worms like to burrow into darkness and won't be too happy to have to rise to the surface for food.  Remember to check the bedding for moisture and use a spray bottle to wet it if it's drying out.

Compostable Items

Fruits
Vegetables
Newspaper
Cardboard
Office paper
Coffee grounds
Tea leaves/bags
Paper towels/napkins
Leaves
Grass clippings (avoid if you have your lawn chemically treated for weeds)
Sawdust (non-treated, non-aromatic woods only)

Do not include items such as meat, dairy products, oily foods, spicy or salty foods.  Some citrus is okay, but don't add alot at one time.  I read that it can have the same effect on the worms as the feeling of getting lemon juice into a cut on your skin.  OUCH! 

The easiest and best way to use your compost is to top dress the soil around your plants with a thin layer of the castings.  A 1/4" deep layer on top of the soil has been proven to increase plant growth by as much as 25%.  The castings can also be added to water and used as foliage spray and has been shown to drastically reduce plant pests, including aphids.  To make the worm "tea," add about a cup of castings to a gallon of water and allow to steep for 24 hours.  It can then be sprayed on the leaves or used to feed/water the plants.  You should see results in about 3 days. 

When I first started this project, I was afraid that the thought of hundreds of worms in my backyard would freak me out.  But if I had to be honest, I now worry about my worms almost like I do my dog.  Are they too hot or cold outside?  Are they happy and well fed?  I check on them daily and will continue to sporadically report their progress as my project moves along.  If you are also vermicomposting, please leave me a comment and let me know how it's working for you!


Pin It
  • Digg
  • Del.icio.us
  • StumbleUpon
  • Reddit
  • RSS

Composting II: Introducing Worms to Your Bin

Last week I shared details on building a compost bin to be used for vermicomposting. Now we're ready for the next step of making the bedding for the worms and introducing them to the bin. 


It was suggested by the instructor of the free library workshop that I attended that Red Wigglers are the best type of worms to be used for vermicomposting and he recommended starting with a pound of worms.  These can be purchased online from various sources or from any place that sells fishing bait.  My container is a bit larger than the one our instructor demonstrated in the workshop, but I've decided to stick with using a pound of worms because after reading the literature given to us, I found out there are at least 500 worms in a pound and that, if happy in their conditions, they can multiply really quickly and I'd be lying if I said I wasn't a little creeped out thinking about potentially having hundreds of worms in my back yard.  It is undecided at this point if I will ever sleep well again knowing that.  I purchased my worms online from Worms, Etc., located in Greer, SC.  My worms arrived alive and well the day after they were shipped. 


Shredded newspaper and cardboard are used for the worm bedding.  You can rip the paper into shreds yourself or if you have access to a paper shredder, that does the trick too.  I used two daily editions and a Sunday edition of my local newspaper to start with.  Once the papers are shredded, soak them in water until they are thoroughly wet and then squeeze the water out before adding it to the bin (pull the paper apart just a bit and fluff it so it's not one big wet clump).  You will need to make sure your bedding always stays moist (but not dripping wet) in the bin so keep a spray bottle handy in case you need to add moisture.  The worms prefer dark and moist conditions and will not survive long if their bedding dries out. As you are adding the shredded wet paper, also toss in a couple of handsful of dirt here and there.  The worms require this to help process and digest the food scraps.  The bedding will eventually be broken down and become part of the composting process so you'll need to add more bedding as needed.  Think about shredding and saving your junk mail, napkins, and paper towels. 


When the bedding is done, it's time to add the worms.  Worms prefer to live and work in darkness, so after you put them into their new home, leave the lid off for a bit to force them to burrow into the bedding.  It will take a little while for them to get used to their new surroundings so you'll want to wait a day before feeding them.  In the meantime, save some of your vegetable and fruit scraps from the kitchen for a couple of days prior to adding your worms so you'll have something for the first feeding.  The next post will discuss in more detail what you can feed your worms and how often you should feed them.

My bin is now situated in the far corner of my yard, next to my garden and under a shade tree. 

Pin It
  • Digg
  • Del.icio.us
  • StumbleUpon
  • Reddit
  • RSS

Composting I: Building Your Bin

Gardening has always been a hobby of mine but until recently I haven't had much time or space to dedicate to it. My maternal great-grandmother had a green thumb and I was lucky enough to inherit her same love of plants and flowers through the years. I bought a house back in the mid '90s that had established flower beds but then later moved into a condo for several years with no outdoor space and then the conditions in that other not-to-be-mentioned place where I lived weren't right for gardening at all ~ too shady, too many deer and a spouse who didn't want me to make "a mess" in his yard. Now that I am the woman of the house, I can make as big of a mess in my yard as I want to!

Last year was my first attempt at vegetable gardening after a long absence and this year I've also added alot of flowers and herbs to the beds in the back of my house.  During the winter I started adding my fruit and vegetable scraps to my garden area in the hopes of enriching the soil and when I saw that my local library was offering a free one-hour workshop on composting, I decided to check it out and see what I could learn.  The workshop focused on vermicomposting, which is the process by which worms are used to break down food scraps and other items such as grass and leaves that are added to their territory.  The result is a rich earthy matter that can be added to soil.  With the exception of one or two items, I had everything already on hand to put together a composting bin so I was eager to get started.  I will attempt to share my composting experiences with you through a series of blog posts, and today we'll focus on building a bin.

The idea behind this method of composting is that you can do it anywhere so if you are limited on space the bin can be kept on a patio, in a garage, or in a laundry/mudroom room inside your house.  Keep in mind that there are worms involved and supposedly they won't leave the confines of the bin, but I'm not sure how comfortable I am knowing there would be hundreds of worms in my laundry room ~ sounds to me like a possible remake of the movie Attack of the Killer Tomatoes ~ so my bin is going to be kept in the far corner of my back yard.


 Items you will need:

A container with a lid  (I used a Rubbermaid plastic tote)
Bungee cord (to secure lid), optional
Drill with drill bit (I used 3/4" bit)
Styrofoam packing peanuts
Landscape fabric (the stuff you put down to keep weeds from growing)
Plastic garden fencing
Shredded newspaper
A couple scoops of potting soil or garden dirt


Use the drill to drill holes in the lid and around the container, about 1" or 2" below the rim. You can also drill them in the bottom if you plan to put the container outside. (It may be helpful to know at this point that there is a "forward" and a "reverse" on the drill.  It works much better if you have it in "foward" as I found out about halfway around the tub.)


Fill the tub with a couple of inches of packing peanuts. Cut the plastic fencing to fit and lay over the peanuts and then cover the fencing with a piece of landscaping fabric. This creates a false floor for your bin and allows an area for any drainage that may occur.  If you need to remove the contents of your bin at any time, you can just pick up the fencing and pull it out of the bin easier.

At this point you're ready to use the newspapers and potting soil to make bedding for the worms, add the worms and start feeding them scraps.  I will continue with these steps in the next post.

Pin It
  • Digg
  • Del.icio.us
  • StumbleUpon
  • Reddit
  • RSS